เอกสารประกอบการสอน : 4123006 การพัฒนาโปรแกรมประยุกต์บนอุปกรณ์เคลื่อน Week 3
- เปิด Android studio แล้ว create new flutter project
- ตั้งชื่อ app เป็น week3_child_children แล้วกดสร้าง (ตั้ง path และชื่อ package ด้วย)
- แก้ไข Main.dart
import 'package:flutter/material.dart'; void main() { runApp(MyApp()); } class MyApp extends StatelessWidget { // This widget is the root of your application. @override Widget build(BuildContext context) { return MaterialApp( title: 'Flutter Demo', theme: ThemeData( primarySwatch: Colors.blue, visualDensity: VisualDensity.adaptivePlatformDensity, ), home: MyHomePage(title: 'Flutter Demo Home Page'), ); } } class MyHomePage extends StatefulWidget { MyHomePage({Key key, this.title}) : super(key: key); final String title; @override _MyHomePageState createState() => _MyHomePageState(); } class _MyHomePageState extends State<MyHomePage> { int _counter = 0; void _incrementCounter() { setState(() { _counter++; }); } @override Widget build(BuildContext context) { return Scaffold( appBar: AppBar( title: Text('sompoch'), ), body: Container( ), ); } } - สร้าง directory ชื่อ images (ไปที่ week3_child_children) แก้ไขไฟล์ pubspec.yaml เปิด
asset:- images/แล้วกด pub get หรือถ้าใช้ VS Code ก็ให้พิมพ์ใน Terminal CMD: ว่า pub get แล้ว enter ดังภาพ

- หลังจากนั้นก็หารูปมาใส่ในโฟลเดอร์ images ที่สร้าง เช่นรูป car.png
- การใช้ Row และ Expanded
  body: Container(
           child:Column(
             children: <Widget>[
                Row(
                 children: <Widget>[
                   Expanded(
                     flex: 2,
                     child:  Image.asset('images/car.png'),
                   ),
                   Expanded(
                       flex: 1,
                       child:Image.asset('images/car.png')
                   ),
                 ],
               ),
               Row(
                 mainAxisAlignment: MainAxisAlignment.center,
                 children:<Widget>[
                   RaisedButton(onPressed: (){},
                     color:Colors.blue ,
                     child:Text('Submit'),
                   ),
                   Padding(padding: EdgeInsets.all(5)),
                   RaisedButton(onPressed: (){},
                     color:Colors.red ,
                     child:Text('Cancel'),
                   )
                 ],

               ),
              Image.network('https://encrypted-tbn0.gstatic.com/images?q=tbn:ANd9GcR141bMyqIj-p6GBRLyepstiQJhxeaST_n-aA&usqp=CAU'),

             ],
           ),


      ),
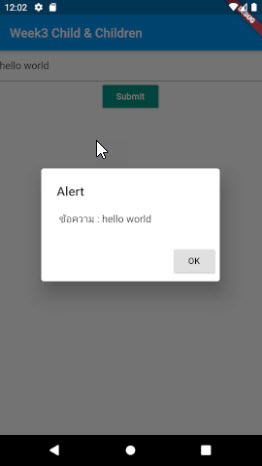
- การสร้าง AlertDialog และการส่งค่าบน TextField ไปยัง Dialog
import 'package:flutter/cupertino.dart';
import 'package:flutter/gestures.dart';
import 'package:flutter/material.dart';

void main() {
  runApp(MyApp());
}

class MyApp extends StatelessWidget {
  // This widget is the root of your application.
  @override
  Widget build(BuildContext context) {
    return MaterialApp(
      title: 'Flutter Demo',
      theme: ThemeData(

        primarySwatch: Colors.blue,

        visualDensity: VisualDensity.adaptivePlatformDensity,
      ),
      home: MyHomePage(title: 'Flutter Demo Home Page'),
    );
  }
}

class MyHomePage extends StatefulWidget {
  MyHomePage({Key key, this.title}) : super(key: key);


  final String title;

  @override
  _MyHomePageState createState() => _MyHomePageState();
}

class _MyHomePageState extends State<MyHomePage> {
  final textFieldInput1=TextEditingController();


  int _counter = 0;

  void _incrementCounter() {
    setState(() {

      _counter++;
    });
  }

  @override
  Widget build(BuildContext context) {

    return Scaffold(
      appBar: AppBar(

        title: Text('Week3 Child & Children'),
      ),
      body: Container(
        child:Column(
          children: <Widget>[
            TextField(
              controller: textFieldInput1,
            ),
            RaisedButton(
              onPressed: (){
                //print('Clicked.');
                showDialog(
                  context: context,
                  builder:(BuildContext context){
                    return AlertDialog(
                      title: Text('Alert'),
                      content: Text(' ข้อความ : '+textFieldInput1.text),
                      actions: <Widget>[
                        RaisedButton(
                          onPressed: (){
                            Navigator.pop(context);
                          },
                          child:Text('OK'),
                        )
                      ],
                    );
                  },
                );
              },
              child: Text('Submit',style: TextStyle(color: Colors.white),),
              color: Colors.teal,
            ),
          ],
        ),
      ),


    );
  }
}
ต้องประกาศ final textFieldInput1=TextEditingController(); ไว้ด้านบน class _MyHomePageState extends State<MyHomePage> ก่อน แล้ว TextField ถึงกำหนดให้ controller เชื่อมถึงกันได้