
เอกสารประกอบการสอน FlutterBasic1Day
- เปิด android studio แล้วเลือก new flutter project
- เลือก flutter sdk path C:\flutter
- ตั้งชื่อ Project Name = myapp (ใช้เป็นตัวพิมพ์เล็ก กับ _ เท่านั้น)
Project location = C:\MyApp (สร้างโดยการกดที่ … แล้วเลือกไดรฟ์ c คลิกขวาแล้ว new Folder แล้วตั้งชื่อ) - กด Finish
- ในหน้าของ Android Studio ให้เลือกเมนู AVD Manager

- เมือ Emulator Android แสดงก็ให้กด run ได้เลยที่เมนู

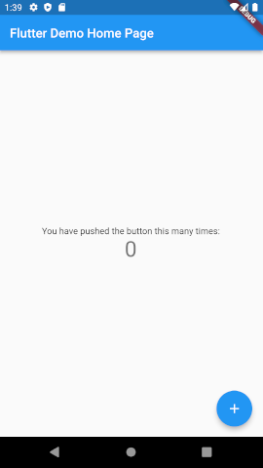
- จะได้หน้าจอ app ตามนี้
- กลับมาที่ android studio ในไฟล์ main.dart (อยู่ในโฟลเดอร์ lib) ให้ไปบรรทัดที่ 25 หรือตรง ThemeData ส่วนของ PrimarySwatch ให้เลือกสีของ theme app เช่นตั้งค่าเป็น primarySwatch: Colors.deepOrange,
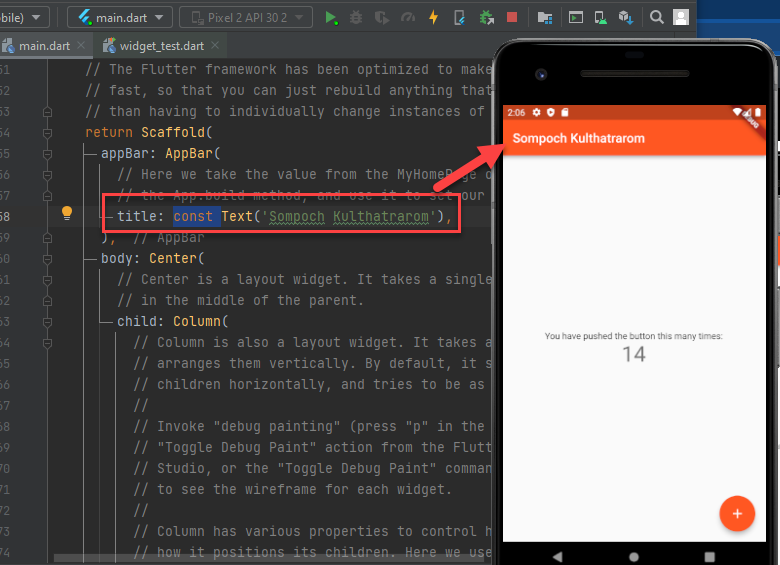
 ทำการกด ctrl+s หรือ save ก็จะได้ตามรูปด้านบน
 - ให้เลื่อนลงไปด้านล่างรงส่วนของ appBar:AppBar ให้เปลี่ยนชื่อ Text เป็นชื่อเราดังภาพ
- สามารถเปลี่ยนสี appbar ได้และฟอนท์ไซส์ได้ดังนี้
appBar: AppBar( title: const Text('Sompoch Kulthatrarom',style: TextStyle(fontSize: 36),), backgroundColor: Colors.green[100], ),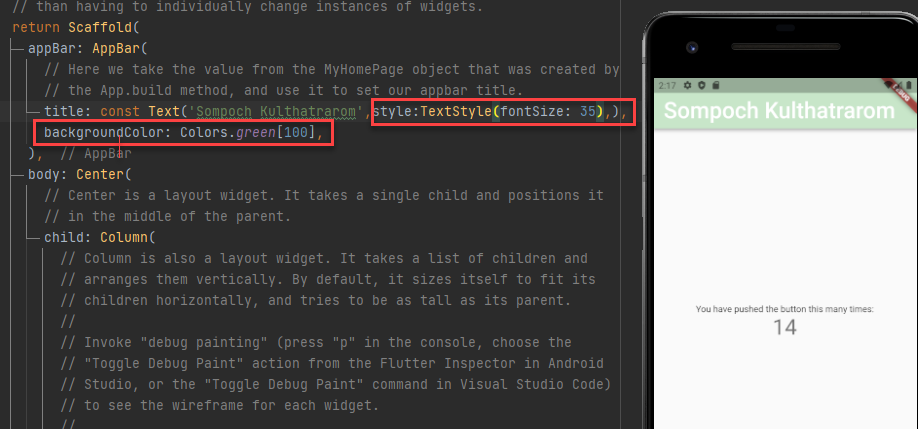 ถ้าต้องการเปลี่ยนสีฟอนท์เป็นสีดำก็สามารถทำตามภาพด้านล่าง
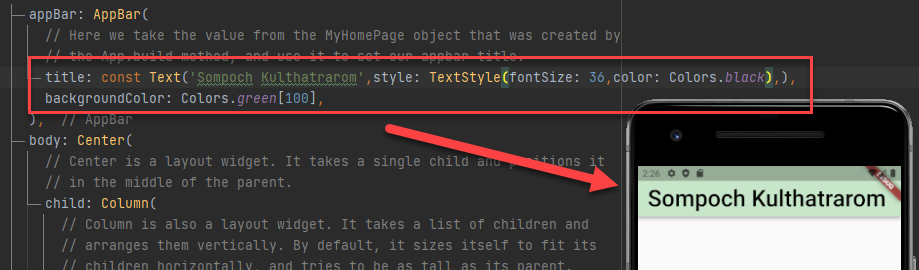
- มาในส่วนของ body ให้ลบ comment อื่นๆ ออกไปให้หมด (ที่มี // ยกเว้น // ปิดหลัง widget แต่ละตัว) ให้เหลือแค่รูปด้านล่าง
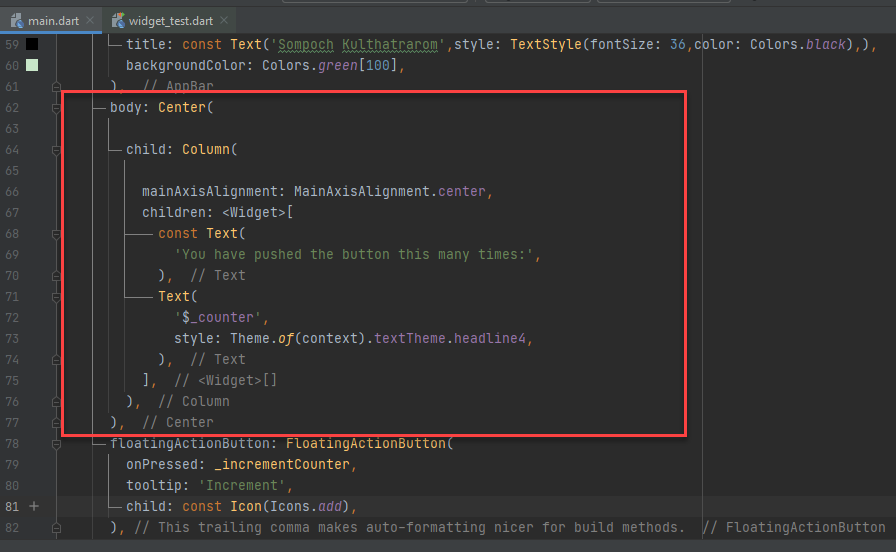
- ลบ widget ภายใน body ออกทั้งหมดเพื่อสร้างใหม่ และลบ FlotingActionButton ออกดังภาพ
 13. แก้ไขตรง body ให้ใส่ child และ children ลงไป แสดงผลด้วย column
body: Center(
  child: Column(
    children: [
      Text('1'),
      Text('2'),
      Text('3'),
    ],
  ),
)
14. หลังจากนั้นสร้างโฟลเดอร์เพื่อเก็บรูปภาพตามภาพ

15. ถ้าสร้าง Folder images แล้วให้เปิดใช้งาน assets โดยไปที่ไฟล์ pubspec.yaml ลบคอมเม้นตรง assets แล้วตรง - images/ เพื่อเปิดใช้งานดังภาพ
หลังจากนั้นกด pub get
15. ถ้าสร้าง Folder images แล้วให้เปิดใช้งาน assets โดยไปที่ไฟล์ pubspec.yaml ลบคอมเม้นตรง assets แล้วตรง - images/ เพื่อเปิดใช้งานดังภาพ
หลังจากนั้นกด pub get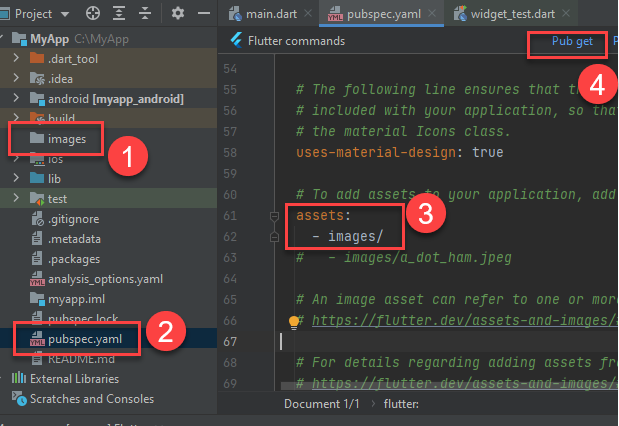
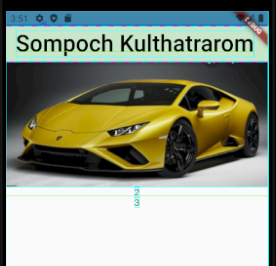
16. ให้นำรูปเรามาใส้ในโฟลเดอร์ images โดยตัวอย่างรูปรถด้านล่างบันทึกเป็นไฟล์ car.png

17. แก้ไขโค้ดใน
body: Center(
  child: Column(
    children: [
     Image(image: AssetImage('images/car.png')),
      Text('2'),
      Text('3'),
    ],
  ),
)
จะได้ผลดังภาพ
โค้ดทั้งหมดของการเรียนวันนี้
import 'package:flutter/cupertino.dart';
import 'package:flutter/material.dart';

void main() {
  runApp(const MyApp());
}

class MyApp extends StatelessWidget {
  const MyApp({Key? key}) : super(key: key);

  // This widget is the root of your application.
  @override
  Widget build(BuildContext context) {
    return MaterialApp(
      title: 'Flutter Demo',
      theme: ThemeData(
        primarySwatch: Colors.deepOrange,
      ),
      home: const MyHomePage(title: 'Flutter Demo Home Page'),
    );
  }
}

class MyHomePage extends StatefulWidget {
  const MyHomePage({Key? key, required this.title}) : super(key: key);

  final String title;

  @override
  State<MyHomePage> createState() => _MyHomePageState();
}

class _MyHomePageState extends State<MyHomePage> {
  int _counter = 0;

  void _incrementCounter() {
    setState(() {
      // This call to setState tells the Flutter framework that something has
      // changed in this State, which causes it to rerun the build method below
      // so that the display can reflect the updated values. If we changed
      // _counter without calling setState(), then the build method would not be
      // called again, and so nothing would appear to happen.
      _counter++;
    });
  }

  @override
  Widget build(BuildContext context) {
    // This method is rerun every time setState is called, for instance as done
    // by the _incrementCounter method above.
    //
    // The Flutter framework has been optimized to make rerunning build methods
    // fast, so that you can just rebuild anything that needs updating rather
    // than having to individually change instances of widgets.
    return Scaffold(
        appBar: AppBar(
          // Here we take the value from the MyHomePage object that was created by
          // the App.build method, and use it to set our appbar title.
          title: const Text(
            'Sompoch Kulthatrarom',
            style: TextStyle(fontSize: 36, color: Colors.black),
          ),
          backgroundColor: Colors.green[100],
        ),
        body: Center(
          child: Column(
            children: [
             Image(image: AssetImage('images/car.png')),
              Text('Name: สมโภชน์ กุลธารารมณ์',style:TextStyle(fontSize: 15, color: Colors.blue) ,),
              Text('Email: sompoch.k@gmail.com'),
              Row(
                mainAxisAlignment: MainAxisAlignment.center,
                children: [
                Icon(Icons.motorcycle,size:36),
                  Icon(Icons.add_call,size:36),
                  Icon(Icons.account_circle_sharp,size:36),
                ],
              )
            ],
          ),
        )

    );
  }
}

เอกสาร Powerpoint FlutterBasic

Link สำหรับเรียนรู้เพิ่มเติม
http://kungtee.com/page/2/?s=flutter+week
จะมีทั้งหมด 6 week