
ขั้นตอนเตรียมการ
-
- ลง xamp เพื่อใช้งาน web server และ MySQL
- ให้เข้าไปที่ phpMyadmin
- สร้าง database (กดที่เมนู SQL ใส่คำสั่งด้านล่างลงไป)
CREATE DATABASE apidb;
- สร้าง table (กดที่เมนู SQL ใส่คำสั่งด้านล่างลงไป)
CREATE TABLE `employees` (
  `id` int(11) NOT NULL AUTO_INCREMENT,
  `first_name` varchar(255) CHARACTER SET latin1 DEFAULT NULL,
  `last_name` varchar(255) CHARACTER SET latin1 DEFAULT NULL,
  `email_address` varchar(255) CHARACTER SET latin1 DEFAULT NULL,
  PRIMARY KEY (`id`)
) ENGINE=InnoDB DEFAULT CHARSET=utf8;
- เพิ่มข้อมูลทดสอบลงใน table ที่สร้าง (กดที่เมนู SQL ใส่คำสั่งด้านล่างลงไป)
insert into employees (id, first_name, last_name, email_address) values (1, 'Carlyle', 'Onians', 'conians0@scribd.com');
insert into employees (id, first_name, last_name, email_address) values (2, 'Eb', 'Powland', 'epowland1@list-manage.com');
insert into employees (id, first_name, last_name, email_address) values (3, 'Tanhya', 'Madison', 'tmadison2@msu.edu');
insert into employees (id, first_name, last_name, email_address) values (4, 'Maurine', 'Nuscha', 'mnuscha3@diigo.com');
insert into employees (id, first_name, last_name, email_address) values (5, 'Cosette', 'Ducket', 'cducket4@pbs.org');
- ให้ไปสร้างไฟล์ employee.php ใน Folder C:\xampp\htdocs โดยมีโค้ดดังนี้
<?php //กำหนดค่า Access-Control-Allow-Origin ให้ เครื่อง อื่น ๆ สามารถเรียกใช้งานหน้านี้ได้ header("Access-Control-Allow-Origin: *"); header("Content-Type: application/json; charset=UTF-8"); header("Access-Control-Allow-Methods: OPTIONS,GET,POST,PUT,DELETE"); header("Access-Control-Max-Age: 3600"); header("Access-Control-Allow-Headers: Content-Type, Access-Control-Allow-Headers, Authorization, X-Requested-With"); //ตั้งค่าการเชื่อมต่อฐานข้อมูล $link = mysqli_connect('localhost', 'user', 'pass', 'database'); mysqli_set_charset($link, 'utf8'); $requestMethod = $_SERVER["REQUEST_METHOD"]; //ตรวจสอบหากใช้ Method GET if($requestMethod == 'GET'){ //ตรวจสอบการส่งค่า id if(isset($_GET['id']) && !empty($_GET['id'])){ $id = $_GET['id']; //คำสั่ง SQL กรณี มีการส่งค่า id มาให้แสดงเฉพาะข้อมูลของ id นั้น $sql = "SELECT * FROM employees WHERE id = $id"; }else{ //คำสั่ง SQL แสดงข้อมูลทั้งหมด $sql = "SELECT * FROM employees"; } $result = mysqli_query($link, $sql); //สร้างตัวแปร array สำหรับเก็บข้อมูลที่ได้ $arr = array(); while ($row = mysqli_fetch_assoc($result)) { $arr[] = $row; } echo json_encode($arr); } //อ่านข้อมูลที่ส่งมาแล้วเก็บไว้ที่ตัวแปร data $data = file_get_contents("php://input"); //แปลงข้อมูลที่อ่านได้ เป็น array แล้วเก็บไว้ที่ตัวแปร result $result = json_decode($data,true); //ตรวจสอบการเรียกใช้งานว่าเป็น Method POST หรือไม่ if($requestMethod == 'POST'){ if(!empty($result)){ $firstName = $result['first_name']; $lastName = $result['last_name']; $emailAddress = $result['email_address']; //คำสั่ง SQL สำหรับเพิ่มข้อมูลใน Database $sql = "INSERT INTO employees (id,first_name,last_name,email_address) VALUES (NULL,'$firstName','$lastName','$emailAddress')"; $result = mysqli_query($link, $sql); if ($result) { echo json_encode(['status' => 'ok','message' => 'Insert Data Complete']); } else { echo json_encode(['status' => 'error','message' => 'Error']); } } } //ตรวจสอบการเรียกใช้งานว่าเป็น Method PUT หรือไม่ if($requestMethod == 'PUT'){ //ตรวจสอบว่ามีการส่งค่า id มาหรือไม่ if(isset($_GET['id']) && !empty($_GET['id'])){ $id = $_GET['id']; $firstName = $result['first_name']; $lastName = $result['last_name']; $emailAddress = $result['email_address']; //คำสั่ง SQL สำหรับแก้ไขข้อมูลใน Database โดยจะแก้ไขเฉพาะข้อมูลตามค่า id ที่ส่งมา $sql = "UPDATE employees SET first_name = '$firstName' , last_name = '$lastName' , email_address = '$emailAddress' WHERE id = $id"; $result = mysqli_query($link, $sql); if ($result) { echo json_encode(['status' => 'ok','message' => 'Update Data Complete']); } else { echo json_encode(['status' => 'error','message' => 'Error']); } } } //ตรวจสอบการเรียกใช้งานว่าเป็น Method DELETE หรือไม่ if($requestMethod == 'DELETE'){ //ตรวจสอบว่ามีการส่งค่า id มาหรือไม่ if(isset($_GET['id']) && !empty($_GET['id'])){ $id = $_GET['id']; //คำสั่ง SQL สำหรับลบข้อมูลใน Database ตามค่า id ที่ส่งมา $sql = "DELETE FROM employees WHERE id = $id"; $result = mysqli_query($link, $sql); if ($result) { echo json_encode(['status' => 'ok','message' => 'Delete Data Complete']); } else { echo json_encode(['status' => 'error','message' => 'Error']); } } } ?> - ลองเรียก API Restful ที่สร้างขึ้นมาแสดงโดยเปิด browser แล้วพิพม์ http://localhost/employee.php
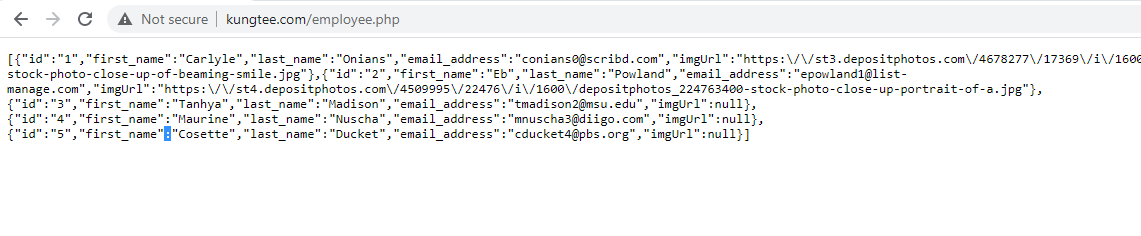 ภาพจากด้านบนจะทดสอบบนเซิฟเวอร์จริง kungtee.com/employee.php
 - เปิด android studio -> new flutter project สร้าง week6_demo_api
- เปิดไฟล์ pubspec.yaml เพิ่ม http: ลงไป
name: week6_demo_api description: A new Flutter application. # The following line prevents the package from being accidentally published to # pub.dev using `pub publish`. This is preferred for private packages. publish_to: 'none' # Remove this line if you wish to publish to pub.dev # The following defines the version and build number for your application. # A version number is three numbers separated by dots, like 1.2.43 # followed by an optional build number separated by a +. # Both the version and the builder number may be overridden in flutter # build by specifying --build-name and --build-number, respectively. # In Android, build-name is used as versionName while build-number used as versionCode. # Read more about Android versioning at https://developer.android.com/studio/publish/versioning # In iOS, build-name is used as CFBundleShortVersionString while build-number used as CFBundleVersion. # Read more about iOS versioning at # https://developer.apple.com/library/archive/documentation/General/Reference/InfoPlistKeyReference/Articles/CoreFoundationKeys.html version: 1.0.0+1 environment: sdk: ">=2.7.0 <3.0.0" dependencies: flutter: sdk: flutter http: ^0.12.2 # The following adds the Cupertino Icons font to your application. # Use with the CupertinoIcons class for iOS style icons. cupertino_icons: ^1.0.0 dev_dependencies: flutter_test: sdk: flutter # For information on the generic Dart part of this file, see the # following page: https://dart.dev/tools/pub/pubspec # The following section is specific to Flutter. flutter: # The following line ensures that the Material Icons font is # included with your application, so that you can use the icons in # the material Icons class. uses-material-design: true # To add assets to your application, add an assets section, like this: # assets: # - images/a_dot_burr.jpeg # - images/a_dot_ham.jpeg # An image asset can refer to one or more resolution-specific "variants", see # https://flutter.dev/assets-and-images/#resolution-aware. # For details regarding adding assets from package dependencies, see # https://flutter.dev/assets-and-images/#from-packages # To add custom fonts to your application, add a fonts section here, # in this "flutter" section. Each entry in this list should have a # "family" key with the font family name, and a "fonts" key with a # list giving the asset and other descriptors for the font. For # example: # fonts: # - family: Schyler # fonts: # - asset: fonts/Schyler-Regular.ttf # - asset: fonts/Schyler-Italic.ttf # style: italic # - family: Trajan Pro # fonts: # - asset: fonts/TrajanPro.ttf # - asset: fonts/TrajanPro_Bold.ttf # weight: 700 # # For details regarding fonts from package dependencies, # see https://flutter.dev/custom-fonts/#from-packages - คลิกขวาที่ folder lib แล้ว new package ตั้งชื่อ model แล้วคลิกขวาที่ model เลือก new สร้างไฟล์ emp.dart
class Emp{ final String id; final String first_name; final String last_name; final String email_address; final String imgUrl; Emp( this.id, this.first_name, this.last_name, this.email_address, this.imgUrl, ); factory Emp.fromMap(Map<String,dynamic>json){ return Emp(json['id'],json['first_name'],json['last_name'],json['email_address'],json['imgUrl']); } factory Emp.fromJson(Map<String,dynamic>json){ return Emp(json['id'],json['first_name'],json['last_name'],json['email_address'],json['imgUrl']); } } - เพิ่มฟังชั่น future เรียก getEmp() และส่วนของ body ให้แสดงผลแบบ FutureBuilder
โค้ดในหน้า main.dart ทั้งหมดดังนี้import 'dart:convert'; import 'package:flutter/material.dart'; import 'model/emp.dart'; import 'package:http/http.dart' as http; Future<List<Emp>> getEmp() async { String url = 'http://kungtee.com/employee.php'; // http.Response response = await http.get(url); http.Response response = await http.get(url); // Try to convert json to dart object List<Emp> allEmp = new List(); List<dynamic> Empployee = json.decode(response.body); for (var empJson in Empployee) { var emp = Emp.fromJson(empJson); // print(emp.first_name); allEmp.add(emp); } // print('count ${allEmp.length}'); return allEmp; } void main() { runApp(MyApp()); } class MyApp extends StatelessWidget { // This widget is the root of your application. @override Widget build(BuildContext context) { return MaterialApp( title: 'Flutter Demo', theme: ThemeData( // This is the theme of your application. // // Try running your application with "flutter run". You'll see the // application has a blue toolbar. Then, without quitting the app, try // changing the primarySwatch below to Colors.green and then invoke // "hot reload" (press "r" in the console where you ran "flutter run", // or simply save your changes to "hot reload" in a Flutter IDE). // Notice that the counter didn't reset back to zero; the application // is not restarted. primarySwatch: Colors.blue, // This makes the visual density adapt to the platform that you run // the app on. For desktop platforms, the controls will be smaller and // closer together (more dense) than on mobile platforms. visualDensity: VisualDensity.adaptivePlatformDensity, ), home: MyHomePage(title: 'Flutter Demo Home Page'), ); } } class MyHomePage extends StatefulWidget { MyHomePage({Key key, this.title}) : super(key: key); // This widget is the home page of your application. It is stateful, meaning // that it has a State object (defined below) that contains fields that affect // how it looks. // This class is the configuration for the state. It holds the values (in this // case the title) provided by the parent (in this case the App widget) and // used by the build method of the State. Fields in a Widget subclass are // always marked "final". final String title; @override _MyHomePageState createState() => _MyHomePageState(); } class _MyHomePageState extends State<MyHomePage> { int _counter = 0; void _incrementCounter() { setState(() { // This call to setState tells the Flutter framework that something has // changed in this State, which causes it to rerun the build method below // so that the display can reflect the updated values. If we changed // _counter without calling setState(), then the build method would not be // called again, and so nothing would appear to happen. _counter++; }); } @override Widget build(BuildContext context) { // This method is rerun every time setState is called, for instance as done // by the _incrementCounter method above. // // The Flutter framework has been optimized to make rerunning build methods // fast, so that you can just rebuild anything that needs updating rather // than having to individually change instances of widgets. return Scaffold( appBar: AppBar( // Here we take the value from the MyHomePage object that was created by // the App.build method, and use it to set our appbar title. title: Text(widget.title), ), body: Center( child: FutureBuilder<List<Emp>>( future: getEmp(), builder: (context,snapshot){ if(snapshot.hasData){ return new ListView.builder( itemCount: snapshot.data.length, itemBuilder: (context, index) { // return EmpObject(item: snapshot.data[index]); return Container( padding: EdgeInsets.all(2), height: 140, child: Card( elevation: 5, child: Row( mainAxisAlignment: MainAxisAlignment.spaceEvenly, children: <Widget>[ Image.network( "${snapshot.data[index].imgUrl}", width: 100, ), Expanded( child: Container( padding: EdgeInsets.all(5), child: Column( mainAxisAlignment: MainAxisAlignment.spaceEvenly, children: <Widget>[ Text("id:${snapshot.data[index].id}"), Text("first_name:${snapshot.data[index].first_name}"), Text("last_name:${snapshot.data[index].last_name}"), Text("email_address:${snapshot.data[index].email_address}"), ], ))) ]), )); }, ); } else if(snapshot.hasError){ return new Text("${snapshot.error}"); } else{ //return loading action return new Container(alignment: AlignmentDirectional.center, child: new CircularProgressIndicator(), ); } }, ) ), floatingActionButton: FloatingActionButton( onPressed: _incrementCounter, tooltip: 'Increment', child: Icon(Icons.add), ), // This trailing comma makes auto-formatting nicer for build methods. ); } }