
เอกสารประกอบการสอน 4123006 การพัฒนาโปรแกรมประยุกต์บนอุปกรณ์เคลื่อน Week 2
- สร้าง app_week2_01 ขึ้นมา แก้ไขไฟล์ main.dart
import 'package:flutter/material.dart';

void main() {
  runApp(MyApp());
}

class MyApp extends StatelessWidget {
  // This widget is the root of your application.
  @override
  Widget build(BuildContext context) {
    return MaterialApp(
      debugShowCheckedModeBanner: false,
      title: 'Flutter Demo',
      theme: ThemeData(

        primarySwatch: Colors.blue,

        visualDensity: VisualDensity.adaptivePlatformDensity,
      ),
      home: MyHomePage(title: 'sompoch22'),
    );
  }
}

class MyHomePage extends StatefulWidget {
  MyHomePage({Key key, this.title}) : super(key: key);
  final String title;

  @override
  _MyHomePageState createState() => _MyHomePageState();
}

class _MyHomePageState extends State<MyHomePage> {
  int _counter = 0;

  void _incrementCounter() {
    setState(() {
      _counter++;
    });
  }

  @override
  Widget build(BuildContext context) {
    return Scaffold(
      appBar: AppBar(
        title: Text('app_week2_01'),
      ),
      body: Center(

      ),

    );
  }
}
2. ให้ไปคลิกขวาที่ app_week2_01 แล้วเลือก new directory แล้วตั้งชื่อ images
3. เปิดไฟล์ pubspec.yaml แล้ว เปิดคอมเม้น assets หลังจากนั้นให้ กด pub get ด้านบน ดังภาพ

4. แก้ไขโค้ด main.dart เพื่อเอาไฟลรูปขึ้นในหน้าจอเรียงแบบ Row
import 'package:flutter/material.dart';

void main() {
  runApp(MyApp());
}

class MyApp extends StatelessWidget {
  // This widget is the root of your application.
  @override
  Widget build(BuildContext context) {
    return MaterialApp(
      debugShowCheckedModeBanner: false,
      title: 'Flutter Demo',
      theme: ThemeData(

        primarySwatch: Colors.blue,

        visualDensity: VisualDensity.adaptivePlatformDensity,
      ),
      home: MyHomePage(title: 'sompoch22'),
    );
  }
}

class MyHomePage extends StatefulWidget {
  MyHomePage({Key key, this.title}) : super(key: key);
  final String title;

  @override
  _MyHomePageState createState() => _MyHomePageState();
}

class _MyHomePageState extends State<MyHomePage> {
  int _counter = 0;

  void _incrementCounter() {
    setState(() {
      _counter++;
    });
  }

  @override
  Widget build(BuildContext context) {
    return Scaffold(
      appBar: AppBar(
        title: Text('app_week2_01'),
      ),
      body: Container(
        child:Row(
          mainAxisAlignment: MainAxisAlignment.spaceEvenly,
          children: [
            Image.asset('images/car1.png'),
            Image.asset('images/car2.png'),
            Image.asset('images/car3.png'),
          ],
        )
      ),

    );
  }
}
วีดีโอประกอบการสอนตั้งแต่ข้อที่ 1.-4.
5. กำหนดขนาดของรูปภาพให้มีความกว้าง และความสูงตามต้องการ โดยสามารถกำหนดใน Image.assets แล้วระบุ width,height
import 'package:flutter/material.dart';

void main() {
  runApp(MyApp());
}

class MyApp extends StatelessWidget {
  // This widget is the root of your application.
  @override
  Widget build(BuildContext context) {
    return MaterialApp(
      debugShowCheckedModeBanner: false,
      title: 'Flutter Demo',
      theme: ThemeData(

        primarySwatch: Colors.blue,

        visualDensity: VisualDensity.adaptivePlatformDensity,
      ),
      home: MyHomePage(title: 'sompoch22'),
    );
  }
}

class MyHomePage extends StatefulWidget {
  MyHomePage({Key key, this.title}) : super(key: key);
  final String title;

  @override
  _MyHomePageState createState() => _MyHomePageState();
}

class _MyHomePageState extends State<MyHomePage> {
  int _counter = 0;

  void _incrementCounter() {
    setState(() {
      _counter++;
    });
  }

  @override
  Widget build(BuildContext context) {
    return Scaffold(
      appBar: AppBar(
        title: Text('app_week2_01'),
      ),
      body: Container(
        child:Row(
          mainAxisAlignment: MainAxisAlignment.start,
          children: [
            Image.asset('images/car1.png',width: 100,height: 60,),
            Image.asset('images/car2.png',width:100,height: 60,),
            Image.asset('images/car3.png',width: 100,height: 60,),
          ],
        )
      ),

    );
  }
}
6. แก้ไขโค้ดในส่วนของ body (ให้แก้เฉพาะของ body ดูที่ tag ปิด Containner)
 body: Container(
        child:Row(
          mainAxisAlignment: MainAxisAlignment.start,
          children: <Widget>[
            Icon(Icons.thumb_up,size: 48,),
            Icon(Icons.watch,size: 48,color: Colors.red,),
            Icon(Icons.motorcycle,size: 48,),
            Icon(Icons.motorcycle,size: 48,),
            Icon(Icons.motorcycle,size: 48,),
          ],
        )
      ),
7. กรณีที่เราสร้างปุ่มแล้วปุ่มมีความกว้างไม่เท่ากัน ถ้าเราต้องการให้ปุ่มมีความกว้างเท่ากันสามารถใช้ InstrinsicWidth ได้
body: Center(
        child:IntrinsicWidth(
          child:Column(
            crossAxisAlignment: CrossAxisAlignment.stretch,
           children: <Widget>[
             RaisedButton(onPressed: (){},
             child:Text('สั้นๆ')),
             RaisedButton(onPressed: (){},
             child:Text('ยาวนิดๆ')),
             RaisedButton(onPressed: (){},
             child:Text('ยาวมากๆ ที่สุด'))
           ],
          ),
        ),
      ),
8. การสร้าง row ซ้อนเข้าไปในคอลัมน์สามารถทำได้โดยกำหนด child:Row แล้วสร้าง children ซ้อนเข้าไปดังโค้ด
 body: Center(
        child:IntrinsicWidth(
          child:Column(

           children: <Widget>[
             RaisedButton(onPressed: (){},
             child:Text('สั้นๆ')),
             RaisedButton(onPressed: (){},
             child:Text('ยาวนิดๆ')),
             RaisedButton(onPressed: (){},
             child:Text('ยาวมากๆ ที่สุด')),
            Row(
              children: <Widget>[
                   Icon(Icons.star),
                Icon(Icons.star),
                Icon(Icons.star),
                Icon(Icons.star),
                Icon(Icons.star),
               Text(' 170 Review'),
              ],
            )
           ],
          ),
        ),
      ),
9. การแสดงผลแบบ stack ทำให้สามารถกำหนด Layout ของ widget ได้
 body: Center(
        child:Stack(
          fit:StackFit.expand,
          children: <Widget>[
            Text('1',style: TextStyle(fontSize: 100),),
            Text('2',style: TextStyle(fontSize: 80,color: Colors.red),),
          Positioned(
            bottom:0,
            right:0,
            child: Text('3',style: TextStyle(fontSize: 60,color: Colors.blueAccent),),
          ),
            Positioned(
              top:50,
              left:200,
              child: Text('4',style: TextStyle(fontSize: 70,color: Colors.brown),),
            ),
          ],
        )
      ),

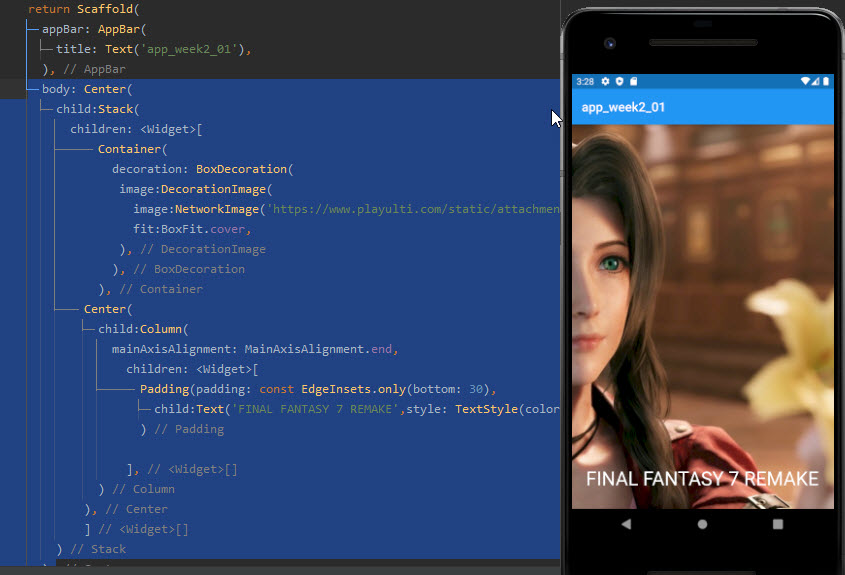
10. การใช้ Stack กำหนดรูปให้แสดงข้อความบนรูปได้ดังตัวอย่าง
  body: Center(
        child:Stack(
          children: <Widget>[
              Container(
                decoration: BoxDecoration(
                 image:DecorationImage(
                   image:NetworkImage('https://www.playulti.com/static/attachment/2019/4/11/attach-1557564995573.jpg'),
                   fit:BoxFit.cover,
                 ),
                ),
              ),
            Center(
              child:Column(
                mainAxisAlignment: MainAxisAlignment.end,
                  children: <Widget>[
                    Padding(padding: const EdgeInsets.only(bottom: 30),
                      child:Text('FINAL FANTASY 7 REMAKE',style: TextStyle(color:Colors.white,fontSize: 30),),
                    )

                  ],
              )
            ),
            ]
        )
      ),
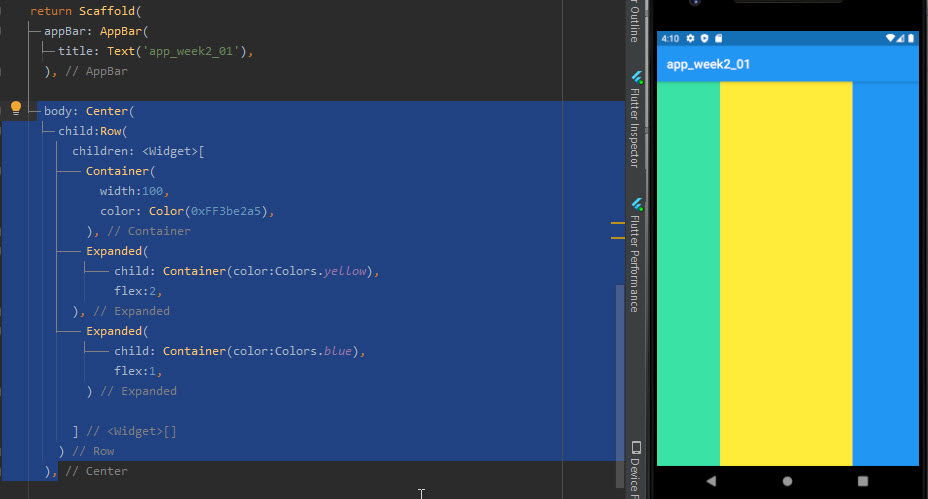
11. การใช้ Expand เพื่อสร้าง Content แบบขยายตามอัตราส่วนหน้าจอ โดยกำหนดตาม flex โดยเปรียบเทียบการแสดงผลระหว่าง Container กับ Expanded ดังโค้ดด้านล่าง
 body: Center(
        child:Row(
          children: <Widget>[
            Container(
              width:100,
              color: Color(0xFF3be2a5),
            ),
            Expanded(
                child: Container(color:Colors.yellow),
                flex:2,
          ),
            Expanded(
                child: Container(color:Colors.blue),
                flex:1,
            )

          ]
        )
      ),
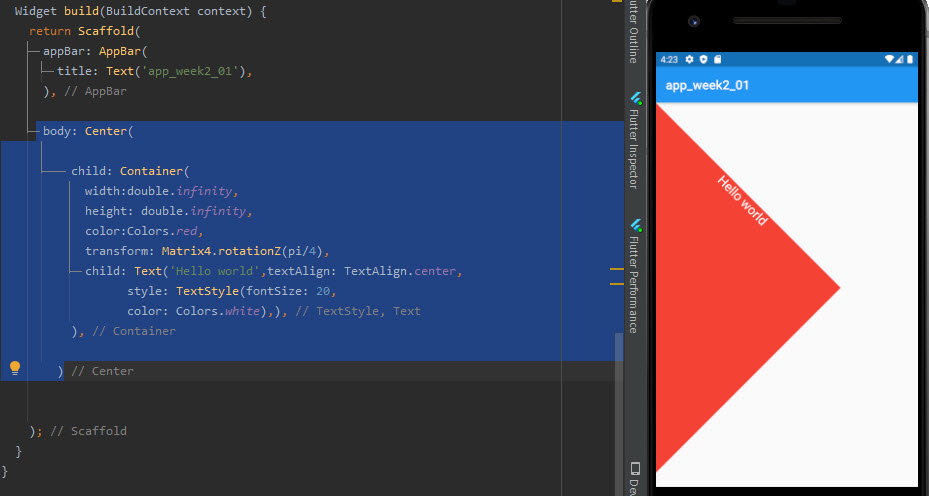
12. สามารถกำหนดให้ Container แสดงผลแบบหมุน Transform ได้ดังภาพ
 body: Center(

          child: Container(
            width:double.infinity,
            height: double.infinity,
            color:Colors.red,
            transform: Matrix4.rotationZ(pi/4),
            child: Text('Hello world',textAlign: TextAlign.center,
                  style: TextStyle(fontSize: 20,
                  color: Colors.white),),
          ),

        )
10.การเอารูปไปใส่ในกรอบที่กำหนดให้สวยงาม โดยใช้ BoxDecoration มาช่วย
 body: Center(

          child: Container(
            width:300,
            height:300,
            decoration: BoxDecoration(
              color:Colors.cyan[300],
              borderRadius: BorderRadius.circular(16),
              image: DecorationImage(
               // image:NetworkImage('https://www.playulti.com/static/attachment/2019/4/11/attach-1557564995573.jpg'),
                image:AssetImage('images/car1.png'),
                fit:BoxFit.cover,
              )
              //border:Border.all(width:2,color: Colors.black),
            ),

          ),

        )

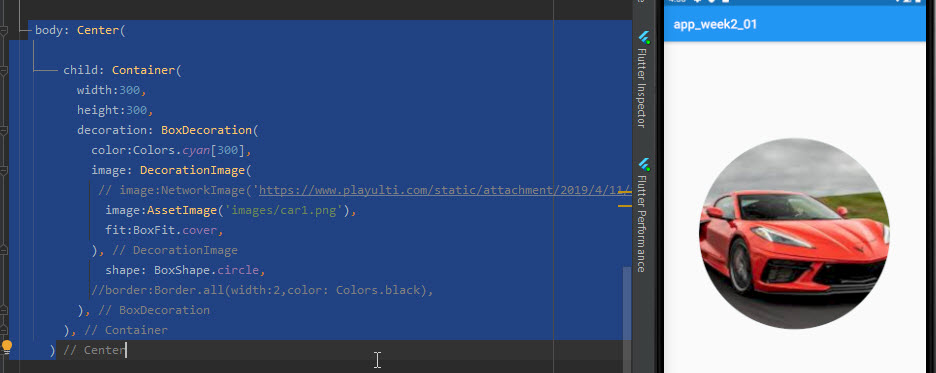
11. สามารถแสดงผลแบบวงกลมได้ แต่ต้องลบ border radius ออกด้วย
12. การใช้งาน Drawer การ slide widget ที่เป็น Container จากด้านข้าง
import 'dart:math';

import 'package:flutter/material.dart';

void main() {
  runApp(MyApp());
}

class MyApp extends StatelessWidget {
  // This widget is the root of your application.
  @override
  Widget build(BuildContext context) {
    return MaterialApp(
      debugShowCheckedModeBanner: false,
      title: 'Flutter Demo',
      theme: ThemeData(

        primarySwatch: Colors.blue,

        visualDensity: VisualDensity.adaptivePlatformDensity,
      ),
      home: MyHomePage(title: 'sompoch22'),
    );
  }
}

class MyHomePage extends StatefulWidget {
  MyHomePage({Key key, this.title}) : super(key: key);
  final String title;

  @override
  _MyHomePageState createState() => _MyHomePageState();
}

class _MyHomePageState extends State<MyHomePage> {
  int _counter = 0;
  final GlobalKey<ScaffoldState> _scaffoldKey=new GlobalKey<ScaffoldState>();
  void _incrementCounter() {
    setState(() {
      _counter++;
    });
  }

  @override
  Widget build(BuildContext context) {
    return Scaffold(
      key: _scaffoldKey,
      appBar: AppBar(
        leading: IconButton(
          onPressed: (){
            _scaffoldKey.currentState.openDrawer();
          },
          icon:Icon(Icons.person),
        ),
        title: Text('app_week2_01'),
        actions: <Widget>[
          IconButton(icon: Icon(Icons.thumb_up), onPressed: (){
            print('print clicked');
          })
        ],
      ),
      drawer: Container(
        height:double.infinity,
        width:250,
        color:Colors.red,
        child:Text('Drawer Zone'),
      ),

      body: Center(

          child: Container(
            width:300,
            height:300,
            decoration: BoxDecoration(
              color:Colors.cyan[300],
              image: DecorationImage(
               // image:NetworkImage('https://www.playulti.com/static/attachment/2019/4/11/attach-1557564995573.jpg'),
                image:AssetImage('images/car1.png'),
                fit:BoxFit.cover,
              ),
                shape: BoxShape.circle,
              //border:Border.all(width:2,color: Colors.black),
            ),
          ),
        )


    );
  }
}
13. ตัวอย่างการสร้างปุ่มกด Button และ TextField รับค่า
 body: Center(
          child:Column(

            children: <Widget>[
              TextField(
                obscureText: true,
                decoration: InputDecoration(
                  border:OutlineInputBorder(),
                  labelText: 'password',
                ),
              ),
              RaisedButton(
                  onPressed: (){},
                  color:Colors.blue,
                  child:Text('Submit',style: TextStyle(color:Colors.white),)
              ),
            ],
          ),

        )
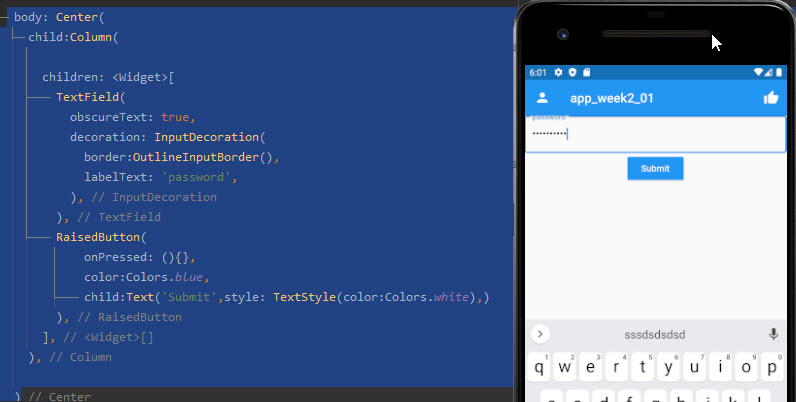
จากภาพด้านบนเราอาจจะสร้าง child:Container มาครอบ Wiget เดิมเพื่อกำหนด padding ให้ TextField ห่างจาก Appbar ได้ดังภาพด้านล่าง

วิดีโอการสอนรอบบ่าย