
การพัฒนา Mobile Application ด้วย Flutter
- dowload flutter https://docs.flutter.dev/get-started/install/windows/mobile?tab=download
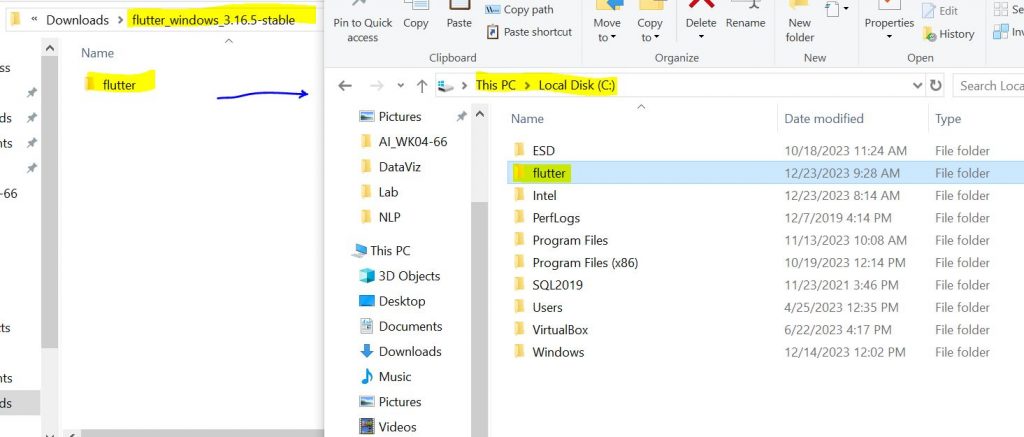
- ทำการแตกไฟล์แล้วเอา folder flutter ไปวางที่ drive c: ตามภาพ
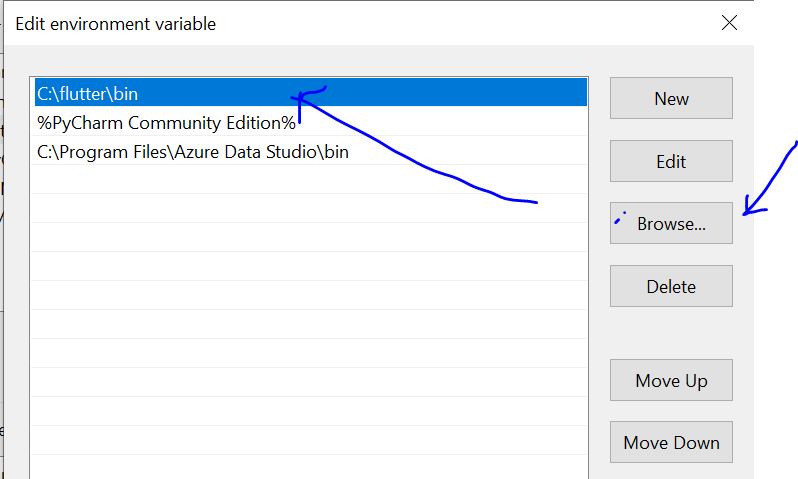
- ไปที่ this pc หรือ my computer ทำการคลิกขวาแล้วเลือก properties แล้วเลือก advance system setting เลือก Environment variable.. แล้ว เลือก Path กด edit ทำการ Brows ไปที่ C:\flutter\bin
ทดสอบว่าตั้งค่าถูกต้องหรือไม่ ให้ไปที่ start แล้วเปิด CMD ขึ้นมาทดสอบพิมพ์คำว่า flutter ใน CMD ถ้าขึ้นคำสั่งแสดงว่าใช้ได้ หรือพิมพ์ flutter doctor - ทำการ Download Android Studio และ Install (กด next เรื่อยๆ จนเสร็จ)
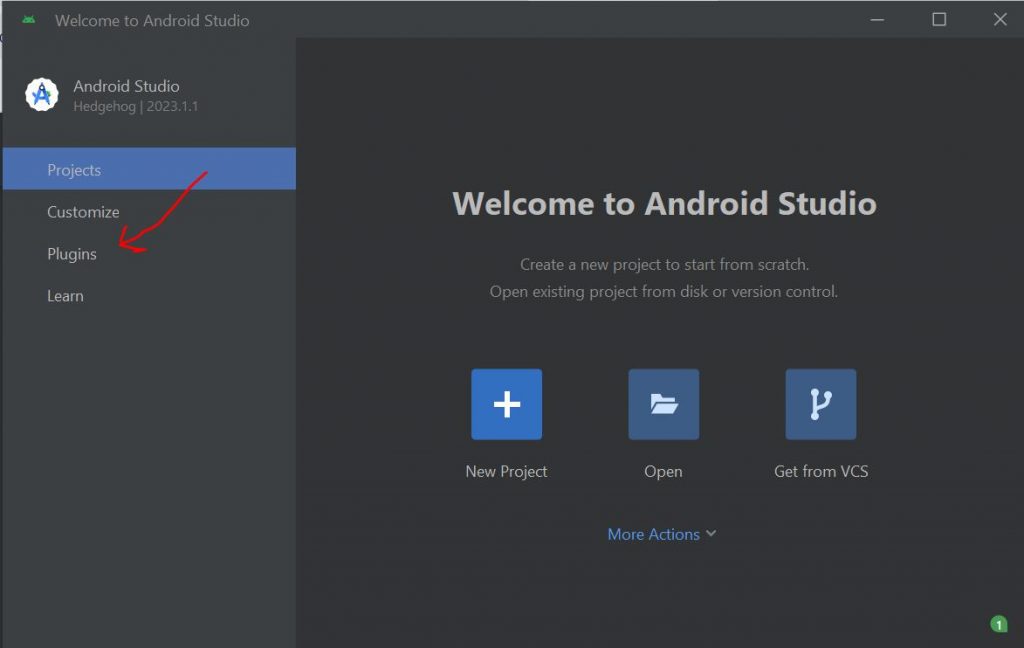
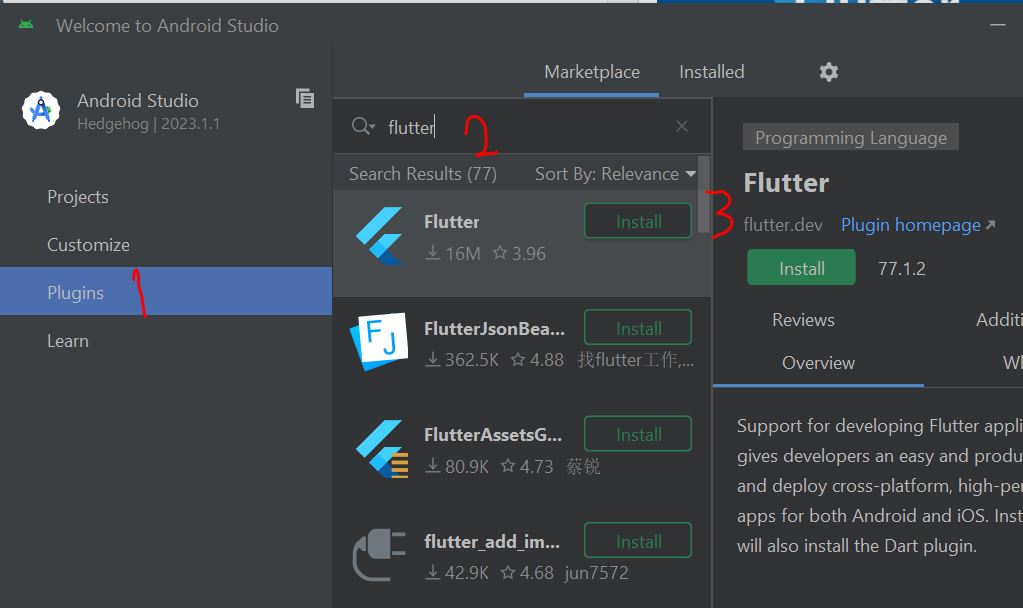
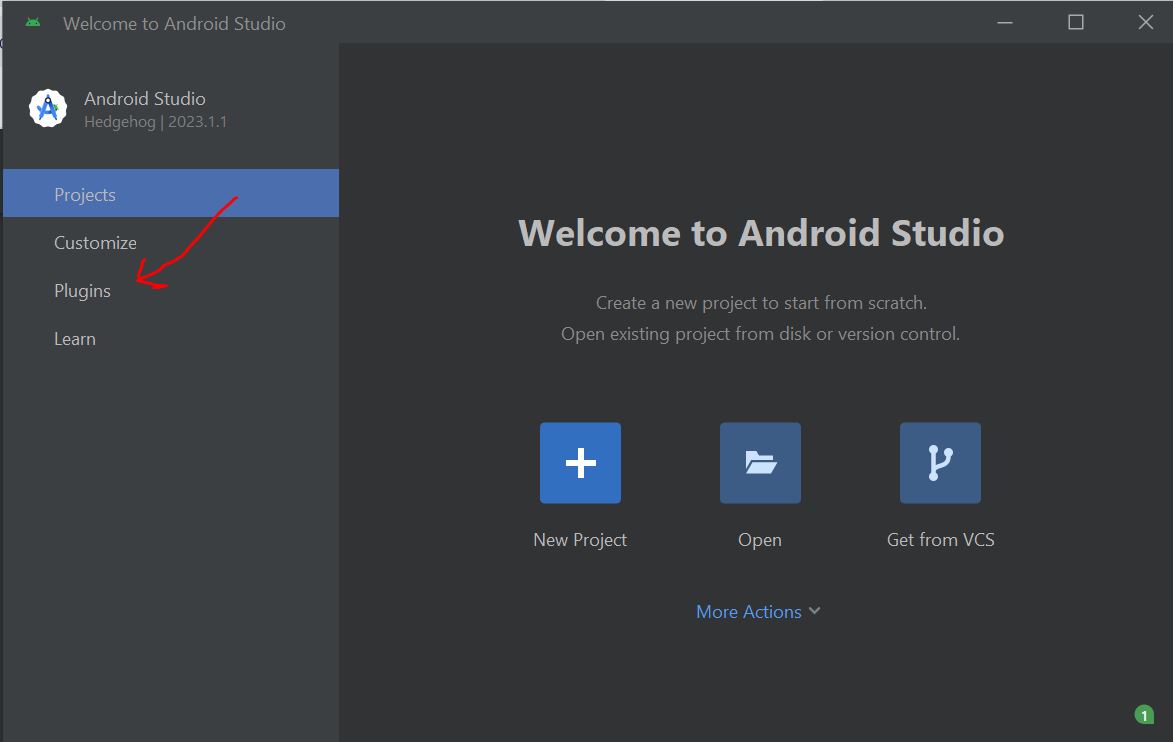
- เปิด android studio ขึ้นมาแล้วเลือก plugin ทำการค้นหา flutter แล้วกด install
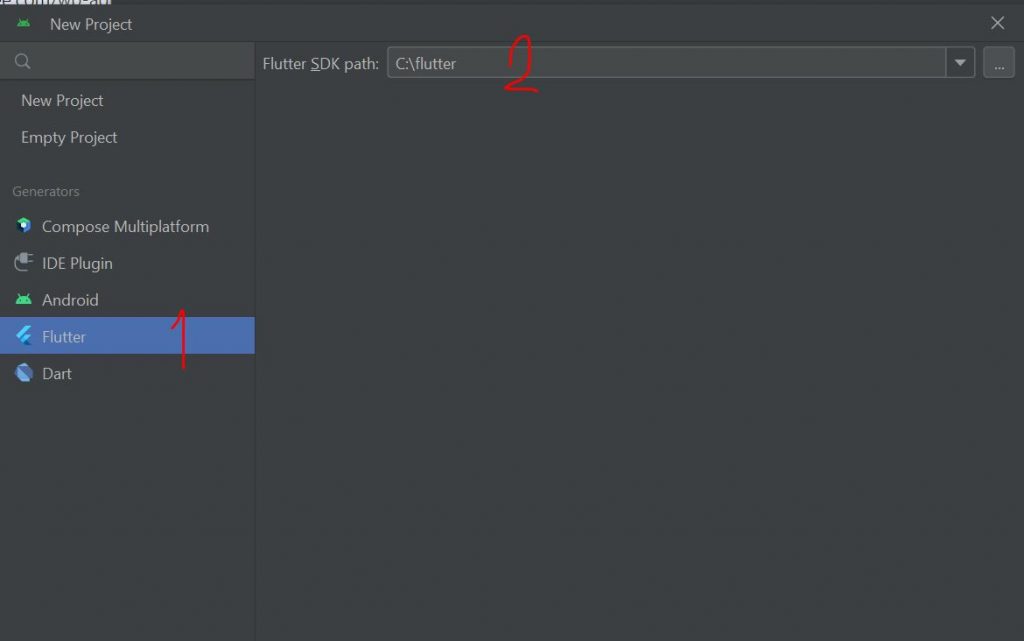
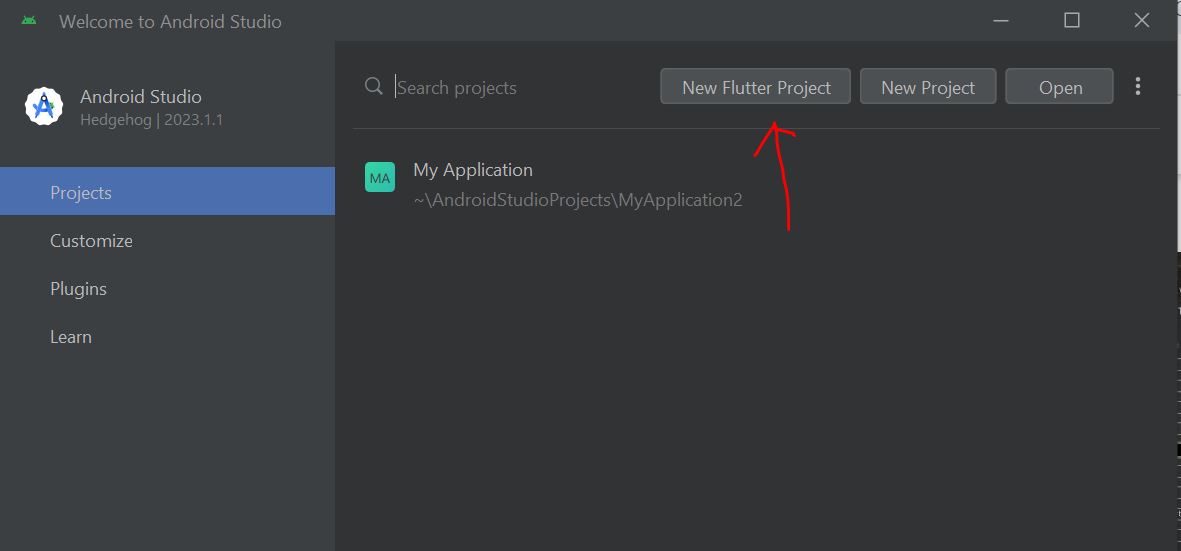
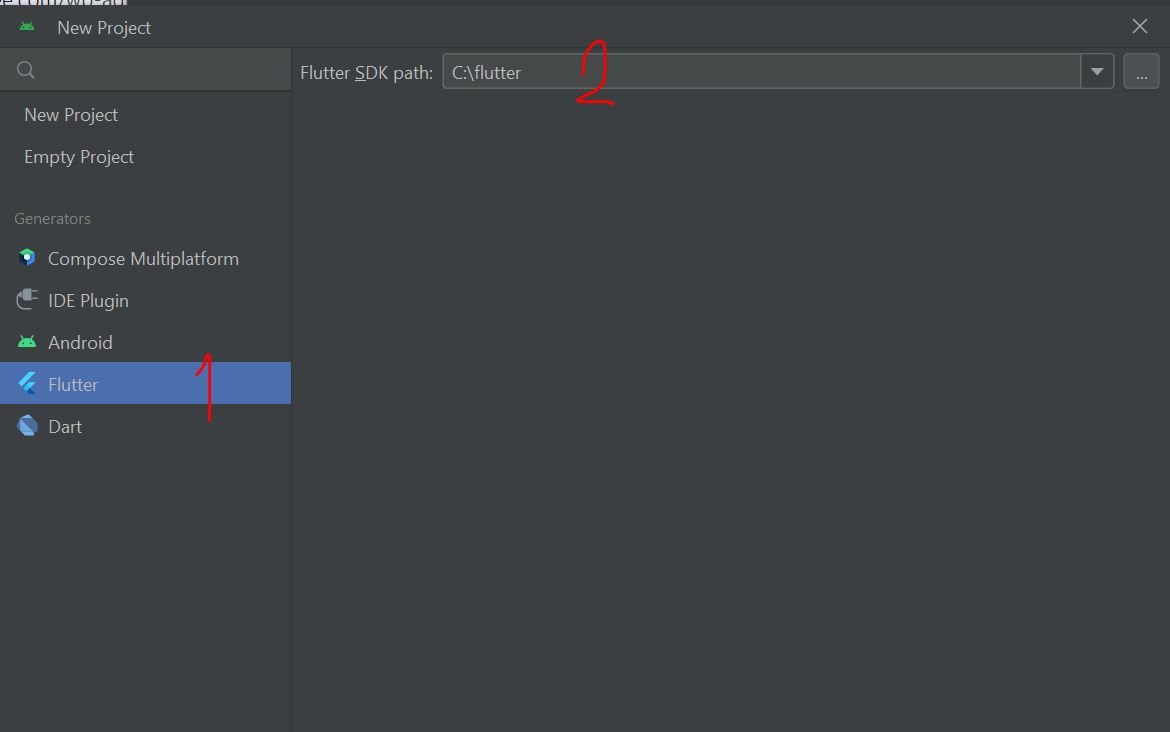
- ไปที่ new flutter project

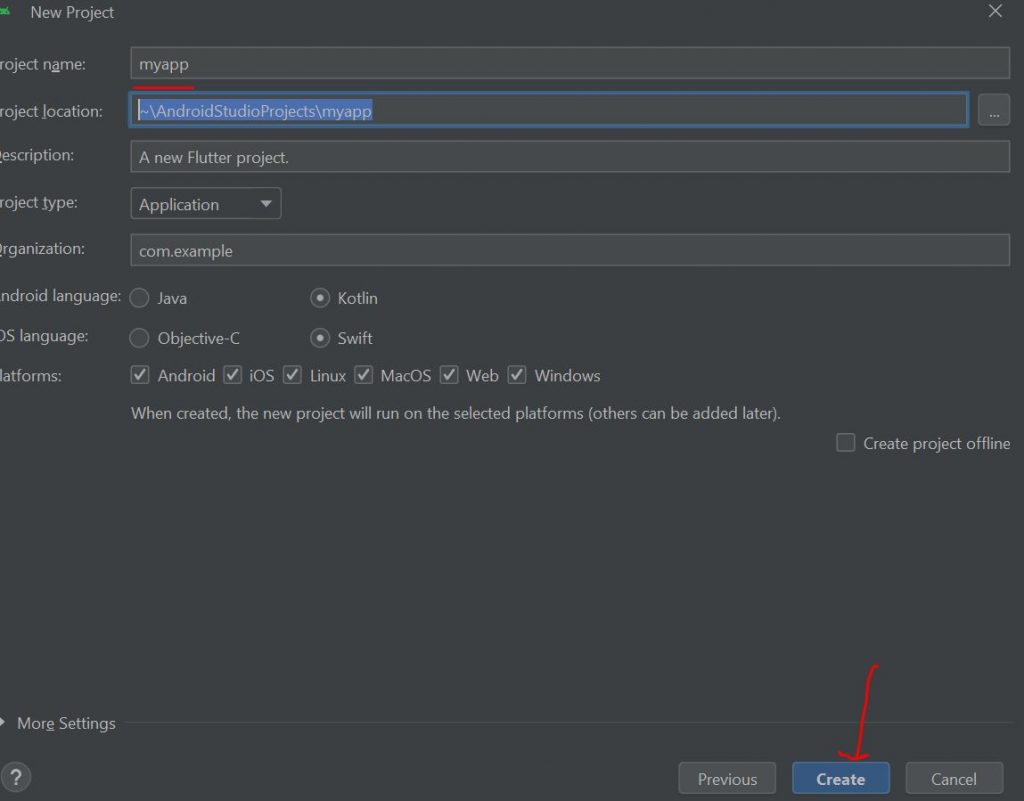
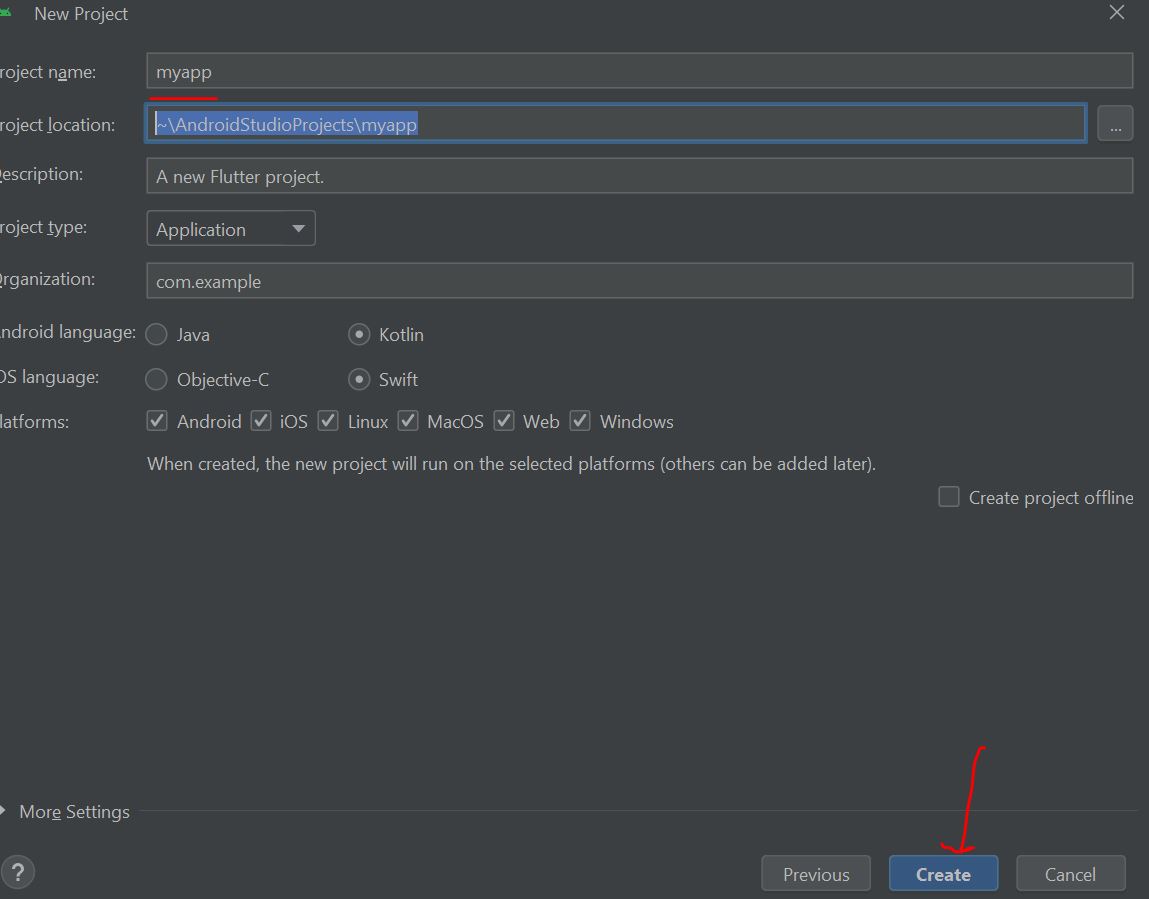
ตั้งชื่อ และกด create
- ลบโค้ดหน้า main.dart แล้วสร้างโค้ดใหม่ลงไป
import 'package:flutter/material.dart';
void main(){
  runApp(
    MaterialApp(
      home:Scaffold(
        appBar: AppBar(
          title: Text('ssss'),
          backgroundColor: Colors.blue,
        ),
      ) ,
    )
  );
}

8. สร้างส่วนของ body แล้วเอารูปภาพไปแสดง รูปจาก internet มี url รูป
import 'package:flutter/material.dart';
void main(){
  runApp(
    MaterialApp(
      home:Scaffold(
        appBar: AppBar(
          title: Text('หัว appbar'),
          backgroundColor: Colors.blue,
        ),
        body:Image(image: NetworkImage('https://encrypted-tbn0.gstatic.com/images?q=tbn:ANd9GcTsynNQepmuaPnj7X-8LL180Dn8CgyCaBec3CuPD78avHswiI39DuqdSQpNIM991Sf98wM&usqp=CAU'))
      ) ,
    )
  );
}
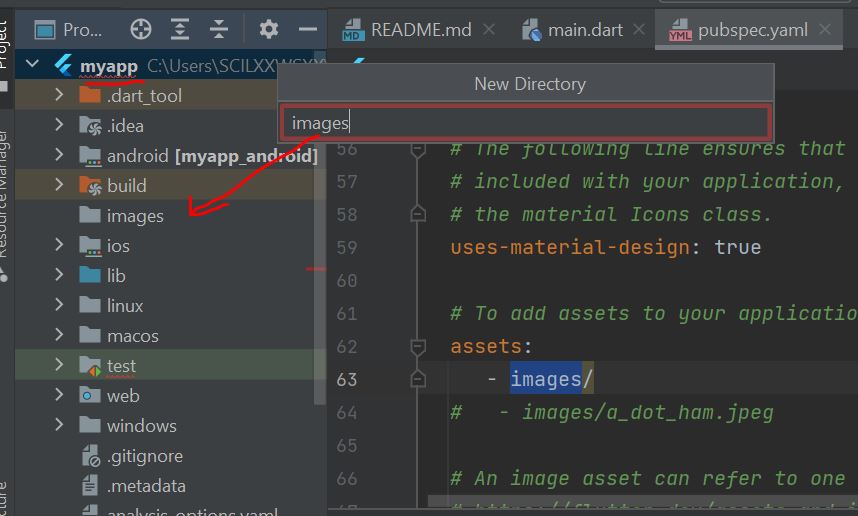
9. การเรียกใช้ ไฟล์รูปในเครื่อง ให้ที่โปรเจ็คแล้วแก้ไขไฟล์ pubspec.yaml เอา comment ตรง assets ออก พร้อมทั้ง – images/ แล้วกด pub get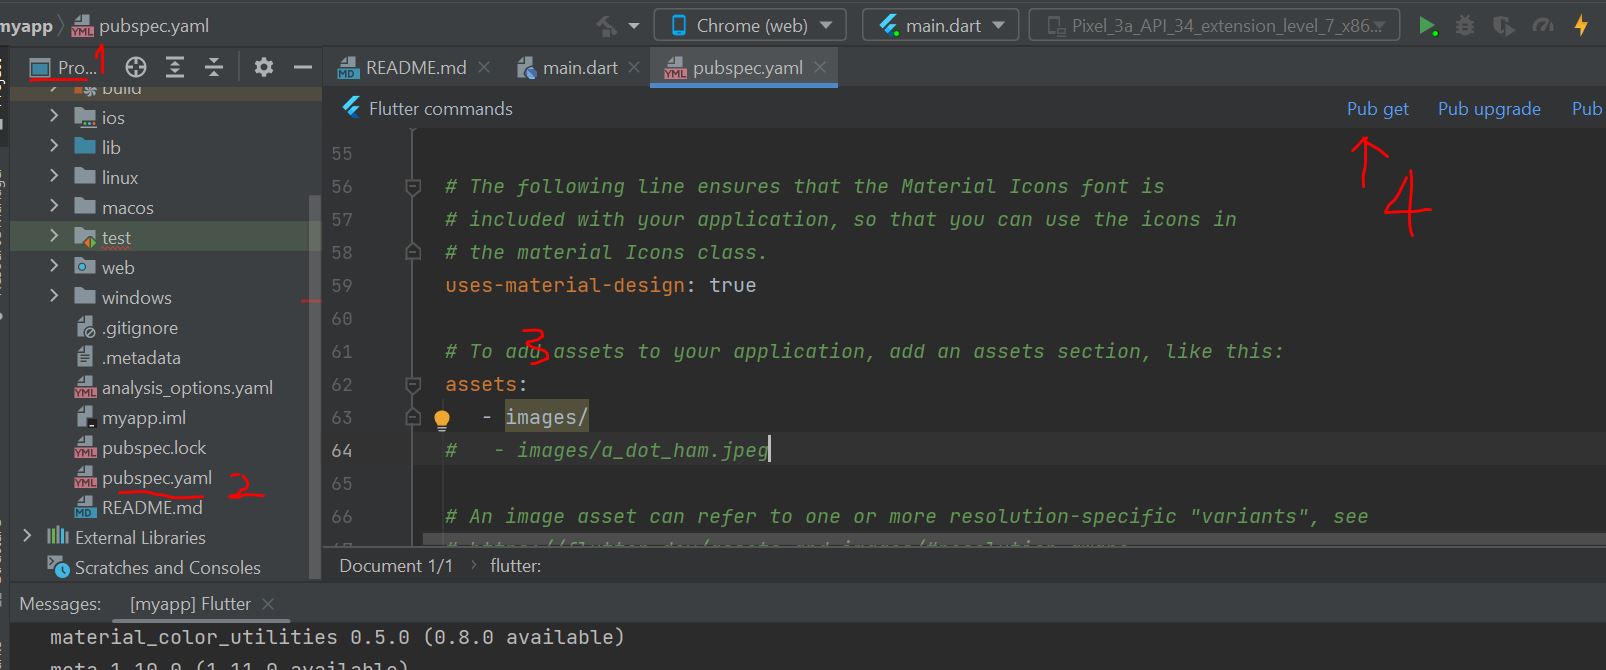
10. คลิกขวาที่โปรเจ็คของเราแล้วเลือก new directory แล้วสร้าง directory images ขึ้นมา
11. Layout
import 'package:flutter/material.dart';
void main(){
  runApp(
    MaterialApp(
      home:Scaffold(
        appBar: AppBar(
          title: Text('หัว appbar'),
          backgroundColor: Colors.blue,
        ),
        //body:Image(image: NetworkImage('https://encrypted-tbn0.gstatic.com/images?q=tbn:ANd9GcTsynNQepmuaPnj7X-8LL180Dn8CgyCaBec3CuPD78avHswiI39DuqdSQpNIM991Sf98wM&usqp=CAU'))
        //body: Image(image: AssetImage('images/car1.jpg')),
        body: Row(
          children: <Widget>[
            Column(children: [
              Text('Element 1'),
              Text('Element 2'),
              Image(image: NetworkImage('https://encrypted-tbn0.gstatic.com/images?q=tbn:ANd9GcTsynNQepmuaPnj7X-8LL180Dn8CgyCaBec3CuPD78avHswiI39DuqdSQpNIM991Sf98wM&usqp=CAU'))
            ],),
            Column(children: [
              Text('Element 3'),
              Text('Element 4')
            ],),

          ],
        ),
      ) ,
    )
  );
}
12. layout + icon
import 'package:flutter/material.dart';
void main(){
  runApp(
    MaterialApp(
      home:Scaffold(
        appBar: AppBar(
          title: Text('หัว appbar'),
          backgroundColor: Colors.blue,
        ),
        //body:Image(image: NetworkImage('https://encrypted-tbn0.gstatic.com/images?q=tbn:ANd9GcTsynNQepmuaPnj7X-8LL180Dn8CgyCaBec3CuPD78avHswiI39DuqdSQpNIM991Sf98wM&usqp=CAU'))
        //body: Image(image: AssetImage('images/car1.jpg')),
        body: Center(
          child: Column(
            children: [
              Row(
                children: [
                  Text(''),
                  Text('Heading',),
                  Text(''),
                ],
              ),
              Row(
                children: [
                  Icon(Icons.access_time_filled,size: 48,),
                  Text('5'),
                  Text('6'),
                ],
              ),
              Row(
                children: [
                  Icon(Icons.ac_unit,size: 48,),
                  Icon(Icons.accessibility_new_outlined,size: 48,),
                  Icon(Icons.accessible_forward_sharp,size: 48,),
                ],
              ),

            ],
          ),
        ),
        ) ,
      ) ,
    );

}
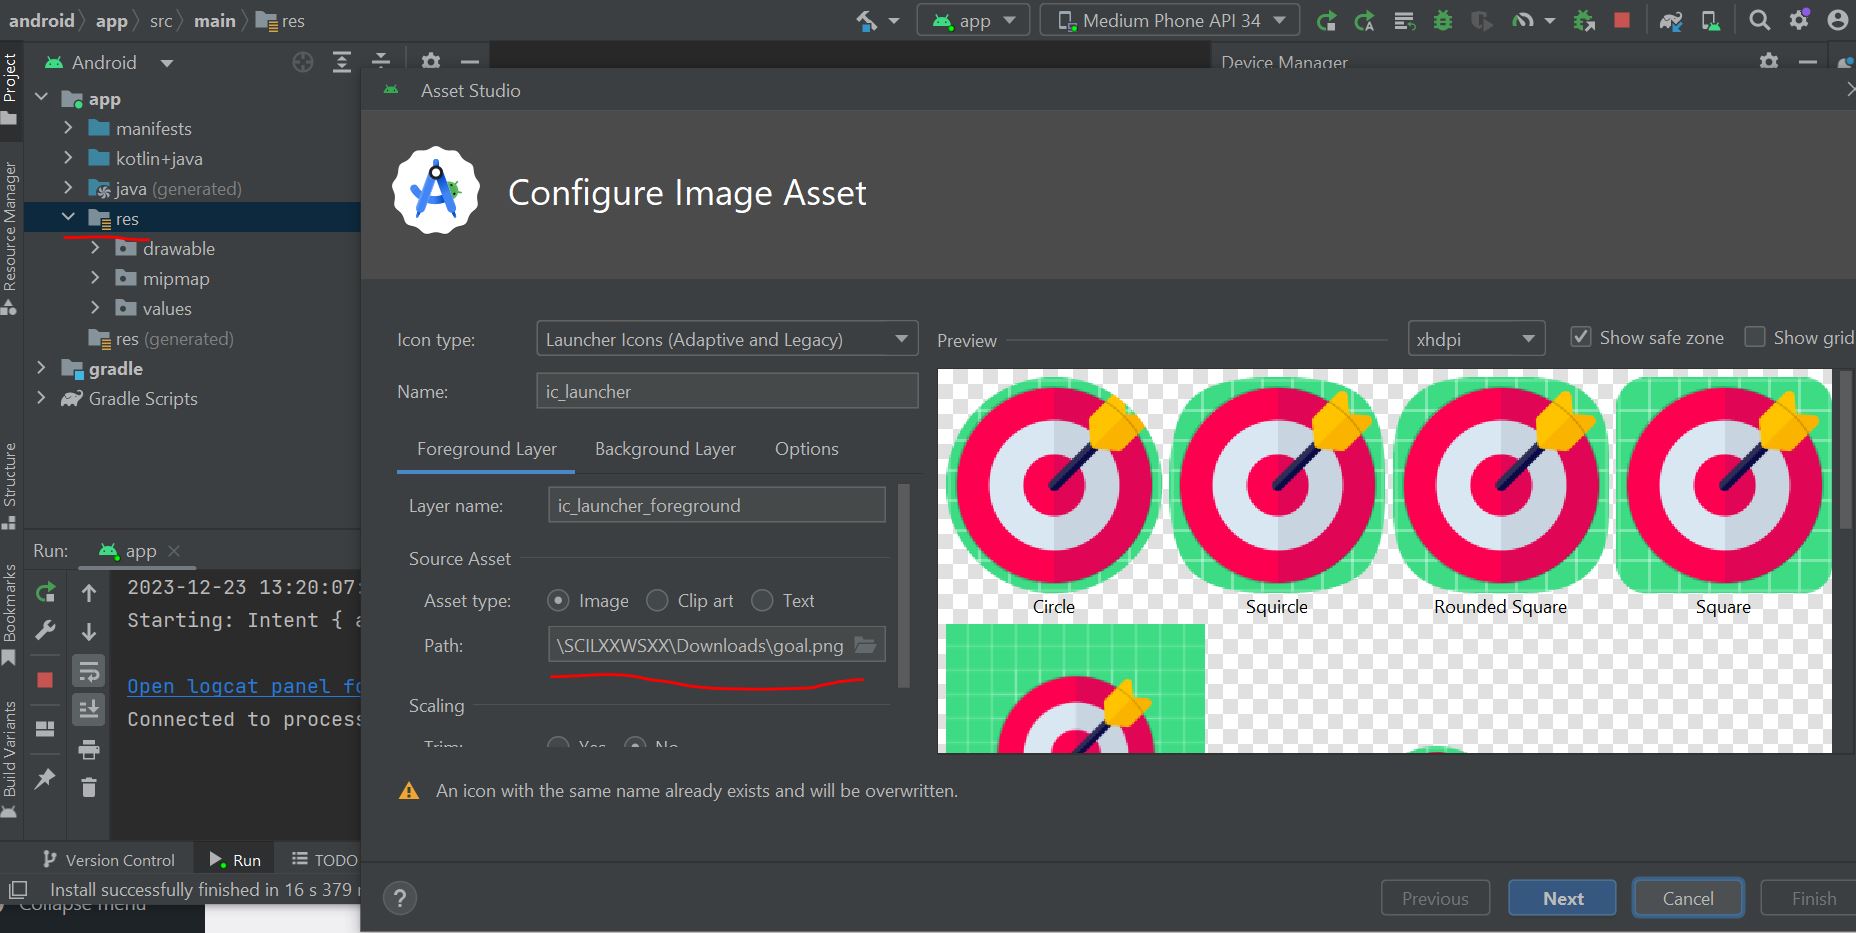
13. การทำ icon ให้ไปที่เมนู file แล้วเลือก open แล้วเลือก android (ตอนเราเลือก open จะอยู่ path เดิมอยู่แล้ว แค่เปิดเฉพาะส่วนที่เป็น android)

14. หลังจากนั้นให้คลิกขวาที่ folder res แล้วเลือก new เลือก Image Asset หลังจากนั้น เลือก Path ให้ค้นหารูป png สำหรับทำ icon เลือกแล้ว resize แล้วกด next จน finish แล้วไปทดสอบบน android emulator ว่า icon เสร็จไหม

15. เอา debug ออก
import 'package:flutter/material.dart';
void main(){
  runApp(
    MaterialApp(
      debugShowCheckedModeBanner: false,
      home:Scaffold(
        appBar: AppBar(
          title: Text('หัว appbar'),
          backgroundColor: Colors.blue,
        ),
        //body:Image(image: NetworkImage('https://encrypted-tbn0.gstatic.com/images?q=tbn:ANd9GcTsynNQepmuaPnj7X-8LL180Dn8CgyCaBec3CuPD78avHswiI39DuqdSQpNIM991Sf98wM&usqp=CAU'))
        //body: Image(image: AssetImage('images/car1.jpg')),
        body: Center(
          child: Column(
            children: [
              Row(
                children: [
                  Text(''),
                  Text('Heading',),
                  Text(''),
                ],
              ),
              Row(
                children: [
                  Icon(Icons.access_time_filled,size: 48,),
                  Text('5'),
                  Text('6'),
                ],
              ),
              Row(
                children: [
                  Icon(Icons.ac_unit,size: 48,),
                  Icon(Icons.accessibility_new_outlined,size: 48,),
                  Icon(Icons.accessible_forward_sharp,size: 48,),
                ],
              ),

            ],
          ),
        ),
        ) ,
      ) ,
    );

}
16. input control รับค่าจาก text input แล้วกดปุ่มเพื่อ inter act แสดงค่าที่กรอกได้
import 'package:flutter/material.dart';

void main() {
  runApp(const MyApp());
}

class MyApp extends StatelessWidget {
  const MyApp({super.key});


  @override
  Widget build(BuildContext context) {
    return MaterialApp(
      title: 'Flutter Demo',
      theme: ThemeData(

        colorScheme: ColorScheme.fromSeed(seedColor: Colors.deepPurple),
        useMaterial3: true,
      ),
      home: const MyHomePage(title: 'Flutter Demo Home Page'),
    );
  }
}

class MyHomePage extends StatefulWidget {
  const MyHomePage({super.key, required this.title});


  final String title;

  @override
  State<MyHomePage> createState() => _MyHomePageState();
}

class _MyHomePageState extends State<MyHomePage> {
  TextEditingController input1=TextEditingController();
  int _counter = 0;

  void _incrementCounter() {
    setState(() {

      _counter++;
    });


  }

  @override
  Widget build(BuildContext context) {

    return Scaffold(
      appBar: AppBar(title: Text('แอพรับค่า input แล้วกดปุ่มแสดงผลได้'),),
      body: Container(
        padding: EdgeInsets.all(10),
        child: Column(
          children: [
            TextField(
              keyboardType: TextInputType.number,
              controller: input1,
            ),
            ElevatedButton(onPressed:(){
              setState(() {
              });
            },
                child: Center(child: const Text('Submit')
                )),
            Text('ผลลัพธ์ : '+input1.text)
          ],
        ),
      ),
    );
  }
}
17. BMI
import 'package:flutter/material.dart';

void main() {
  runApp(MyApp());
}

class MyApp extends StatelessWidget {
  @override
  Widget build(BuildContext context) {
    return MaterialApp(
      title: 'BMI Calculator',
      theme: ThemeData(
        primarySwatch: Colors.blue,
      ),
      home: BMICalculator(),
    );
  }
}

class BMICalculator extends StatefulWidget {
  @override
  _BMICalculatorState createState() => _BMICalculatorState();
}

class _BMICalculatorState extends State<BMICalculator> {
  TextEditingController weightController = TextEditingController();
  TextEditingController heightController = TextEditingController();
  double bmiResult = 0.0;

  @override
  Widget build(BuildContext context) {
    return Scaffold(
      appBar: AppBar(
        title: Text('BMI Calculator'),
      ),
      body: Padding(
        padding: const EdgeInsets.all(16.0),
        child: Column(
          mainAxisAlignment: MainAxisAlignment.center,
          children: <Widget>[
            TextField(
              controller: weightController,
              keyboardType: TextInputType.number,
              decoration: InputDecoration(labelText: 'Weight (kg)'),
            ),
            SizedBox(height: 16),
            TextField(
              controller: heightController,
              keyboardType: TextInputType.number,
              decoration: InputDecoration(labelText: 'Height (cm)'),
            ),
            SizedBox(height: 16),
            ElevatedButton(
              onPressed: () {
                calculateBMI();
              },
              child: Text('Calculate BMI'),
            ),
            SizedBox(height: 16),
            Text(
              'BMI Result: ${bmiResult.toStringAsFixed(2)}',
              style: TextStyle(fontSize: 20),
            ),
          ],
        ),
      ),
    );
  }

  void calculateBMI() {
    double weight = double.tryParse(weightController.text) ?? 0.0;
    double height = double.tryParse(heightController.text) ?? 0.0;

    if (weight > 0 && height > 0) {
      setState(() {
        bmiResult = weight / ((height / 100) * (height / 100));
      });
    } else {
      // Handle invalid input
      showDialog(
        context: context,
        builder: (BuildContext context) {
          return AlertDialog(
            title: Text('Invalid Input'),
            content: Text('Please enter valid weight and height.'),
            actions: <Widget>[
              TextButton(
                onPressed: () {
                  Navigator.of(context).pop();
                },
                child: Text('OK'),
              ),
            ],
          );
        },
      );
    }
  }
}