- ไปที่ drive d ในโฟลเดอร์ชื่อเรา พิมพ์ cmd บน address bar
- ใช้คำสั่ง ionic start week5_grid blank เพื่อสร้างโปรเจ็คใหม่
- เนื่องจากมีการอัพเดท json ระบบจะให้กด y แล้ว enter
- พิมพ์ cd week5_grid
- พิมพ์ ionic serve เพื่อจำรองแอพบน browser
(ถ้าต้องการให้เปิดบน Google Chrome
ionic serve –browser “chrome”) - เปิด visual studio code แล้วเลือก file->open folder
แล้วเลือก week5_grid - หน้า home.page.html
<ion-header> <ion-toolbar> <ion-title> Ionic Grid </ion-title> </ion-toolbar> </ion-header> <ion-content> <ion-grid> <ion-row> <ion-col> username </ion-col> <ion-col> <ion-input type="text" placeholder="กรุณากรอก username" [(ngModel)]="username" > </ion-input> </ion-col> </ion-row> <ion-row> <ion-col> password </ion-col> <ion-col> <ion-input type="password" placeholder="กรุณากรอก password" [(ngModel)]="password"> </ion-input> </ion-col> </ion-row> <ion-row> <ion-col></ion-col> <ion-col> <ion-button (click)="Login(username,password)" color="success"> <ion-icon slot="start" name="log-in"></ion-icon> Login </ion-button> </ion-col> </ion-row> </ion-grid> </ion-content> - หน้า home.page.ts
import { Component } from '@angular/core'; @Component({ selector: 'app-home', templateUrl: 'home.page.html', styleUrls: ['home.page.scss'], }) export class HomePage { constructor() {} Login(username,password){ //alert(username+password); if(username=='admin' && password=='password'){ alert('go to profile page'); } else { alert('กรุณากรอก username / password ให้ถูกต้อง'); } } } - สร้างหน้า profile ให้ปิด serve ก่อนโดยกดปุ่ม ctrl+c ย้ำๆ ในหน้า CMD หลังจากนั้นพิมพ์
ionic generate page profile - ถ้าเราต้องการให้ login ถูก เมื่อกรอก username=admin password=password แล้วให้เด้งไปหน้า profile จะต้องประกาศใช้งาน router ในหน้า home.page.ts (หน้า type script ก่อน) แล้วเพิ่มคำสั่ง
this.router.navigateByUrl(‘/profile’); ดังภาพ (สีแดงคือส่วนที่เพิ่ม)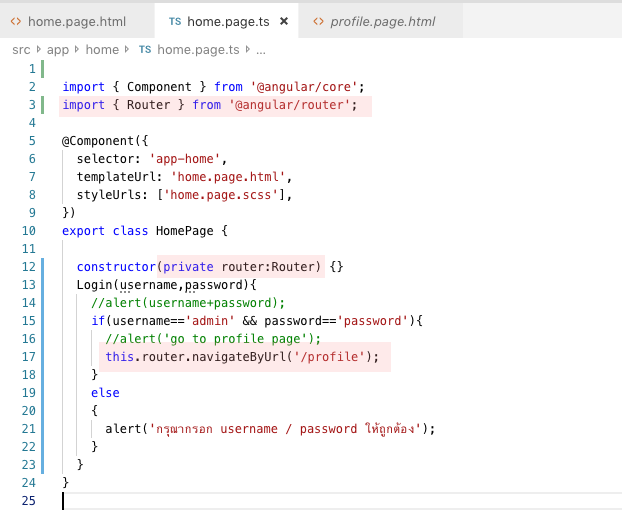
import { Component } from '@angular/core';
import { Router } from '@angular/router';

@Component({
  selector: 'app-home',
  templateUrl: 'home.page.html',
  styleUrls: ['home.page.scss'],
})
export class HomePage {

  constructor(private router:Router) {}
  Login(username,password){
    //alert(username+password);
    if(username=='admin' && password=='password'){
      //alert('go to profile page');
      this.router.navigateByUrl('/profile');
    }
    else
    {
      alert('กรุณากรอก username / password ให้ถูกต้อง');
    }
  }
}
11. เปิด cmd อีกรอบพิมพ์ ionic serve ทดสอบโปรแกรมดู กรอก username password ที่ถูกลงไปแล้วลองดูว่าไปหน้าโปรไฟล์หรือไม่12. เปิด android studio แล้วเปิด emulator android ขึ้นมา13. หลังจากนั้นปิด serve กด ctrl+c ย้ำๆ ใน cmd แล้วพิมพ์ ionic cordova run android

Technology Web & Application