
เรียนรู้การใช้ widget
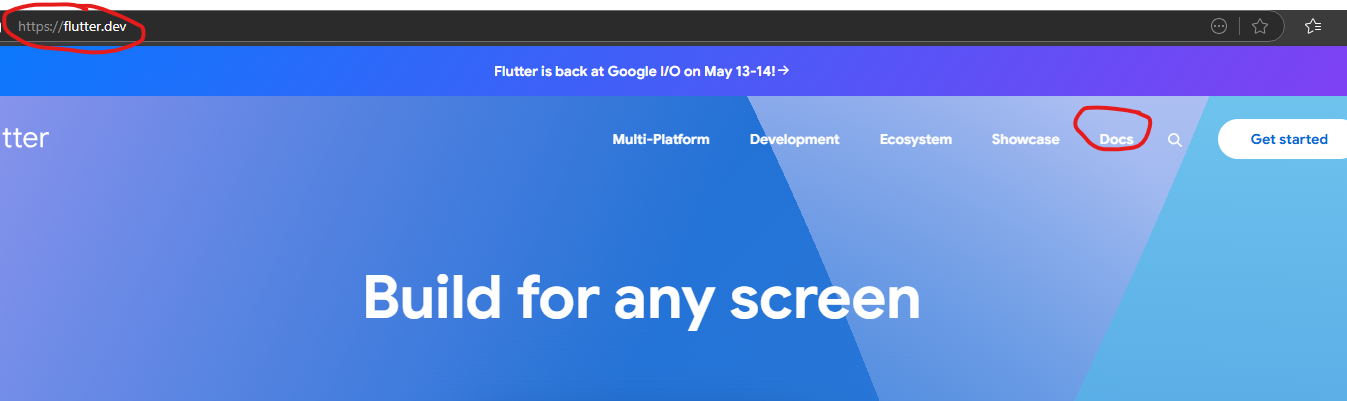
- เปิด browser เข้าไปที่ flutter.dev เลือกเมนู doc
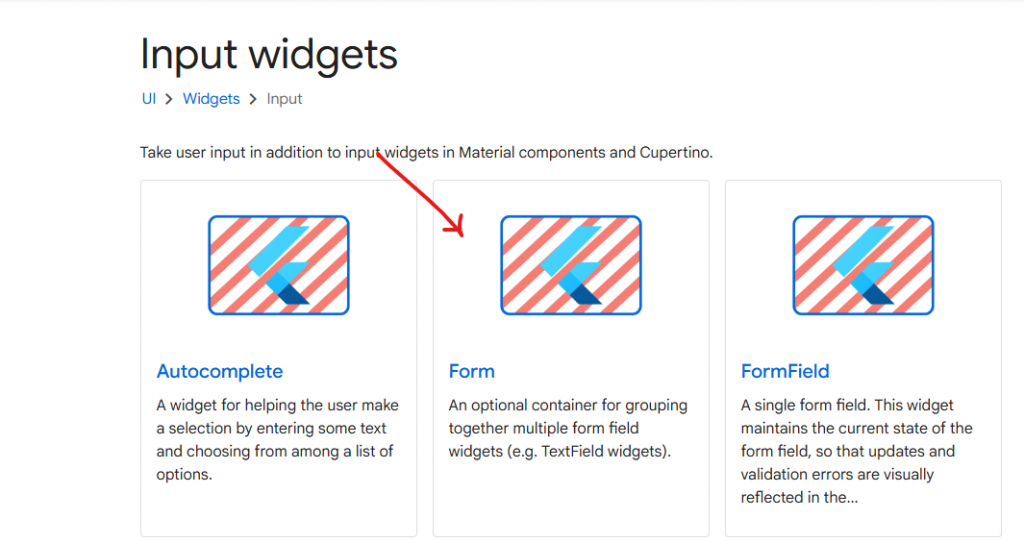
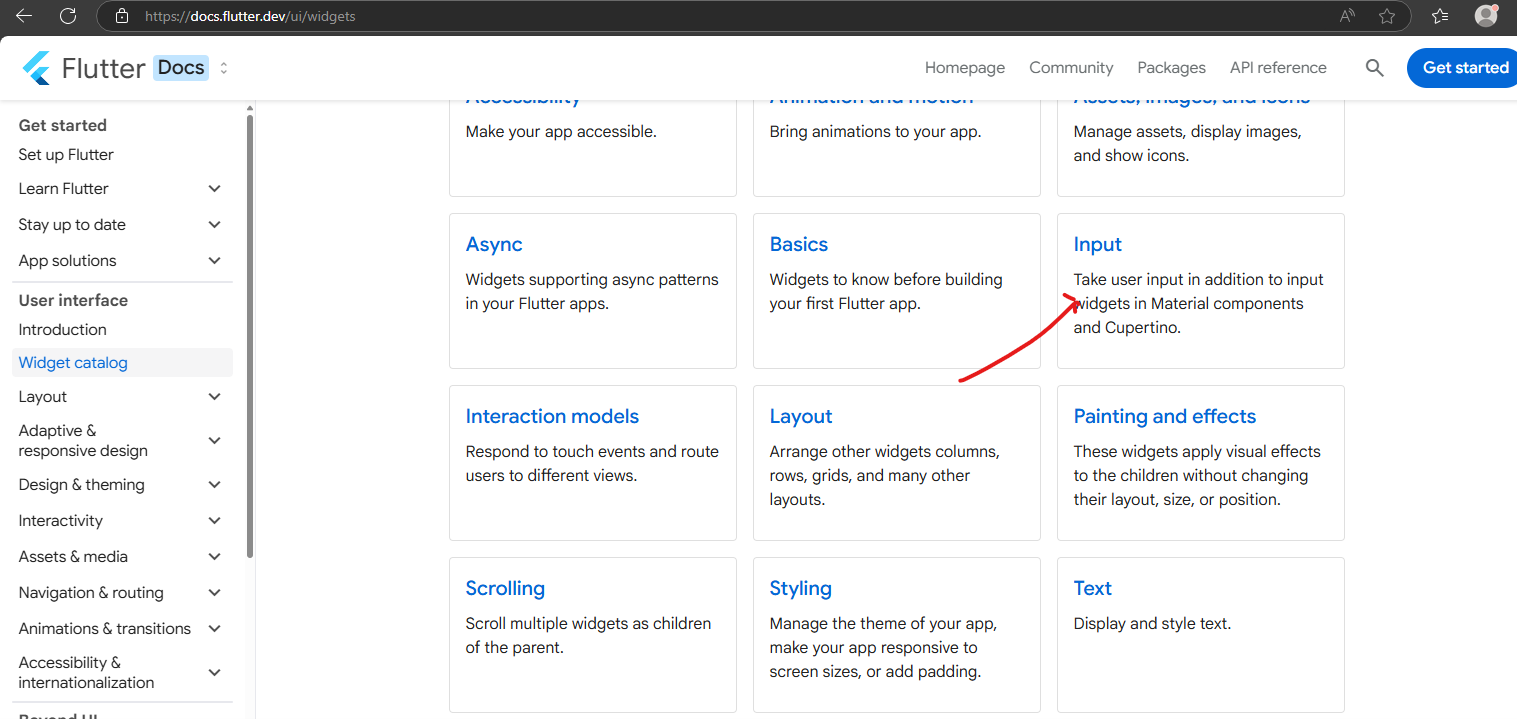
 2. จะเข้าหน้า document เลือกเมนูด้านซ้าย widget catalog จะพบหน้ารวม widget แล้วเลือก input ตามภาพฃ

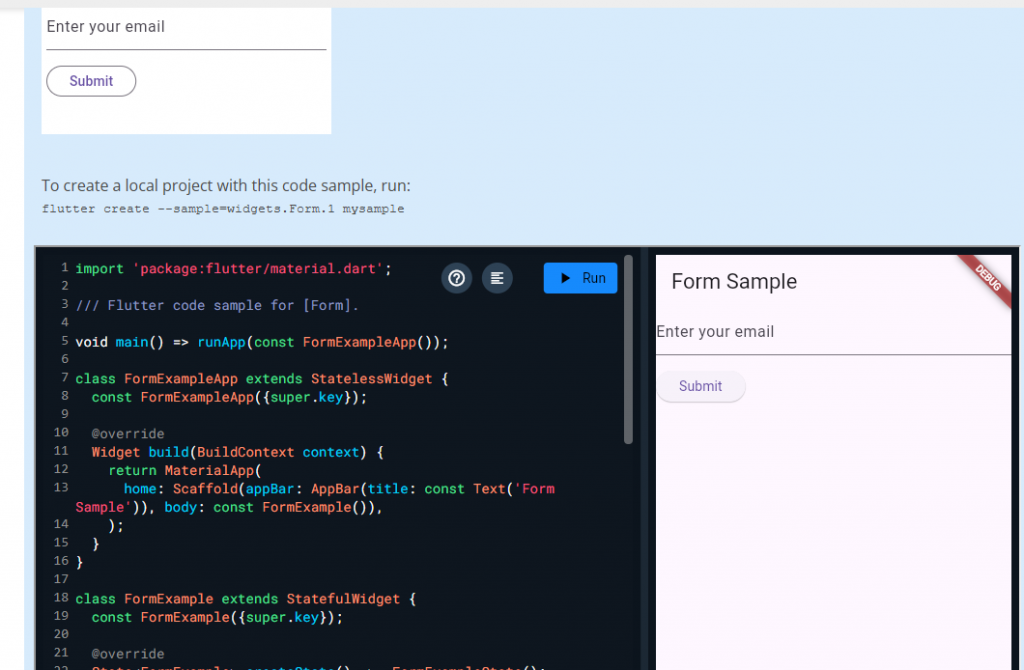
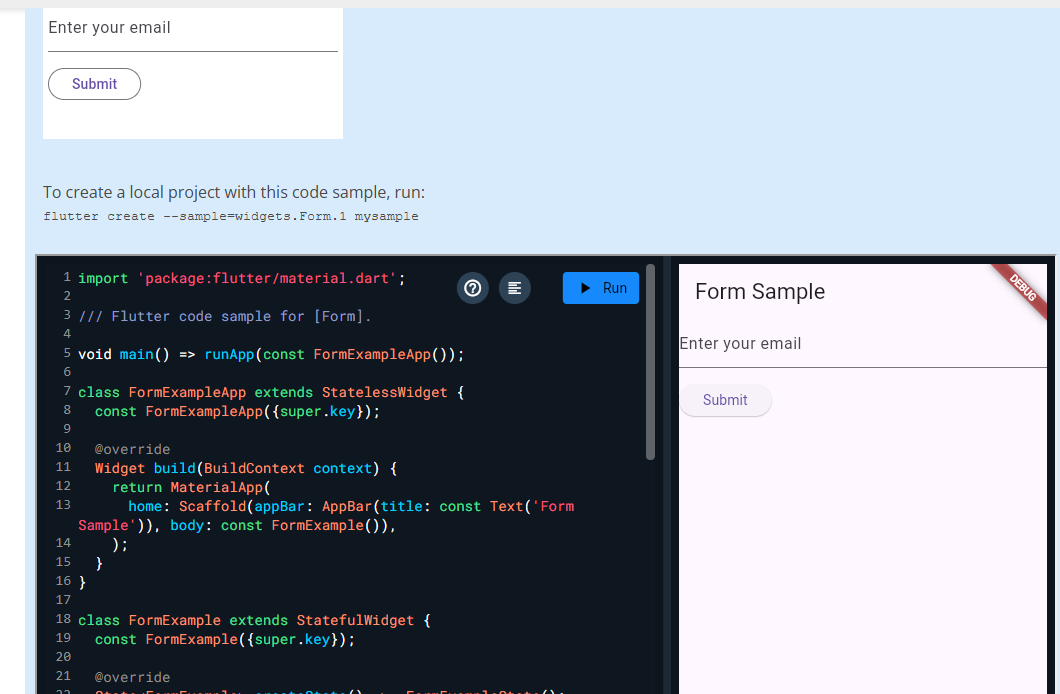
3. จะเห็นตัวอย่างและ Code ให้ลองแก้ไขและแสดงผลได้
4. กด close project (ไปที่เมนูไฟล์ หรือขีดสีขีด กดไปจะมีเมนู close project)
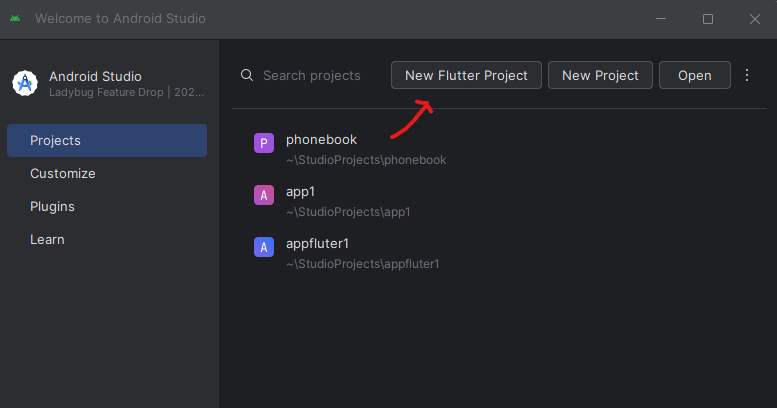
5. กด create new flutter project
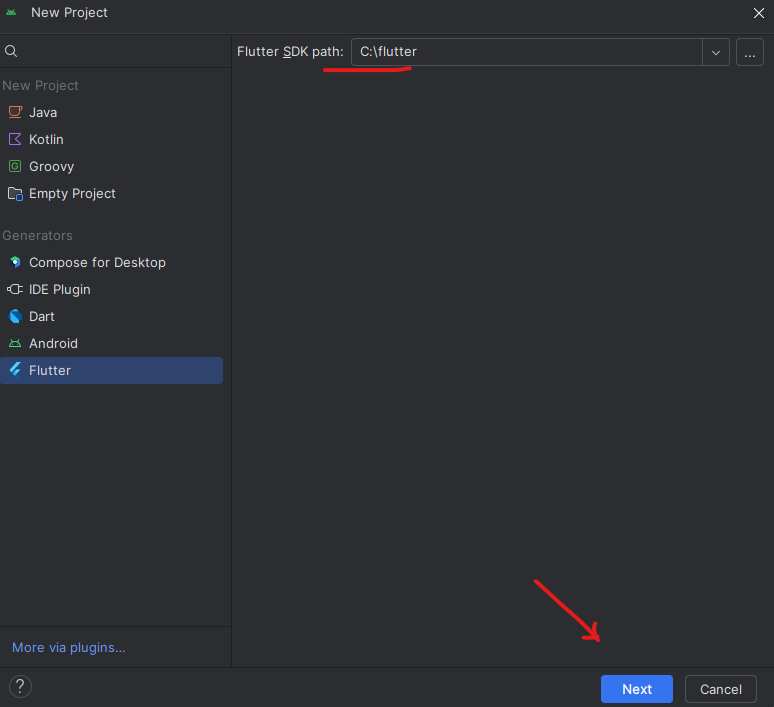
6. ดู path flutter แล้วกด next
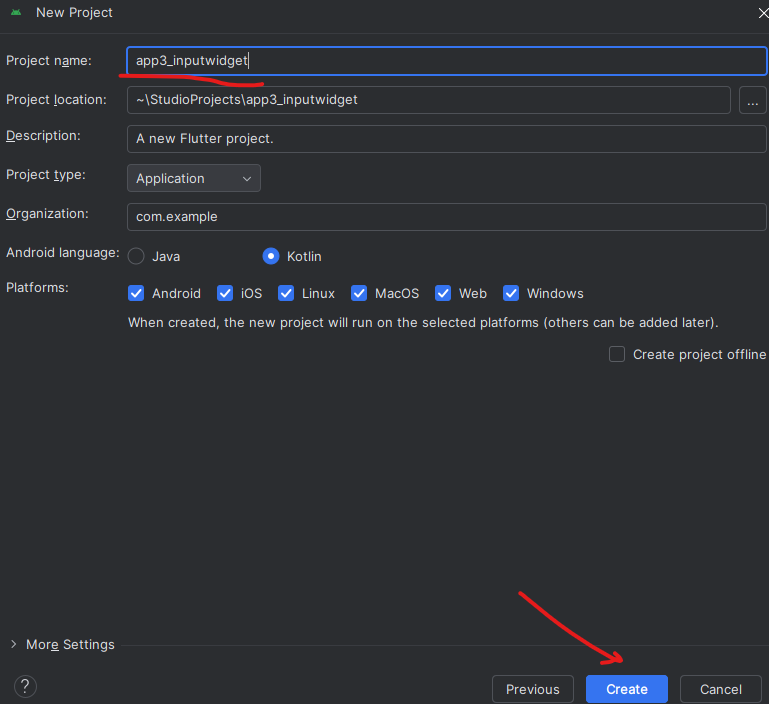
7. ตั้งชื่อ app3_inputwidget แล้วกด create ตามภาพ
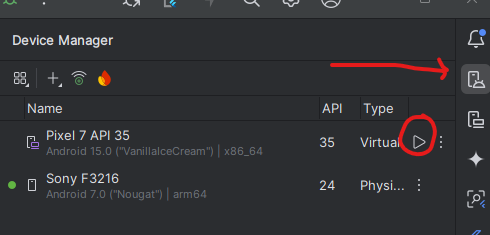
8. android จะสร้างโปรเจ็ค app3_inputwidget ที่ใช้ flutter ขึนมาหลังจากนั้นให้กด run emulator ขึ้นมารอ
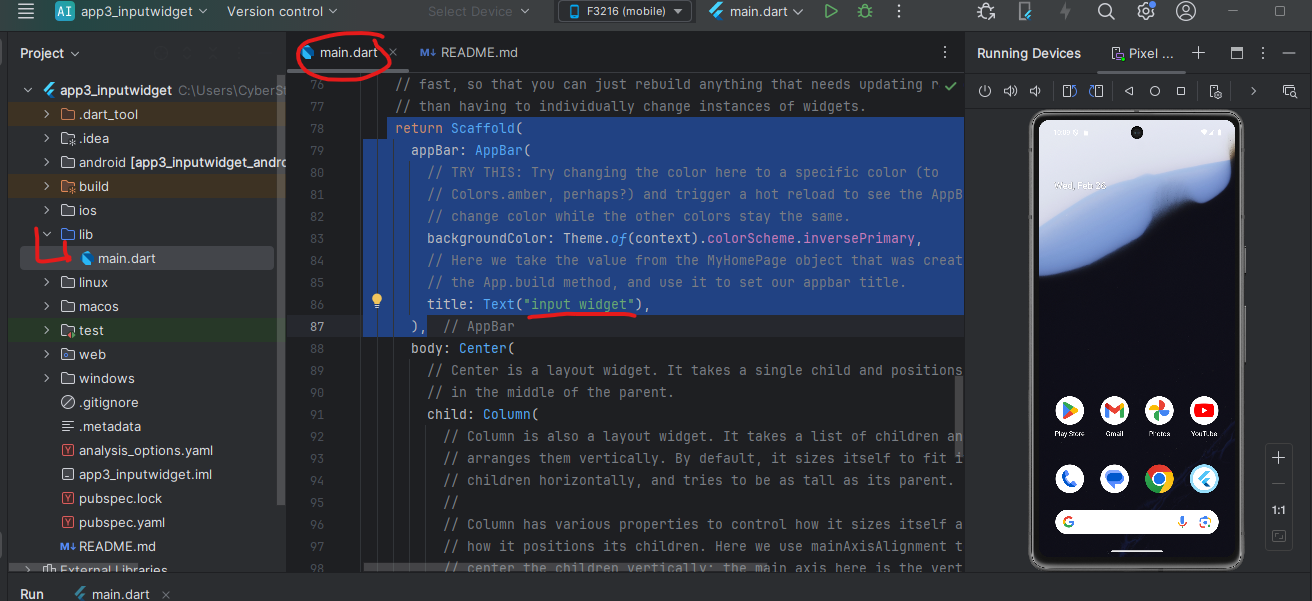
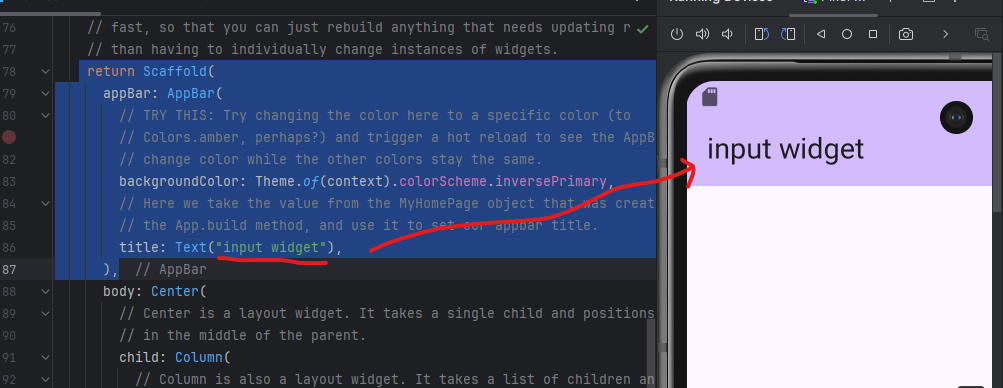
 9. ไปที่ไฟล์ main.dart แล้วแก้ไข title ของ app bar เป็น input widget

 return Scaffold(
      appBar: AppBar(

        backgroundColor: Theme.of(context).colorScheme.inversePrimary,

        title: Text("input widget"),
      ),

จะได้หน้าจอดังนี้
code main.dart
import 'package:flutter/material.dart';

void main() {
  runApp(const MyApp());
}

class MyApp extends StatelessWidget {
  const MyApp({super.key});

  // This widget is the root of your application.
  @override
  Widget build(BuildContext context) {
    return MaterialApp(
      title: 'Flutter Demo',
      theme: ThemeData(
        // This is the theme of your application.
        //
        // TRY THIS: Try running your application with "flutter run". You'll see
        // the application has a purple toolbar. Then, without quitting the app,
        // try changing the seedColor in the colorScheme below to Colors.green
        // and then invoke "hot reload" (save your changes or press the "hot
        // reload" button in a Flutter-supported IDE, or press "r" if you used
        // the command line to start the app).
        //
        // Notice that the counter didn't reset back to zero; the application
        // state is not lost during the reload. To reset the state, use hot
        // restart instead.
        //
        // This works for code too, not just values: Most code changes can be
        // tested with just a hot reload.
        colorScheme: ColorScheme.fromSeed(seedColor: Colors.deepPurple),
      ),
      home: const MyHomePage(title: 'Flutter Demo Home Page'),
    );
  }
}

class MyHomePage extends StatefulWidget {
  const MyHomePage({super.key, required this.title});

  // This widget is the home page of your application. It is stateful, meaning
  // that it has a State object (defined below) that contains fields that affect
  // how it looks.

  // This class is the configuration for the state. It holds the values (in this
  // case the title) provided by the parent (in this case the App widget) and
  // used by the build method of the State. Fields in a Widget subclass are
  // always marked "final".

  final String title;

  @override
  State<MyHomePage> createState() => _MyHomePageState();
}

class _MyHomePageState extends State<MyHomePage> {
  int _counter = 0;
  final GlobalKey<FormState> _formKey = GlobalKey<FormState>();
  void _incrementCounter() {
    setState(() {
      // This call to setState tells the Flutter framework that something has
      // changed in this State, which causes it to rerun the build method below
      // so that the display can reflect the updated values. If we changed
      // _counter without calling setState(), then the build method would not be
      // called again, and so nothing would appear to happen.
      _counter++;
    });
  }

  @override
  Widget build(BuildContext context) {
    // This method is rerun every time setState is called, for instance as done
    // by the _incrementCounter method above.
    //
    // The Flutter framework has been optimized to make rerunning build methods
    // fast, so that you can just rebuild anything that needs updating rather
    // than having to individually change instances of widgets.
    return Scaffold(

      appBar: AppBar(
        // TRY THIS: Try changing the color here to a specific color (to
        // Colors.amber, perhaps?) and trigger a hot reload to see the AppBar
        // change color while the other colors stay the same.
        backgroundColor: Theme.of(context).colorScheme.inversePrimary,
        // Here we take the value from the MyHomePage object that was created by
        // the App.build method, and use it to set our appbar title.
        title: Text("input widget"),
      ),
      body: Form(
        // Center is a layout widget. It takes a single child and positions it
        // in the middle of the parent.
        key: _formKey,
        child: Column(

          mainAxisAlignment: MainAxisAlignment.start,
          children: <Widget>[
            TextFormField(
              decoration: const InputDecoration(hintText: 'Enter your email'),
              validator: (String? value) {
                if (value == null || value.isEmpty) {
                  return 'Please enter some text';
                }
                return null;
              },
            ),
            Padding(
              padding: const EdgeInsets.symmetric(vertical: 16.0),
              child: ElevatedButton(
                onPressed: () {
                  // Validate will return true if the form is valid, or false if
                  // the form is invalid.
                  if (_formKey.currentState!.validate()) {
                    // Process data.
                  }
                },
                child: const Text('Submit'),
              ),
            ),
          ],
        ),
      ),
      floatingActionButton: FloatingActionButton(
        onPressed: _incrementCounter,
        tooltip: 'Increment',
        child: const Icon(Icons.add),
      ), // This trailing comma makes auto-formatting nicer for build methods.
    );
  }
}
RESET CODE กลับเพื่อพิมพ์สร้าง widget เองใหม่
import 'package:flutter/material.dart';

void main() {
  runApp(const MyApp());
}

class MyApp extends StatelessWidget {
  const MyApp({super.key});

  // This widget is the root of your application.
  @override
  Widget build(BuildContext context) {
    return MaterialApp(
      title: 'Flutter Demo',
      theme: ThemeData(
        // This is the theme of your application.
        //
        // TRY THIS: Try running your application with "flutter run". You'll see
        // the application has a purple toolbar. Then, without quitting the app,
        // try changing the seedColor in the colorScheme below to Colors.green
        // and then invoke "hot reload" (save your changes or press the "hot
        // reload" button in a Flutter-supported IDE, or press "r" if you used
        // the command line to start the app).
        //
        // Notice that the counter didn't reset back to zero; the application
        // state is not lost during the reload. To reset the state, use hot
        // restart instead.
        //
        // This works for code too, not just values: Most code changes can be
        // tested with just a hot reload.
        colorScheme: ColorScheme.fromSeed(seedColor: Colors.deepPurple),
      ),
      home: const MyHomePage(title: 'Flutter Demo Home Page'),
    );
  }
}

class MyHomePage extends StatefulWidget {
  const MyHomePage({super.key, required this.title});

  // This widget is the home page of your application. It is stateful, meaning
  // that it has a State object (defined below) that contains fields that affect
  // how it looks.

  // This class is the configuration for the state. It holds the values (in this
  // case the title) provided by the parent (in this case the App widget) and
  // used by the build method of the State. Fields in a Widget subclass are
  // always marked "final".

  final String title;

  @override
  State<MyHomePage> createState() => _MyHomePageState();
}

class _MyHomePageState extends State<MyHomePage> {
  int _counter = 0;

  void _incrementCounter() {
    setState(() {
      // This call to setState tells the Flutter framework that something has
      // changed in this State, which causes it to rerun the build method below
      // so that the display can reflect the updated values. If we changed
      // _counter without calling setState(), then the build method would not be
      // called again, and so nothing would appear to happen.
      _counter++;
    });
  }

  @override
  Widget build(BuildContext context) {
    // This method is rerun every time setState is called, for instance as done
    // by the _incrementCounter method above.
    //
    // The Flutter framework has been optimized to make rerunning build methods
    // fast, so that you can just rebuild anything that needs updating rather
    // than having to individually change instances of widgets.
    return Scaffold(
      appBar: AppBar(
        // TRY THIS: Try changing the color here to a specific color (to
        // Colors.amber, perhaps?) and trigger a hot reload to see the AppBar
        // change color while the other colors stay the same.
        backgroundColor: Theme.of(context).colorScheme.inversePrimary,
        // Here we take the value from the MyHomePage object that was created by
        // the App.build method, and use it to set our appbar title.
        title: Text("input widget"),
      ),
      body: Center(

        child: Column(

          mainAxisAlignment: MainAxisAlignment.center,
          children: <Widget>[


          ],
        ),
      ),
      floatingActionButton: FloatingActionButton(
        onPressed: _incrementCounter,
        tooltip: 'Increment',
        child: const Icon(Icons.add),
      ), // This trailing comma makes auto-formatting nicer for build methods.
    );
  }
}
แก้ไขเพิ่ม widget textfield และปุ่ม ElevatedButton
import 'package:flutter/material.dart';

void main() {
  runApp(const MyApp());
}

class MyApp extends StatelessWidget {
  const MyApp({super.key});

  // This widget is the root of your application.
  @override
  Widget build(BuildContext context) {
    return MaterialApp(
      title: 'Flutter Demo',
      theme: ThemeData(
        // This is the theme of your application.
        //
        // TRY THIS: Try running your application with "flutter run". You'll see
        // the application has a purple toolbar. Then, without quitting the app,
        // try changing the seedColor in the colorScheme below to Colors.green
        // and then invoke "hot reload" (save your changes or press the "hot
        // reload" button in a Flutter-supported IDE, or press "r" if you used
        // the command line to start the app).
        //
        // Notice that the counter didn't reset back to zero; the application
        // state is not lost during the reload. To reset the state, use hot
        // restart instead.
        //
        // This works for code too, not just values: Most code changes can be
        // tested with just a hot reload.
        colorScheme: ColorScheme.fromSeed(seedColor: Colors.deepPurple),
      ),
      home: const MyHomePage(title: 'Flutter Demo Home Page'),
    );
  }
}

class MyHomePage extends StatefulWidget {
  const MyHomePage({super.key, required this.title});

  // This widget is the home page of your application. It is stateful, meaning
  // that it has a State object (defined below) that contains fields that affect
  // how it looks.

  // This class is the configuration for the state. It holds the values (in this
  // case the title) provided by the parent (in this case the App widget) and
  // used by the build method of the State. Fields in a Widget subclass are
  // always marked "final".

  final String title;

  @override
  State<MyHomePage> createState() => _MyHomePageState();
}

class _MyHomePageState extends State<MyHomePage> {
  int _counter = 0;

  void _incrementCounter() {
    setState(() {
      // This call to setState tells the Flutter framework that something has
      // changed in this State, which causes it to rerun the build method below
      // so that the display can reflect the updated values. If we changed
      // _counter without calling setState(), then the build method would not be
      // called again, and so nothing would appear to happen.
      _counter++;
    });
  }

  @override
  Widget build(BuildContext context) {
    // This method is rerun every time setState is called, for instance as done
    // by the _incrementCounter method above.
    //
    // The Flutter framework has been optimized to make rerunning build methods
    // fast, so that you can just rebuild anything that needs updating rather
    // than having to individually change instances of widgets.
    return Scaffold(
      appBar: AppBar(
        // TRY THIS: Try changing the color here to a specific color (to
        // Colors.amber, perhaps?) and trigger a hot reload to see the AppBar
        // change color while the other colors stay the same.
        backgroundColor: Theme.of(context).colorScheme.inversePrimary,
        // Here we take the value from the MyHomePage object that was created by
        // the App.build method, and use it to set our appbar title.
        title: Text("input widget"),
      ),
      body: Center(

        child: Column(

          mainAxisAlignment: MainAxisAlignment.center,
          children: <Widget>[

               TextField(
                 decoration: InputDecoration(
                   labelText: 'กรอกส่วนสูง cm'
                 ),
               ),
            ElevatedButton(onPressed: (){}, child: Text('submit'))

          ],
        ),
      ),
      floatingActionButton: FloatingActionButton(
        onPressed: _incrementCounter,
        tooltip: 'Increment',
        child: const Icon(Icons.add),
      ), // This trailing comma makes auto-formatting nicer for build methods.
    );
  }
}
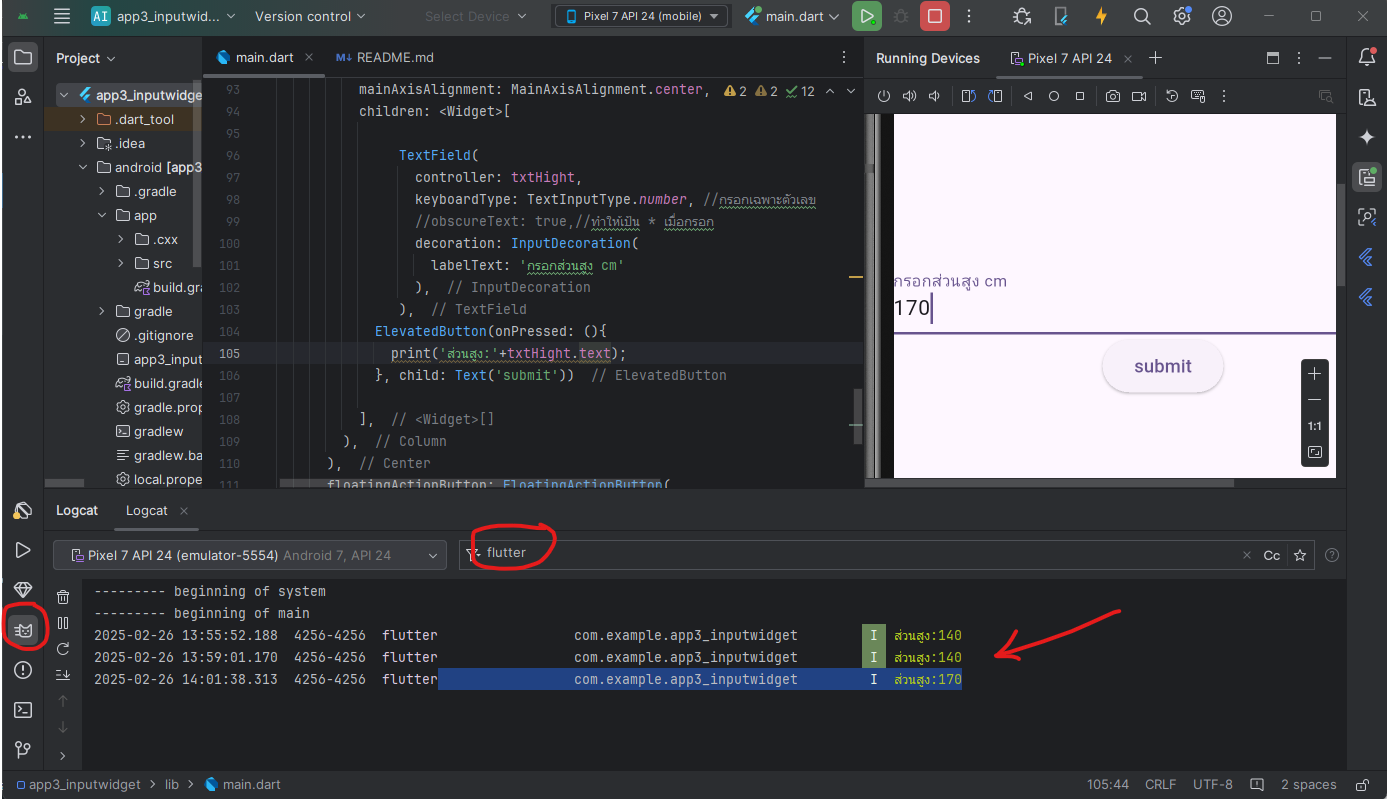
10. สร้างตัวแปร มารับค่าจาก textfiled ที่เป็น input text โดยไปสร้างตรง function ที่มีคำว่า extend state<….>
class _MyHomePageState extends State<MyHomePage> {
  int _counter = 0;
  //ประกาศตัวแปรมารับค่าจาก text iunput
  TextEditingController txtHight=TextEditingController();

11. ไปที่ TextField ต้องทำให้รู้จักกับ ตัวแปร ที่สร้างโดยใช้คำสั่งนี้
TextField(
  controller: txtHight,
  keyboardType: TextInputType.number, //กรอกเฉพาะตัวเลข
  //obscureText: true,//ทำให้เป้น * เมื่อกรอก

12. แก้ไขโค้ดตรงปุ่มกด ให้แสดงค่าเมื่อมีการกรอกใน ช่อง TextField สังเกตุจะแก้ตรง {} เคาะด้านในแล้วใส่โค้ดตามตัวอย่างด้านล่างที่เป็นสีแดง
ElevatedButton(onPressed: (){
  print('ส่วนสูง:'+txtHight.text);
}, child: Text('submit'))

โค้ดทั้งหมด
import 'package:flutter/material.dart';

void main() {
  runApp(const MyApp());
}

class MyApp extends StatelessWidget {
  const MyApp({super.key});

  // This widget is the root of your application.
  @override
  Widget build(BuildContext context) {
    return MaterialApp(
      title: 'Flutter Demo',
      theme: ThemeData(
        // This is the theme of your application.
        //
        // TRY THIS: Try running your application with "flutter run". You'll see
        // the application has a purple toolbar. Then, without quitting the app,
        // try changing the seedColor in the colorScheme below to Colors.green
        // and then invoke "hot reload" (save your changes or press the "hot
        // reload" button in a Flutter-supported IDE, or press "r" if you used
        // the command line to start the app).
        //
        // Notice that the counter didn't reset back to zero; the application
        // state is not lost during the reload. To reset the state, use hot
        // restart instead.
        //
        // This works for code too, not just values: Most code changes can be
        // tested with just a hot reload.
        colorScheme: ColorScheme.fromSeed(seedColor: Colors.deepPurple),
      ),
      home: const MyHomePage(title: 'Flutter Demo Home Page'),
    );
  }
}

class MyHomePage extends StatefulWidget {
  const MyHomePage({super.key, required this.title});

  // This widget is the home page of your application. It is stateful, meaning
  // that it has a State object (defined below) that contains fields that affect
  // how it looks.

  // This class is the configuration for the state. It holds the values (in this
  // case the title) provided by the parent (in this case the App widget) and
  // used by the build method of the State. Fields in a Widget subclass are
  // always marked "final".

  final String title;

  @override
  State<MyHomePage> createState() => _MyHomePageState();
}

class _MyHomePageState extends State<MyHomePage> {
  int _counter = 0;
  //ประกาศตัวแปรมารับค่าจาก text iunput
  TextEditingController txtHight=TextEditingController();
  void _incrementCounter() {
    setState(() {
      // This call to setState tells the Flutter framework that something has
      // changed in this State, which causes it to rerun the build method below
      // so that the display can reflect the updated values. If we changed
      // _counter without calling setState(), then the build method would not be
      // called again, and so nothing would appear to happen.
      _counter++;
    });
  }

  @override
  Widget build(BuildContext context) {
    // This method is rerun every time setState is called, for instance as done
    // by the _incrementCounter method above.
    //
    // The Flutter framework has been optimized to make rerunning build methods
    // fast, so that you can just rebuild anything that needs updating rather
    // than having to individually change instances of widgets.
    return Scaffold(
      appBar: AppBar(
        // TRY THIS: Try changing the color here to a specific color (to
        // Colors.amber, perhaps?) and trigger a hot reload to see the AppBar
        // change color while the other colors stay the same.
        backgroundColor: Theme.of(context).colorScheme.inversePrimary,
        // Here we take the value from the MyHomePage object that was created by
        // the App.build method, and use it to set our appbar title.
        title: Text("input widget"),
      ),
      body: Center(

        child: Column(

          mainAxisAlignment: MainAxisAlignment.center,
          children: <Widget>[

               TextField(
                 controller: txtHight,
                 keyboardType: TextInputType.number, //กรอกเฉพาะตัวเลข
                 //obscureText: true,//ทำให้เป้น * เมื่อกรอก
                 decoration: InputDecoration(
                   labelText: 'กรอกส่วนสูง cm'
                 ),
               ),
            ElevatedButton(onPressed: (){
              print('ส่วนสูง:'+txtHight.text);
            }, child: Text('submit'))

          ],
        ),
      ),
      floatingActionButton: FloatingActionButton(
        onPressed: _incrementCounter,
        tooltip: 'Increment',
        child: const Icon(Icons.add),
      ), // This trailing comma makes auto-formatting nicer for build methods.
    );
  }
}
เมือกรอกข้อมูลลงใน text input ส่วนสูงและกดปุ่ม submit เราสามารถจะเห็นค่าที่กรอกได้ผ่าน Logcat ตามภาพ
โค้ด BMI ทั้งหมดมีดังนี้
import 'package:flutter/material.dart';

void main() {
  runApp(const MyApp());
}

class MyApp extends StatelessWidget {
  const MyApp({super.key});

  // This widget is the root of your application.
  @override
  Widget build(BuildContext context) {
    return MaterialApp(
      title: 'Flutter Demo',
      theme: ThemeData(
        // This is the theme of your application.
        //
        // TRY THIS: Try running your application with "flutter run". You'll see
        // the application has a purple toolbar. Then, without quitting the app,
        // try changing the seedColor in the colorScheme below to Colors.green
        // and then invoke "hot reload" (save your changes or press the "hot
        // reload" button in a Flutter-supported IDE, or press "r" if you used
        // the command line to start the app).
        //
        // Notice that the counter didn't reset back to zero; the application
        // state is not lost during the reload. To reset the state, use hot
        // restart instead.
        //
        // This works for code too, not just values: Most code changes can be
        // tested with just a hot reload.
        colorScheme: ColorScheme.fromSeed(seedColor: Colors.deepPurple),
      ),
      home: const MyHomePage(title: 'Flutter Demo Home Page'),
    );
  }
}

class MyHomePage extends StatefulWidget {
  const MyHomePage({super.key, required this.title});

  // This widget is the home page of your application. It is stateful, meaning
  // that it has a State object (defined below) that contains fields that affect
  // how it looks.

  // This class is the configuration for the state. It holds the values (in this
  // case the title) provided by the parent (in this case the App widget) and
  // used by the build method of the State. Fields in a Widget subclass are
  // always marked "final".

  final String title;

  @override
  State<MyHomePage> createState() => _MyHomePageState();
}

class _MyHomePageState extends State<MyHomePage> {
  int _counter = 0;
  //ประกาศตัวแปรมารับค่าจาก text iunput
  TextEditingController txtHight=TextEditingController();
  TextEditingController txtWeight=TextEditingController();
  String resultSummary="0";
  void _incrementCounter() {
    setState(() {

      // This call to setState tells the Flutter framework that something has
      // changed in this State, which causes it to rerun the build method below
      // so that the display can reflect the updated values. If we changed
      // _counter without calling setState(), then the build method would not be
      // called again, and so nothing would appear to happen.
      _counter++;
    });
  }

  @override
  Widget build(BuildContext context) {
    // This method is rerun every time setState is called, for instance as done
    // by the _incrementCounter method above.
    //
    // The Flutter framework has been optimized to make rerunning build methods
    // fast, so that you can just rebuild anything that needs updating rather
    // than having to individually change instances of widgets.
    return Scaffold(
      appBar: AppBar(
        // TRY THIS: Try changing the color here to a specific color (to
        // Colors.amber, perhaps?) and trigger a hot reload to see the AppBar
        // change color while the other colors stay the same.
        backgroundColor: Theme.of(context).colorScheme.inversePrimary,
        // Here we take the value from the MyHomePage object that was created by
        // the App.build method, and use it to set our appbar title.
        title: Text("input widget"),
      ),
      body: Center(

        child: Column(

          mainAxisAlignment: MainAxisAlignment.center,
          children: <Widget>[
               Text('ผลลัพธ์:'+resultSummary),
               TextField(
                 controller: txtHight,
                 keyboardType: TextInputType.number, //กรอกเฉพาะตัวเลข
                 //obscureText: true,//ทำให้เป้น * เมื่อกรอก
                 decoration: InputDecoration(
                   labelText: 'กรอกส่วนสูง cm'
                 ),
               ),
            TextField(
              controller: txtWeight,
              keyboardType: TextInputType.number, //กรอกเฉพาะตัวเลข
              //obscureText: true,//ทำให้เป้น * เมื่อกรอก
              decoration: InputDecoration(
                  labelText: 'น้ำหนัก kg'
              ),
            ),
            ElevatedButton(onPressed: (){
               setState(() {
                 //BMI น้ำหนัก หารด้วย ส่วนสูงที่เป็นเมตรยกกำลังสอง
                 var hh2=double.parse(txtHight.text)/100;//ทำจาก cm เป็น m
                 hh2=hh2*hh2; // เอาตัวมันเองยกกำลังสอง ส่วนสูงยกกำลังสอง
                 var bmi=double.parse(txtWeight.text)/hh2;
                 if(bmi>35){
                   resultSummary=bmi.toStringAsFixed(2)+ "อ้วนมาก";
                 }
                 else if(bmi>20){
                   resultSummary=bmi.toStringAsFixed(2)+ "อ้วน";
                 }
                 else{
                   resultSummary=bmi.toStringAsFixed(2)+ "ปกติ";
                 }
                 //resultSummary=bmi.toStringAsFixed(2);//แสดงผลเป้นตัวเลข 2 ดิจิต ใช้ได้เพราะเป็น double
               });
              //print('ส่วนสูง:'+txtHight.text);
            }, child: Text('submit'))

          ],
        ),
      ),
      floatingActionButton: FloatingActionButton(
        onPressed: _incrementCounter,
        tooltip: 'Increment',
        child: const Icon(Icons.add),
      ), // This trailing comma makes auto-formatting nicer for build methods.
    );
  }
}
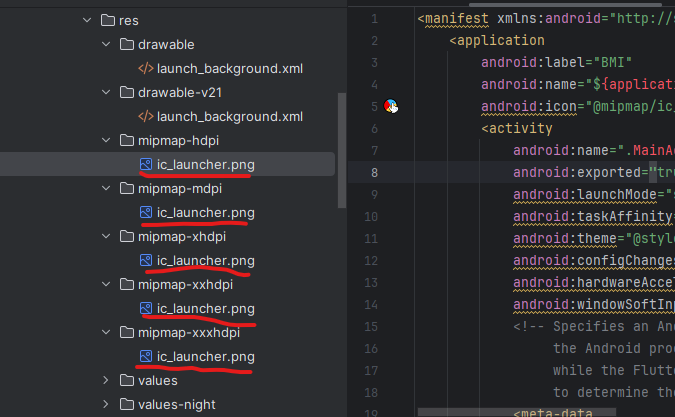
การเปลี่ยนไอคอนของแอพ ให้ไปที่โปรเจคด้านซ้ายกดเข้าไปที่ andoid->app->src->main->res->mipmap-hdpi มีประมาณ 5 โฟลเดอร์ ให้เอารูป png ขนาด 516*516 px เปลี่ยนชื่อเป็น ic_launcher.png ไปเซฟทับของเดิมทั้งหมดที่อยู่ในโฟลเดอร์ mipmap-…..
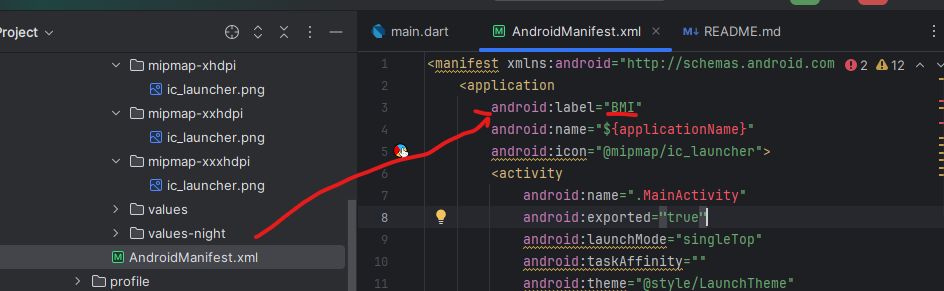
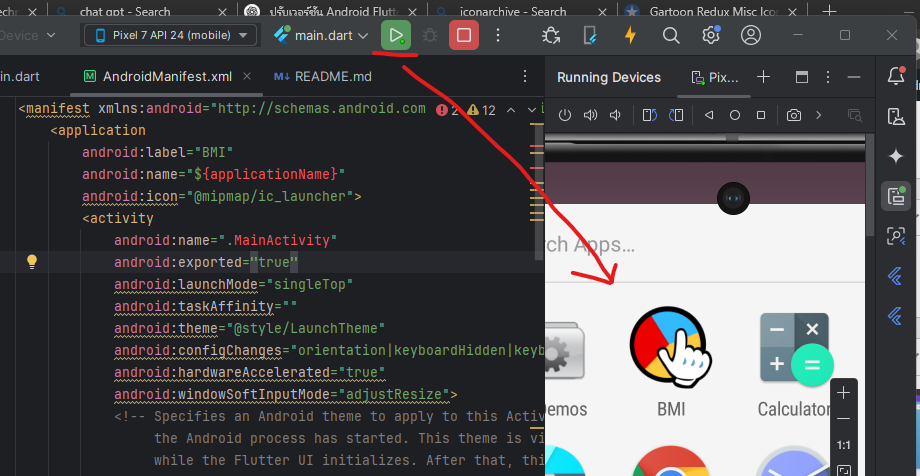
 หลังจากนั้นเปลี่ยนชื่อ app โดยเข้าไปที่ไฟล์ที่ชื่อ AndroidManifest.xml แล้วแก้ตรง Label ตามภาพ
 หลังจากนั้นกด run android
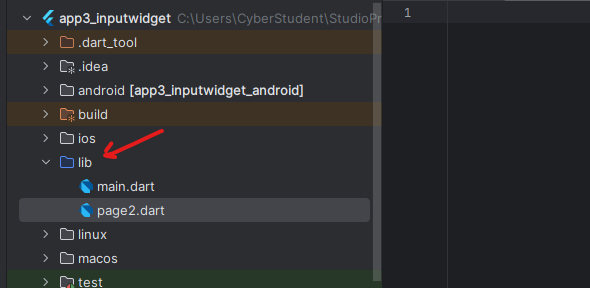
การสร้าง page2.dart โดยไปที่โฟลเดอร์ lib แล้วคลิกขวา แล้ว new dart file ตั้งชื่อว่า page2.dart
 ขั้นตอนการทำสามารถดูได้ที่ link นี้
Flutter – Page 3 – KungTee – So Ku