เอกสารประกอบการสอน  Download HTML BASIC AND CMS WORDPRESS.PDF
-
- โหลด XAMPP โดยเปิด browser แล้วพิมพ์คำว่า XAMPP แล้วเข้าไปที่ Link XAMPP Installers and Downloads for Apache Friends
- เลือก windows แล้วรอ download
- กด icon windows+e มันจะเปิด explorer แล้วเลือก xampp ที่ download มาแล้วกด install

กด next จนเสร็จสิ้น แล้วรอจนลงเสร็จ - กด start apache และ mysql
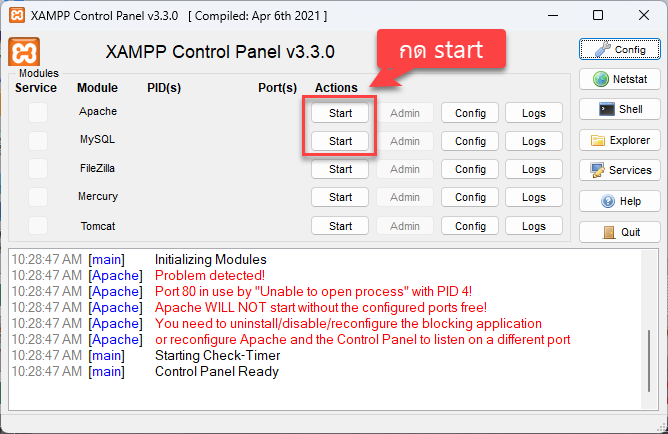
- กรณี start ไม่ได้ให้ไปกด config แล้วแก้ไข port แล้วค่อยกด start ใหม่
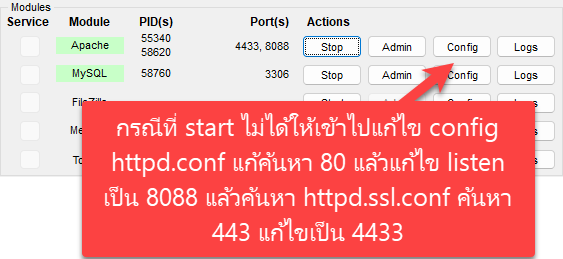
- เปิด browser ขึ้นมาแล้วพิมพ์ localhsot
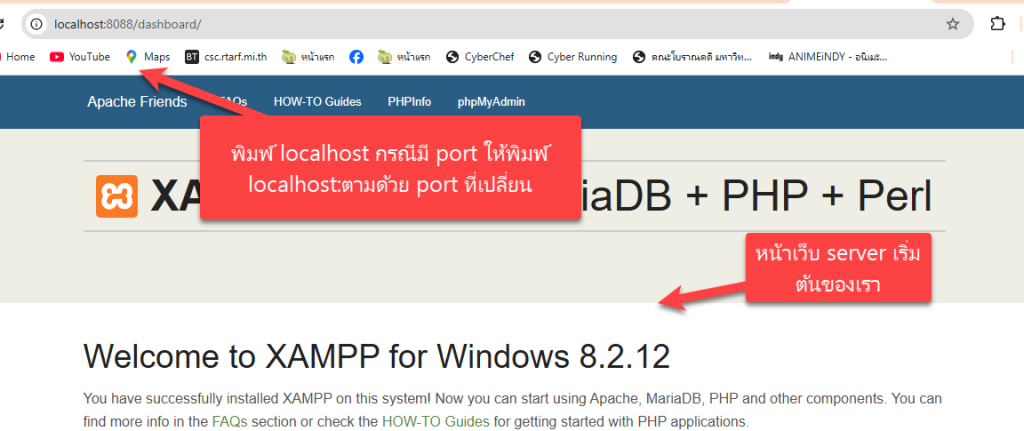
- แก้ไขหน้า dash board
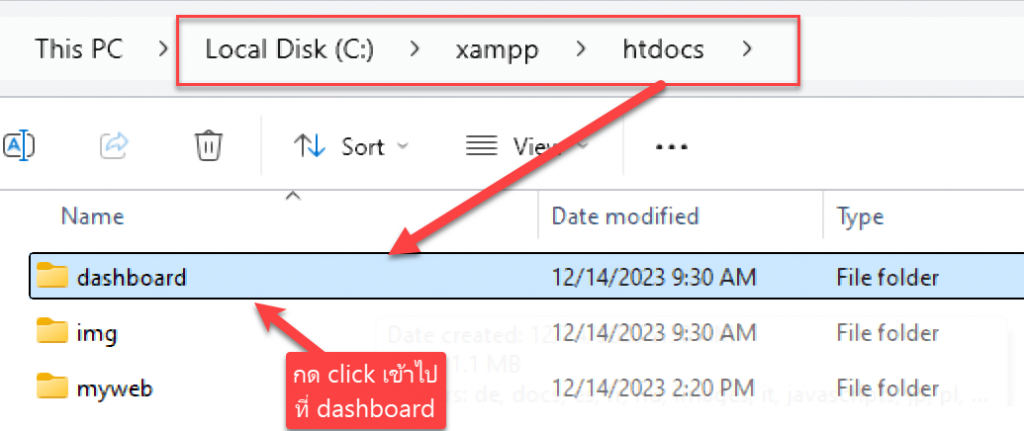
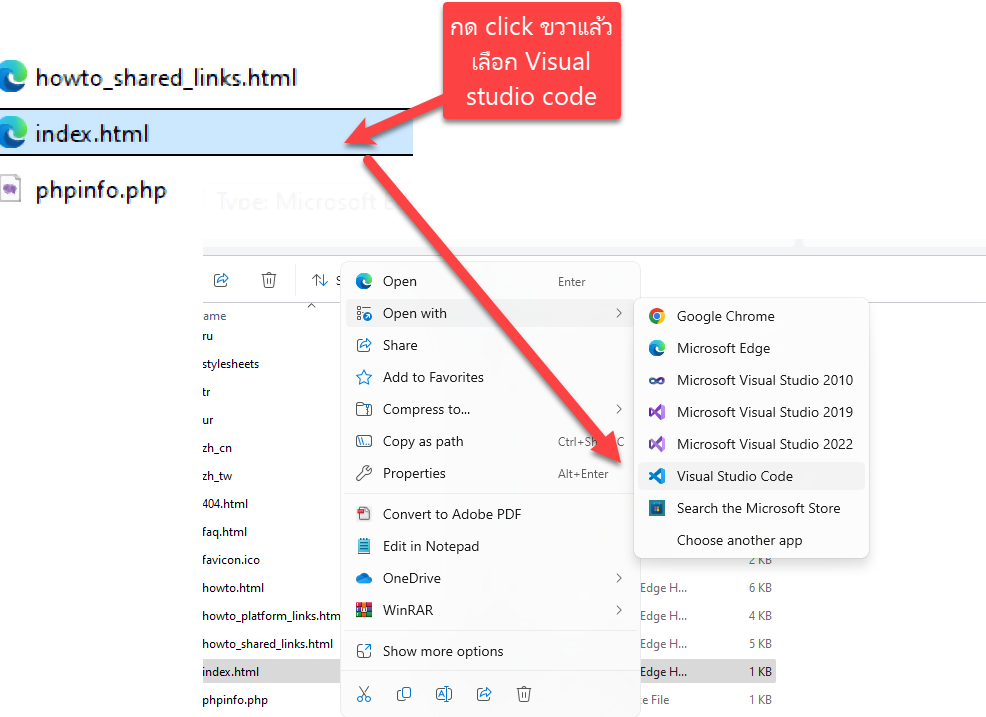
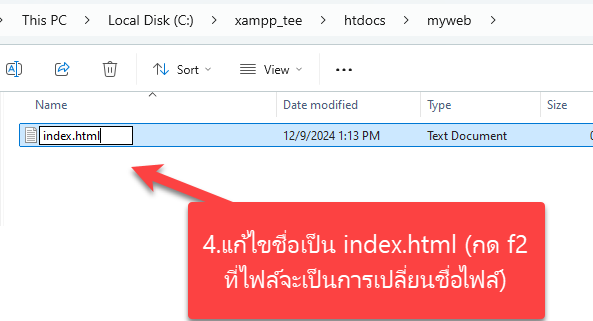
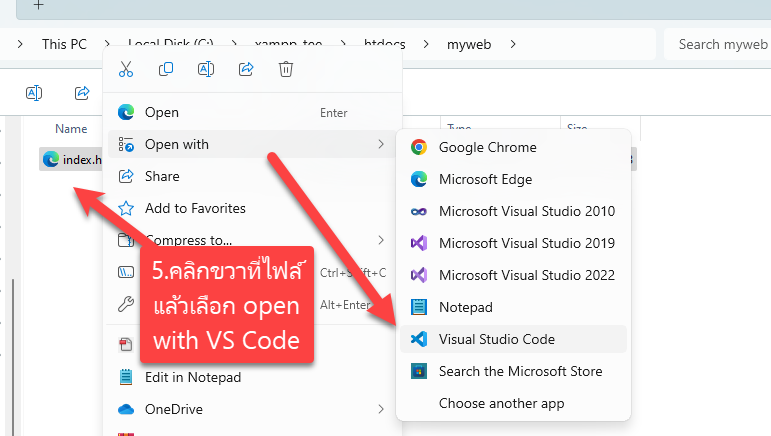
- หาไฟล์ index.html แล้วกดคลิกขวาแล้วเลือก visual studio code เปิดขึ้นมาเพื่อ edit
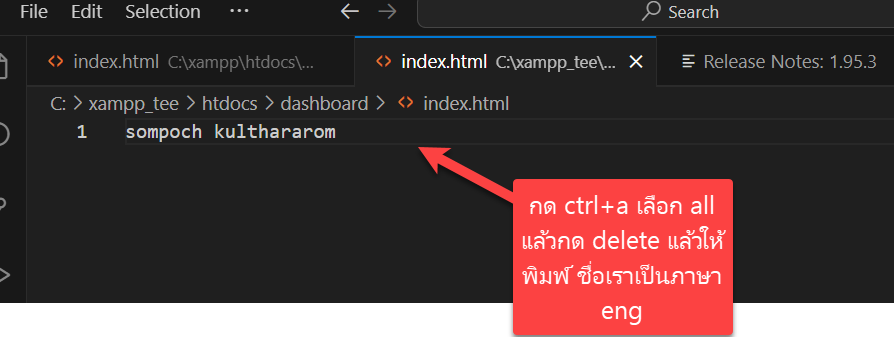
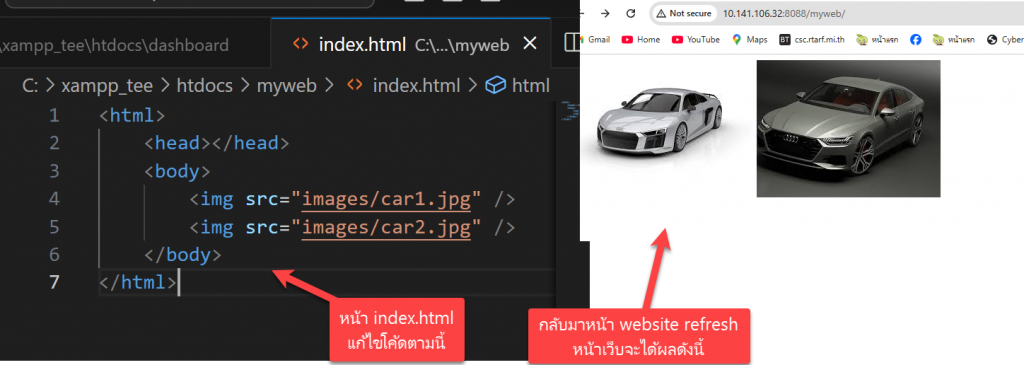
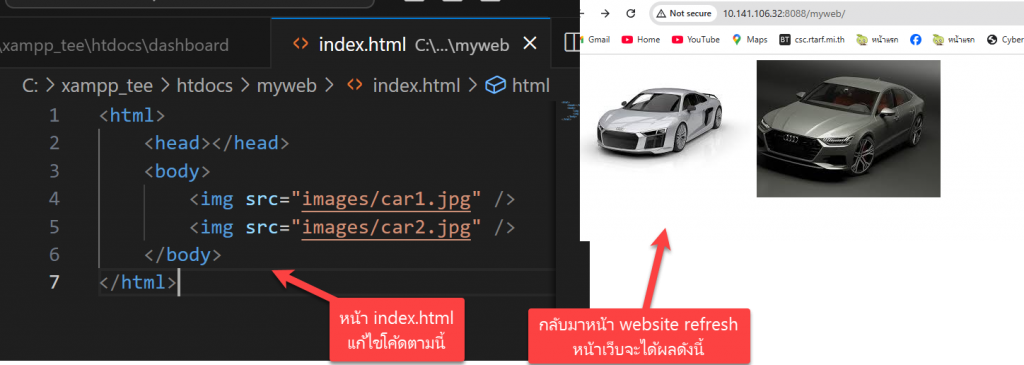
- ทำการแก้ไขไฟล index.html ดังภาพ
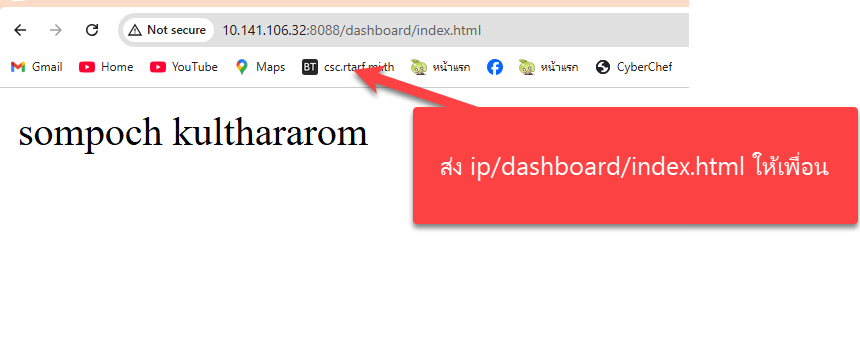
- ส่ง url เป็น ip เครื่องเราให้เพื่อน ข้างๆ ดูว่าเห็นเว็บไซต์เราหรือไม่ โดยเห็นเป็นชื่อเราดังภาพ
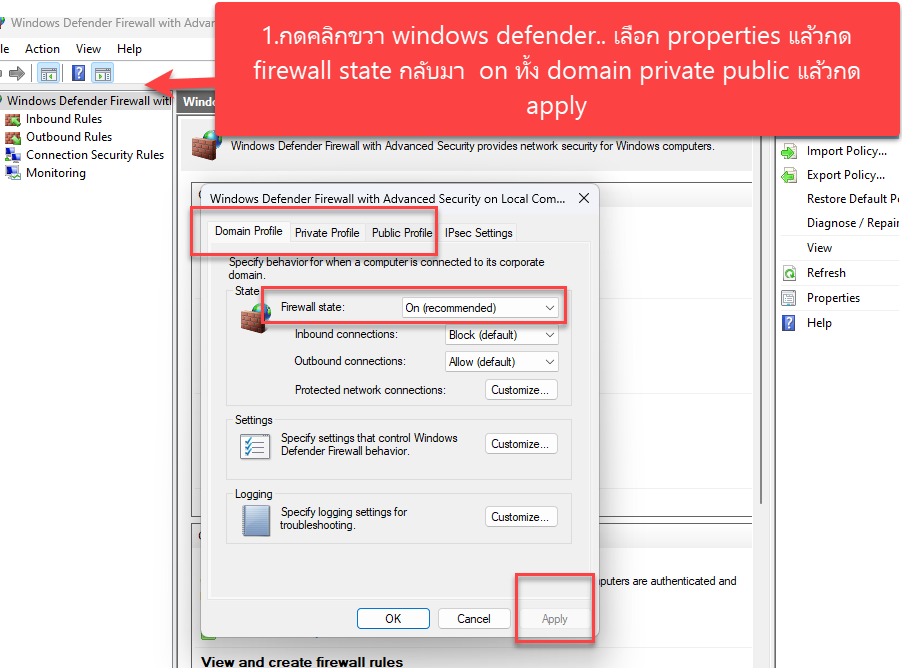
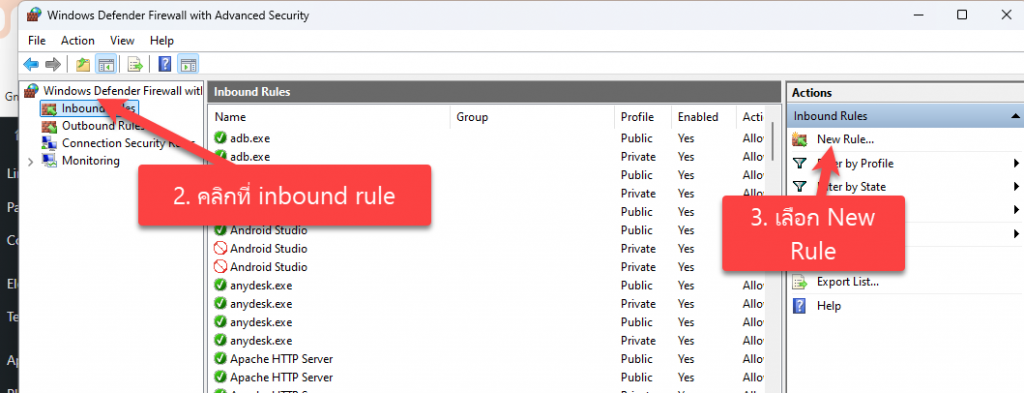
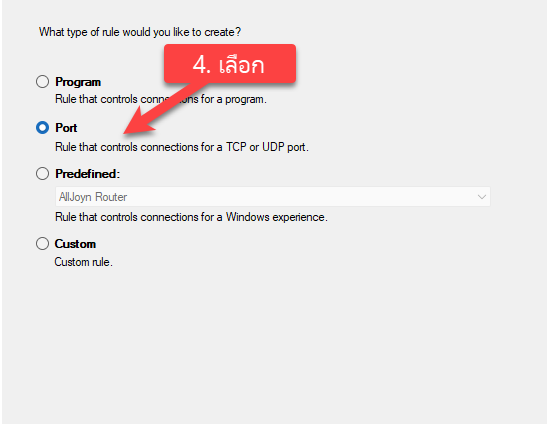
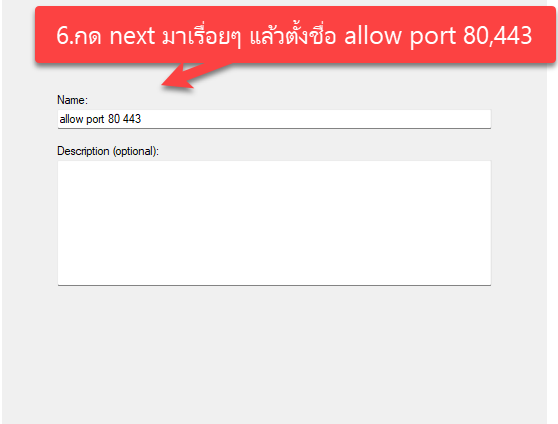
- สำหรับเครื่องเพื่อนเราที่เปิดดูเว็บเราไม่ได้ เกิดจาก advance firewall ของเครื่องก่อน
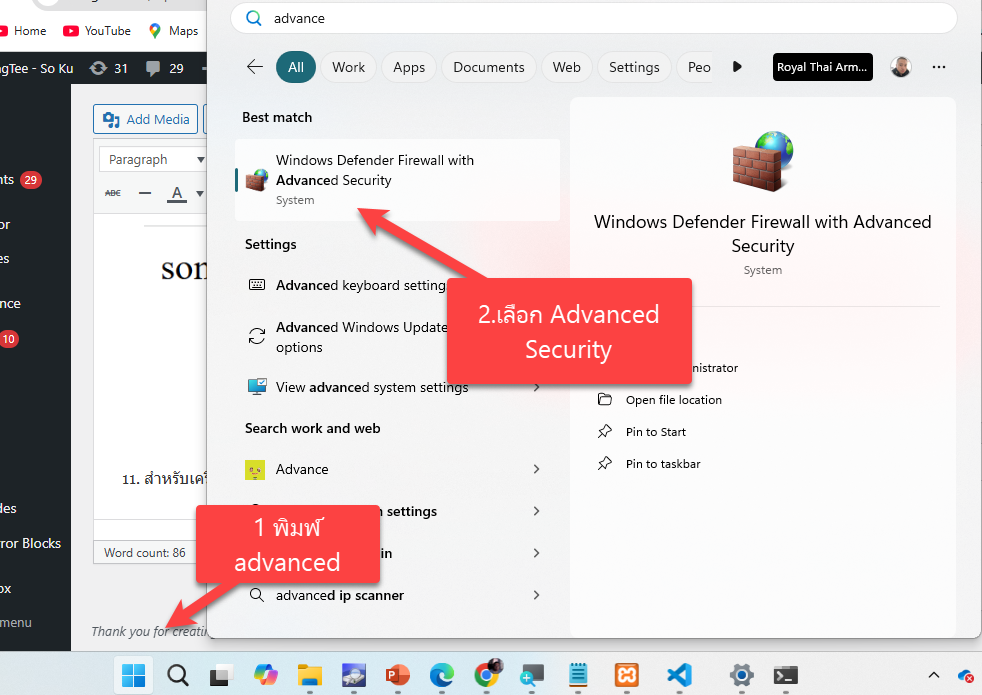
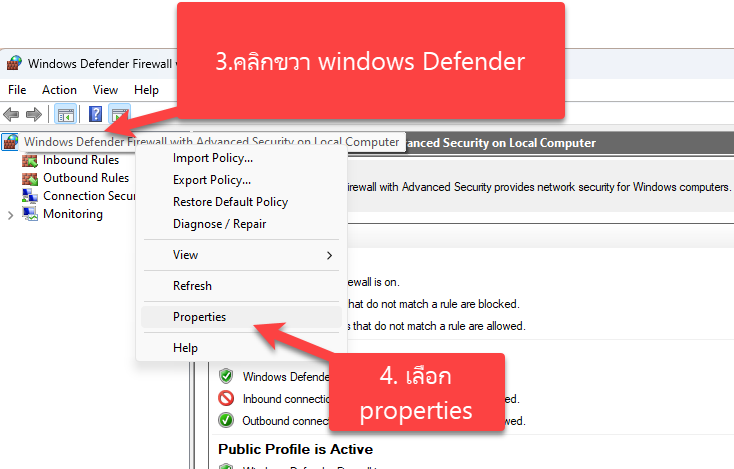
หลังจากนั้นให้เพื่อลองกด refresh หน้าเว็บที่เป็นไอพีของเราอีกรอบ ก็จะเข้าได้ แต่ไม่ควรปิด firewall แบบนี้ เพราะจะโดนมัลแวร์ได้ เพราะฉะนั้นเราควรเปิด firewall เฉพาะ port ที่ต้องการเท่านั้น
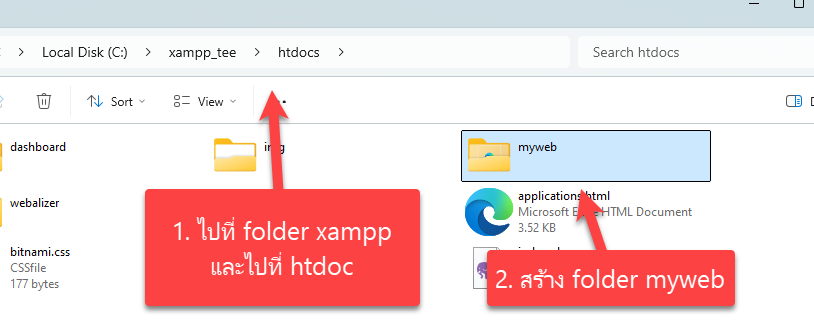
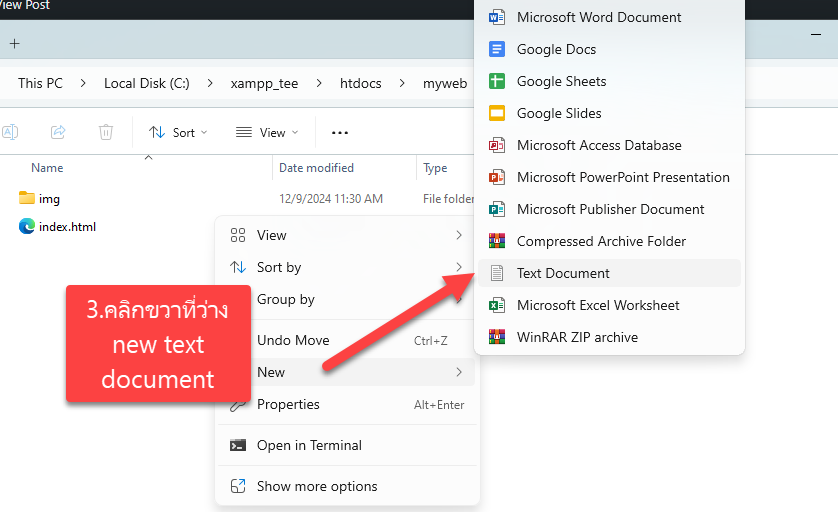
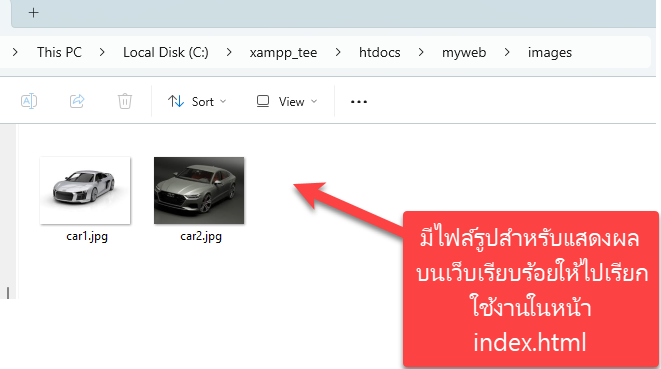
- เฉลย Lab การทำหน้าเว็บไซต์ myweb โดยให้แสดงรูปภาพ บนหน้าเว็บและไว้กึ่งกลาง

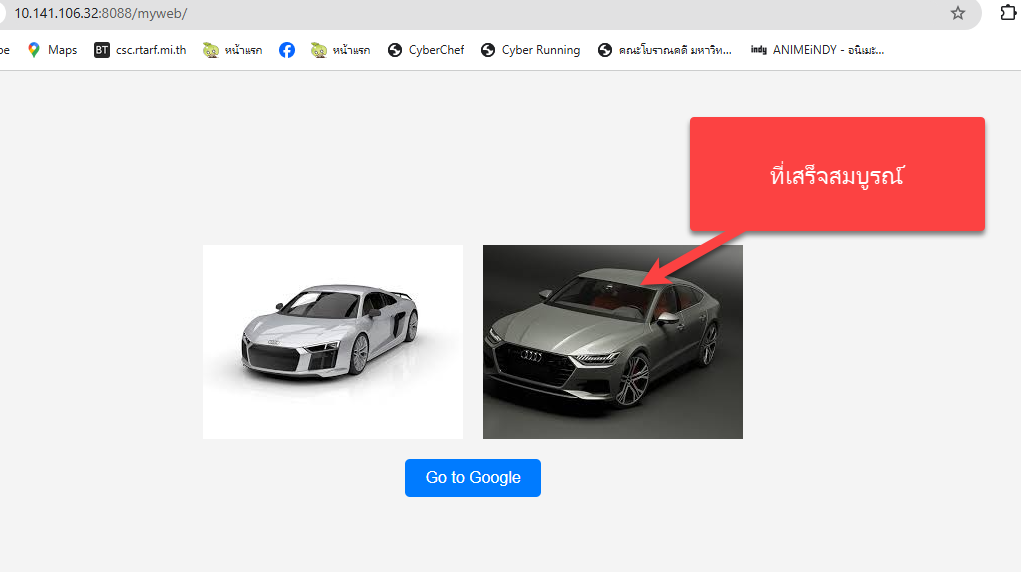
 ถ้าอยากให้รูปอยู่กึ่งกลางและมีขนาดเท่ากัน และมีปุ่มกดด้านล่าง โดยกดแล้วไปหน้า google.co.th ต้องทำยังไง
ให้ทำการ copy code ไปแปะบน chat gpt และพิมพ์สิ่งที่ต้องการลงไปดังภาพ
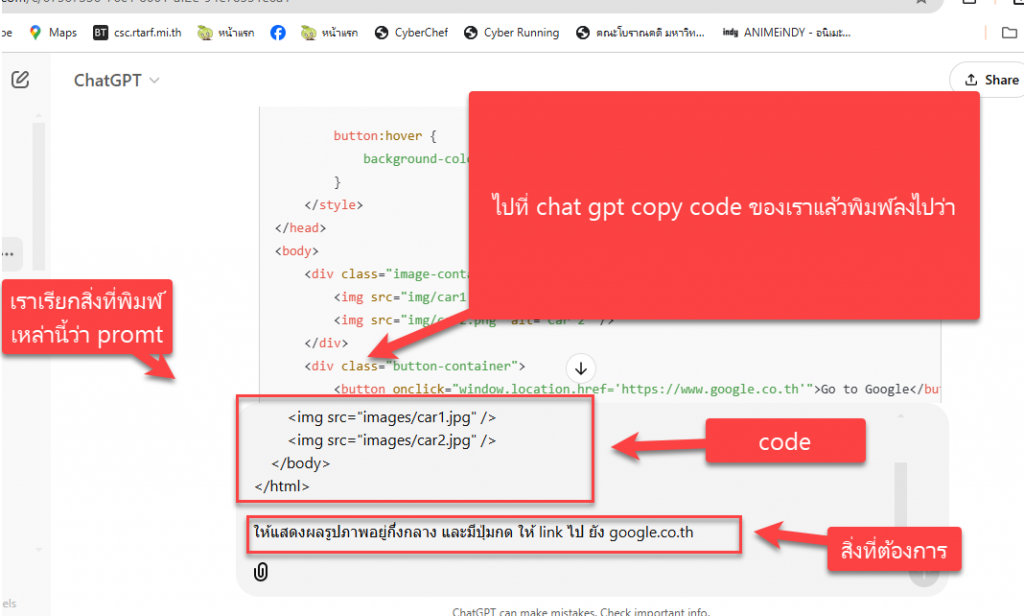
คำสั่งใน chat gpt<!DOCTYPE html> <html lang="en"> <head> <meta charset="UTF-8"> <meta name="viewport" content="width=device-width, initial-scale=1.0"> <title>Images with Button</title> <style> body { display: flex; flex-direction: column; justify-content: center; align-items: center; min-height: 100vh; margin: 0; background-color: #f4f4f4; } .image-container { display: flex; justify-content: center; margin-bottom: 20px; /* ระยะห่างระหว่างรูปภาพและปุ่ม */ } img { max-width: 100%; max-height: 80vh; /* จำกัดขนาดสูงสุดของภาพรวม */ object-fit: contain; margin: 0 10px; } .button-container { text-align: center; } button { padding: 10px 20px; font-size: 16px; color: white; background-color: #007BFF; border: none; border-radius: 5px; cursor: pointer; transition: background-color 0.3s ease; } button:hover { background-color: #0056b3; } </style> </head> <body> <div class="image-container"> <img src="images/car1.jpg" alt="Car 1" /> <img src="images/car2.jpg" alt="Car 2" /> </div> <div class="button-container"> <button onclick="window.location.href='https://www.google.co.th'">Go to Google</button> </div> </body> </html> อยากให้เวลากดรูปภาพแล้ว ให้แสดงรูปภาพแบบ fade ขึ้นมาเป็นรูปใหญ่ๆ
โค้ดที่ได้จาก Chat GPT สมบูรณ์
<!DOCTYPE html>
<html lang="en">
<head>
    <meta charset="UTF-8">
    <meta name="viewport" content="width=device-width, initial-scale=1.0">
    <title>Images with Modal</title>
    <style>
        body {
            display: flex;
            flex-direction: column;
            justify-content: center;
            align-items: center;
            min-height: 100vh;
            margin: 0;
            background-color: #f4f4f4;
        }

        .image-container {
            display: flex;
            justify-content: center;
            margin-bottom: 20px; /* ระยะห่างระหว่างรูปภาพและปุ่ม */
        }

        img {
            max-width: 100%;
            max-height: 80vh; /* จำกัดขนาดสูงสุดของภาพรวม */
            object-fit: contain;
            margin: 0 10px;
            cursor: pointer; /* เปลี่ยนเป็นมือเมื่อวางเมาส์ */
            transition: transform 0.3s ease;
        }

        img:hover {
            transform: scale(1.05); /* ขยายเล็กน้อยเมื่อวางเมาส์ */
        }

        .button-container {
            text-align: center;
        }

        button {
            padding: 10px 20px;
            font-size: 16px;
            color: white;
            background-color: #007BFF;
            border: none;
            border-radius: 5px;
            cursor: pointer;
            transition: background-color 0.3s ease;
        }

        button:hover {
            background-color: #0056b3;
        }

        /* Modal Style */
        .modal {
            display: none; /* ซ่อนโมดอลเริ่มต้น */
            position: fixed;
            top: 0;
            left: 0;
            width: 100%;
            height: 100%;
            background-color: rgba(0, 0, 0, 0.8);
            justify-content: center;
            align-items: center;
            animation: fadeIn 0.3s ease;
        }

        .modal img {
            max-width: 90%;
            max-height: 90%;
            object-fit: contain;
            border: 5px solid white;
        }

        .modal.show {
            display: flex;
        }

        @keyframes fadeIn {
            from {
                opacity: 0;
            }
            to {
                opacity: 1;
            }
        }
    </style>
</head>
<body>
    <div class="image-container">
        <img src="images/car1.jpg" alt="Car 1" onclick="openModal(this.src)" />
        <img src="images/car2.jpg" alt="Car 2" onclick="openModal(this.src)" />
    </div>
    <div class="button-container">
        <button onclick="window.location.href='https://www.google.co.th'">Go to Google</button>
    </div>

    <!-- Modal -->
    <div class="modal" id="modal">
        <img id="modalImage" alt="Full View" />
    </div>

    <script>
        const modal = document.getElementById('modal');
        const modalImage = document.getElementById('modalImage');

        function openModal(src) {
            modalImage.src = src; // ตั้งค่ารูปในโมดอล
            modal.classList.add('show'); // แสดงโมดอล
        }

        // ปิดโมดอลเมื่อคลิกที่พื้นที่ด้านนอก
        modal.onclick = function () {
            modal.classList.remove('show');
        };
    </script>
</body>
</html>

