- เปิด android studio – > new flutter project
- ตั้งชื่อ fluttergui
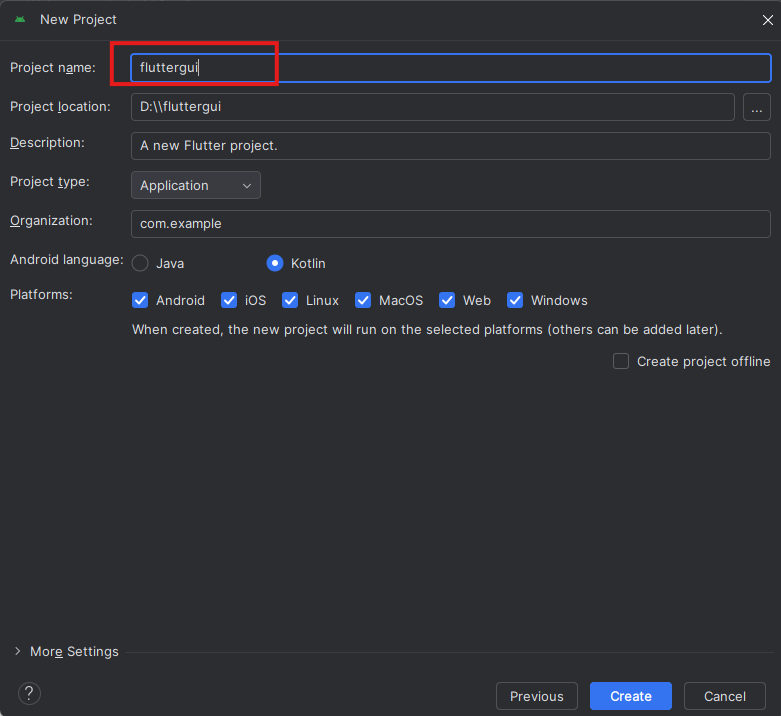 แล้วกดสร้าง Create
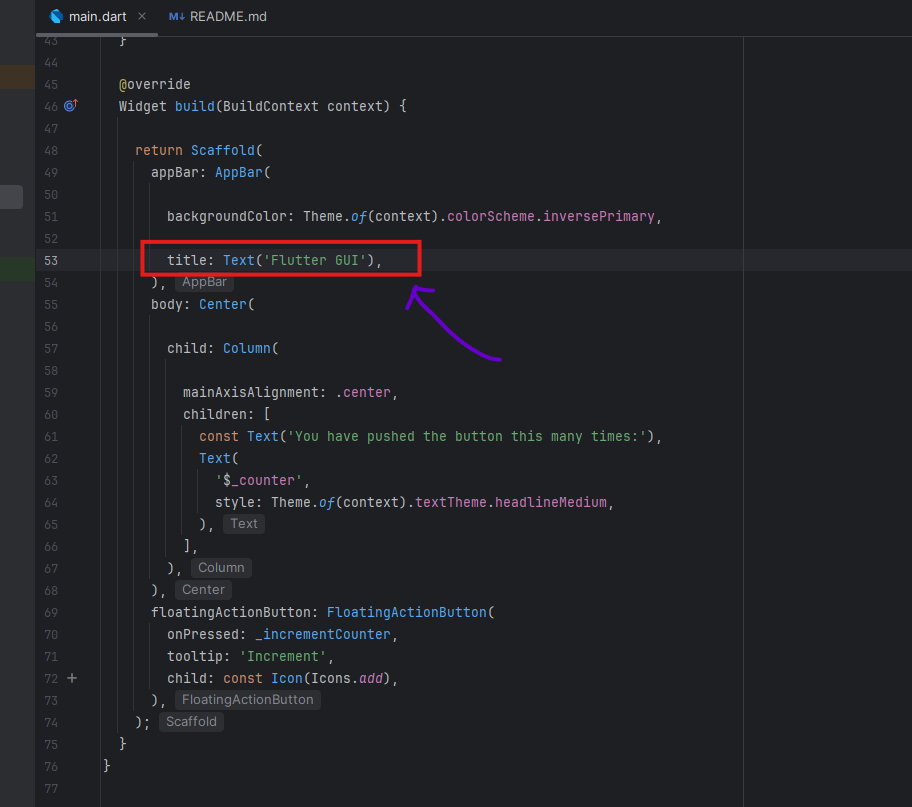
 - เปิดไฟล์ main.dart เพื่อแก้โค้ด
เริ่มแก้ที่ title ตามภาพ
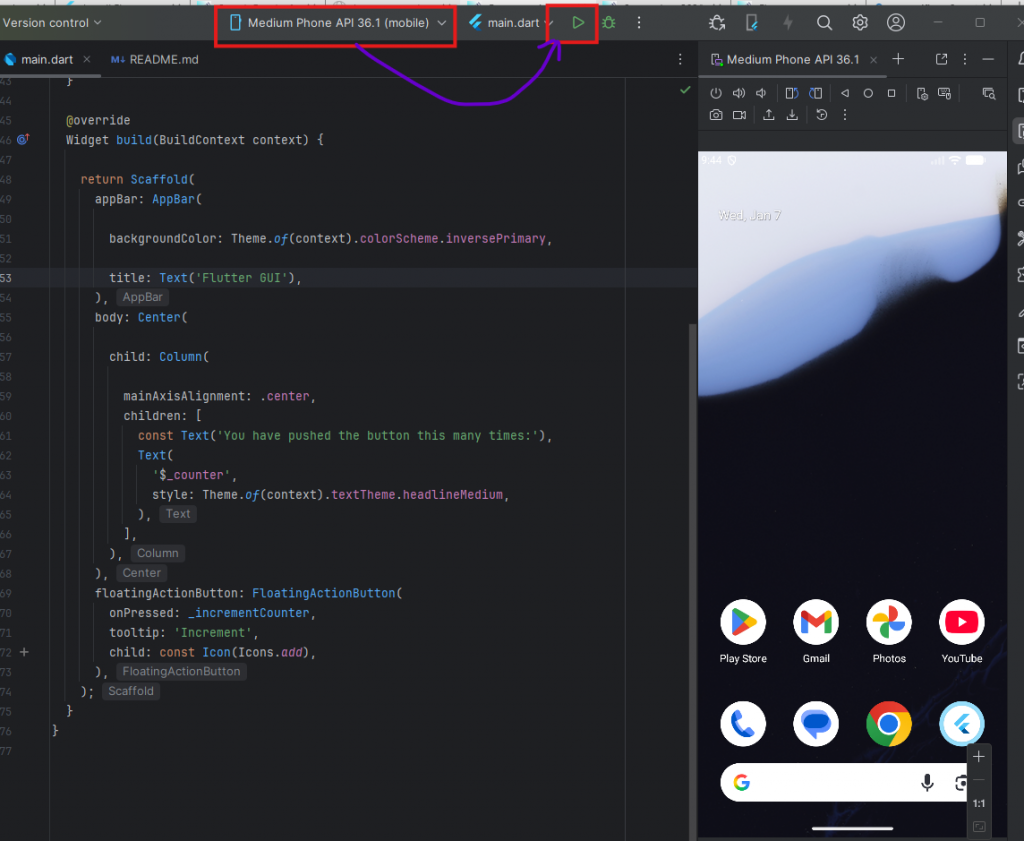
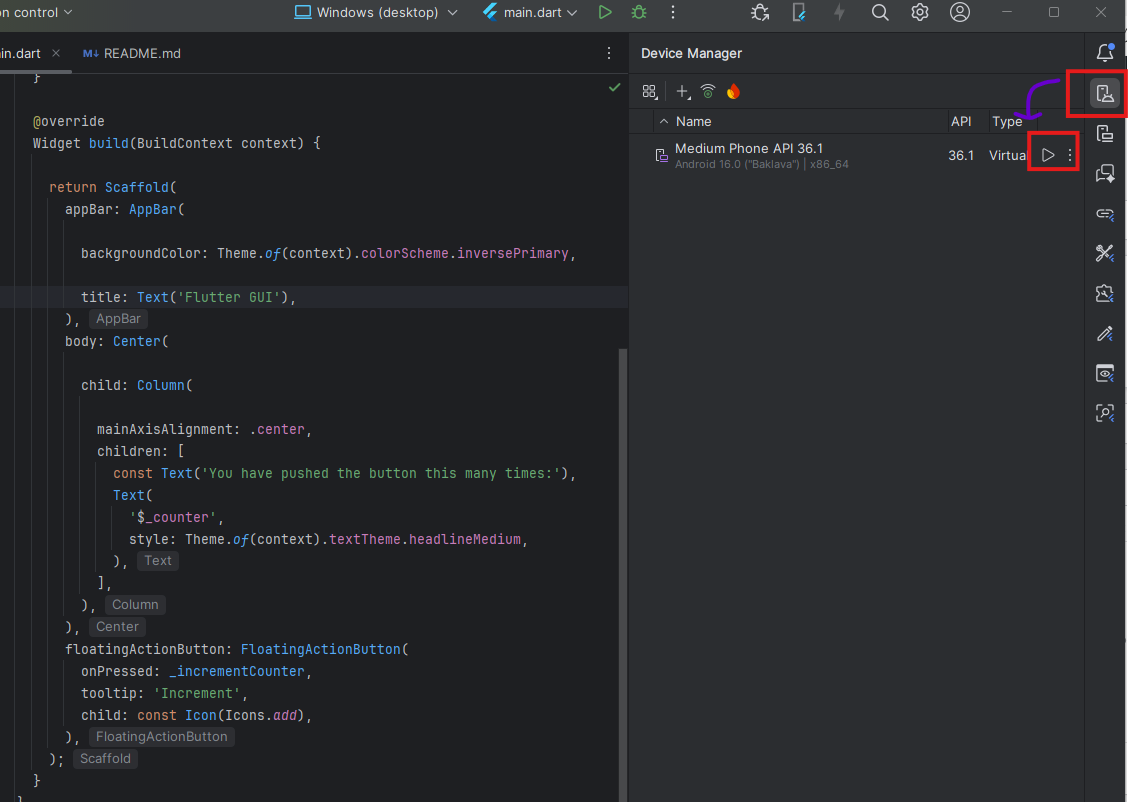
- ทำการเปิด android device manager ทำการ start emulator

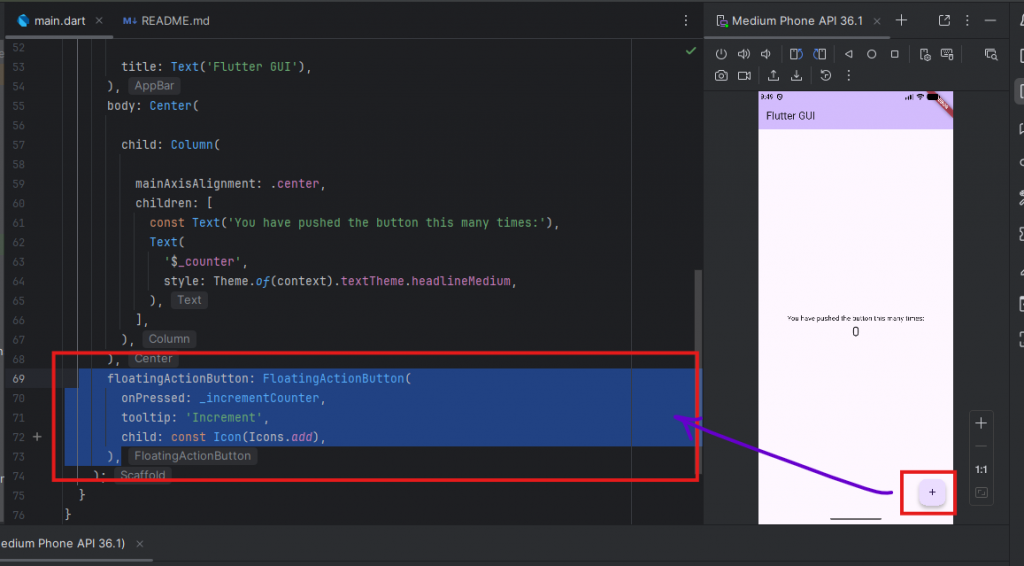
- แก้ไขโค้ด main.dart
ลบปุ่ม floatingaction button ทิ้งไป
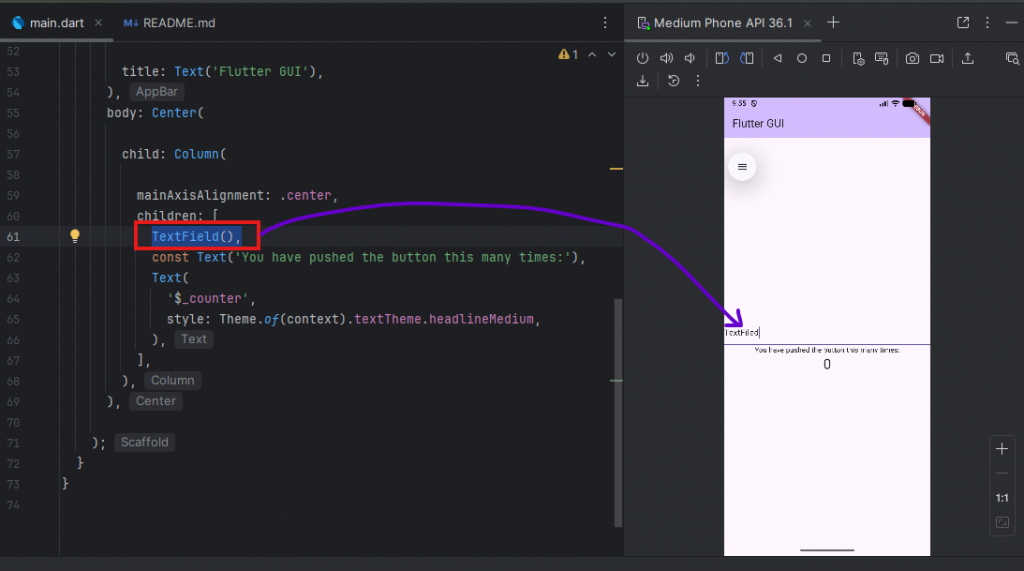
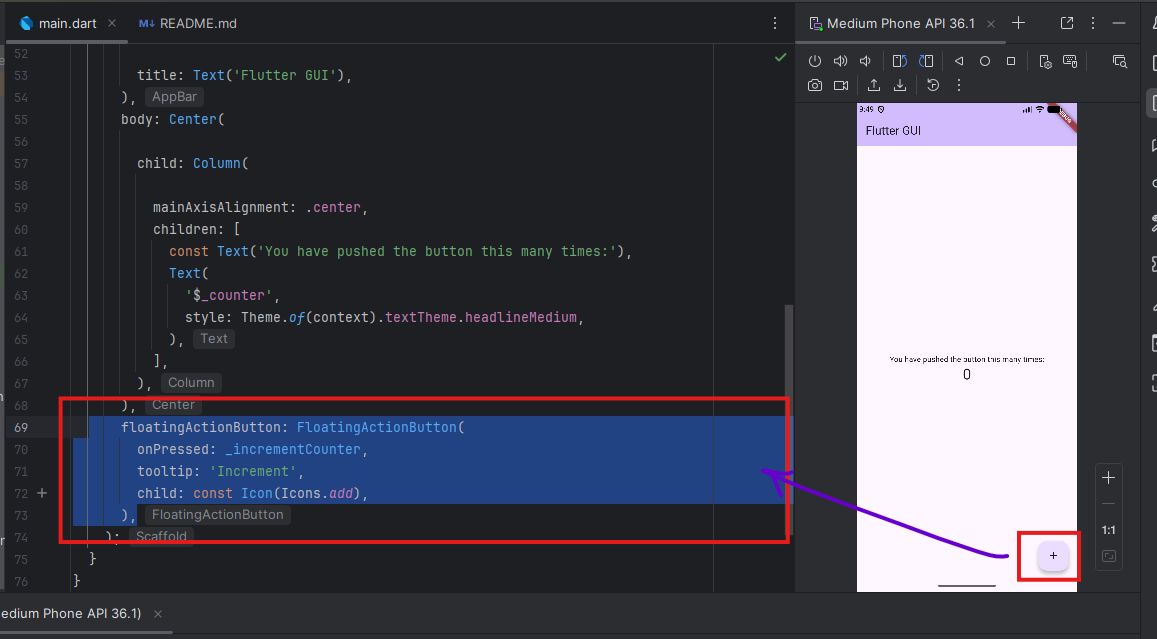
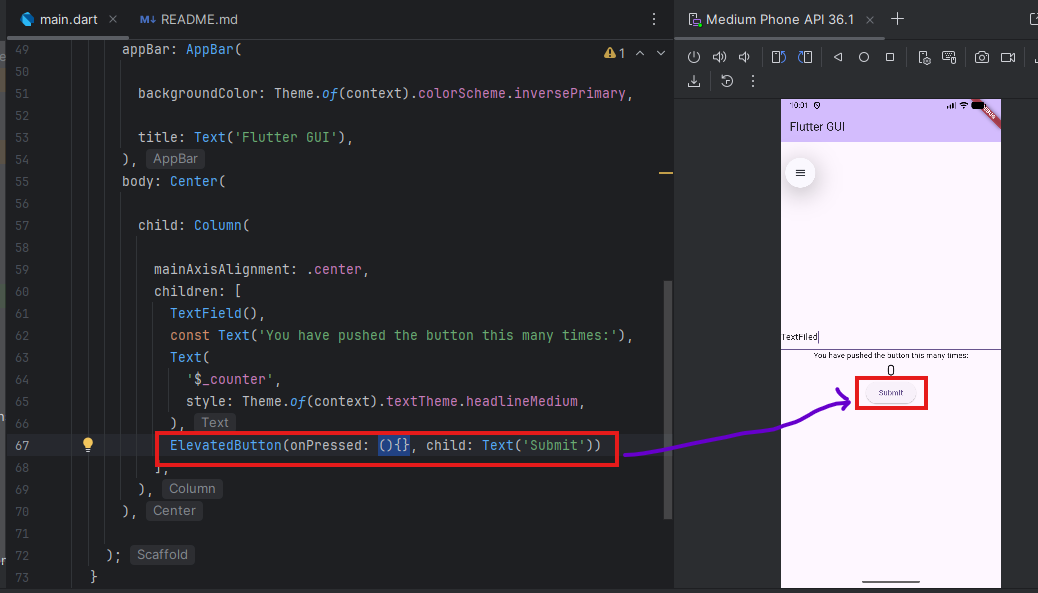
- สร้าง textfiled รับค่า input keyboard
- สร้างปุ่ม submit ดังภาพ

import 'package:flutter/material.dart'; void main() { runApp(const MyApp()); } class MyApp extends StatelessWidget { const MyApp({super.key}); // This widget is the root of your application. @override Widget build(BuildContext context) { return MaterialApp( title: 'Flutter Demo', theme: ThemeData( colorScheme: .fromSeed(seedColor: Colors.deepPurple), ), home: const MyHomePage(title: 'Flutter Demo Home Page'), ); } } class MyHomePage extends StatefulWidget { const MyHomePage({super.key, required this.title}); final String title; @override State<MyHomePage> createState() => _MyHomePageState(); } class _MyHomePageState extends State<MyHomePage> { int _counter = 0; void _incrementCounter() { setState(() { _counter++; }); } @override Widget build(BuildContext context) { return Scaffold( appBar: AppBar( backgroundColor: Theme.of(context).colorScheme.inversePrimary, title: Text('Flutter GUI'), ), body: Center( child: Column( mainAxisAlignment: .center, children: [ TextField(), const Text('You have pushed the button this many times:'), Text( '$_counter', style: Theme.of(context).textTheme.headlineMedium, ), ElevatedButton(onPressed: (){}, child: Text('Submit')) ], ), ), ); } } - จะทำฟังชั่นสำหรับสั่งให้กดปุ่ม แล้วเริ่มการคำนวนเอา input ที่กรอกมาแสดงค่า
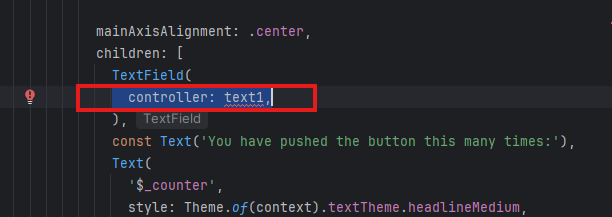
ทำการเพิ่ม controller ใน textfield ตามภาพ
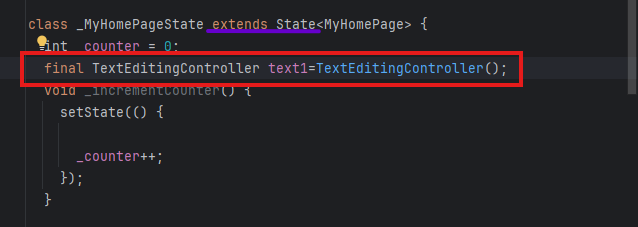
 จะ error ว่า text1 ไม่มี จะต้องไปสร้างตัวแปร text1 ใน extend state (เลื่อนโค้ดไปด้านบนหา extends State ตามภาพด้านล่าง)
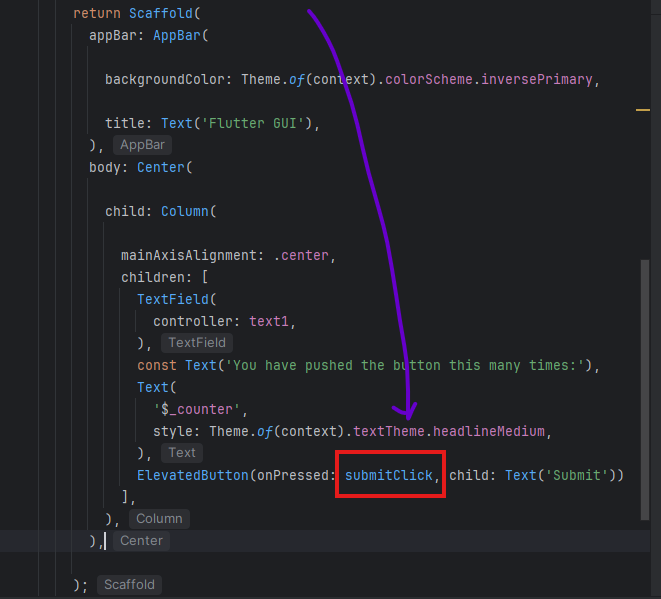
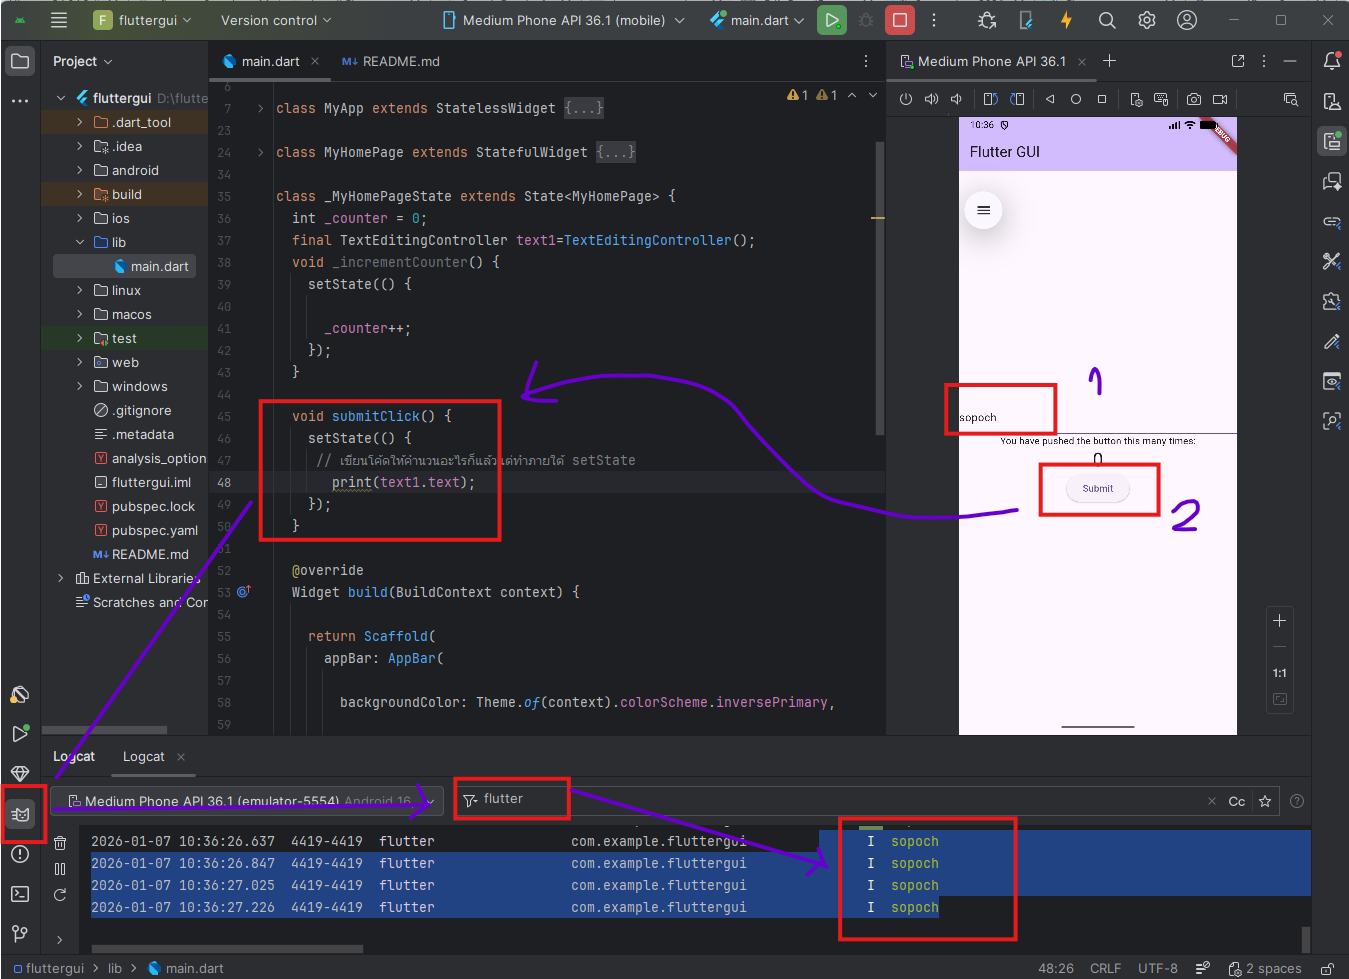
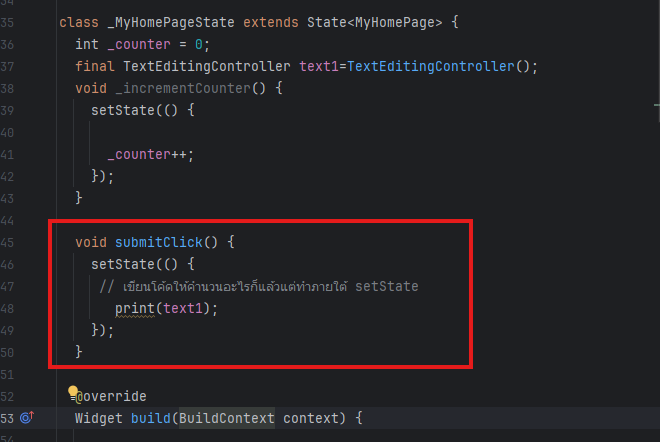 copy ชื่อ submitClick ไปแล้วเอาไปวางใน ElevatedButton ด้านล่างตามภาพ
import 'package:flutter/material.dart'; void main() { runApp(const MyApp()); } class MyApp extends StatelessWidget { const MyApp({super.key}); // This widget is the root of your application. @override Widget build(BuildContext context) { return MaterialApp( title: 'Flutter Demo', theme: ThemeData( colorScheme: .fromSeed(seedColor: Colors.deepPurple), ), home: const MyHomePage(title: 'Flutter Demo Home Page'), ); } } class MyHomePage extends StatefulWidget { const MyHomePage({super.key, required this.title}); final String title; @override State<MyHomePage> createState() => _MyHomePageState(); } class _MyHomePageState extends State<MyHomePage> { int _counter = 0; final TextEditingController text1=TextEditingController(); void _incrementCounter() { setState(() { _counter++; }); } void submitClick() { setState(() { // เขียนโค้ดให้คำนวนอะไรก็แล้วแต่ทำภายใต้ setState print(text1.text); }); } @override Widget build(BuildContext context) { return Scaffold( appBar: AppBar( backgroundColor: Theme.of(context).colorScheme.inversePrimary, title: Text('Flutter GUI'), ), body: Center( child: Column( mainAxisAlignment: .center, children: [ TextField( controller: text1, ), const Text('You have pushed the button this many times:'), Text( '$_counter', style: Theme.of(context).textTheme.headlineMedium, ), ElevatedButton(onPressed: submitClick, child: Text('Submit')) ], ), ), ); } } - ทดสอบกดปุ่มและ monitor log ว่าเกิดอะไรขึ้นในคำสั่ง print จะได้ตามภาพ

- การตกแต่งความสวยงามของ widget หรือ element ที่แสดงบนหน้าจอ
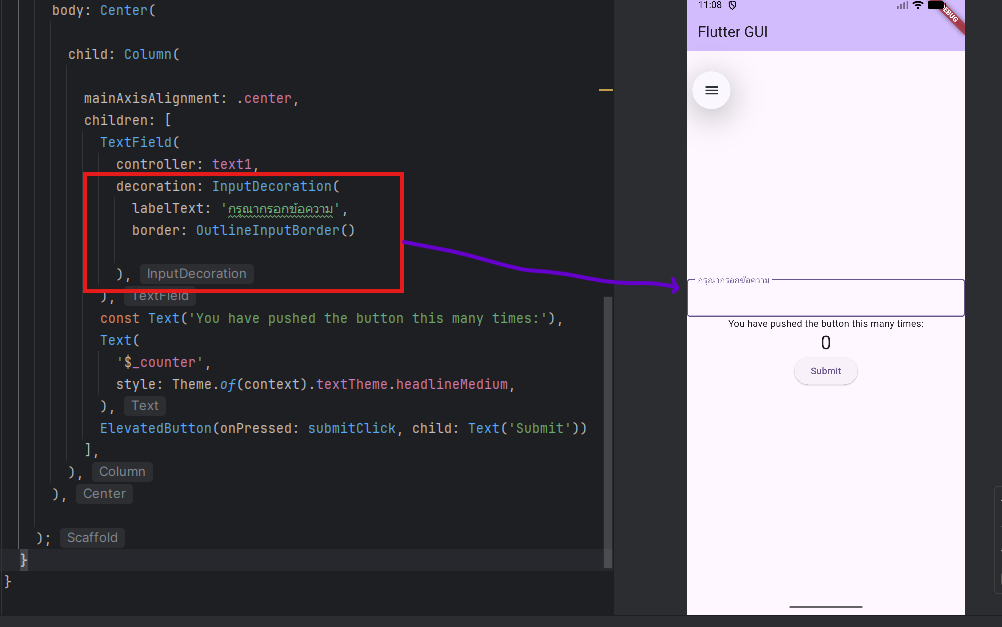
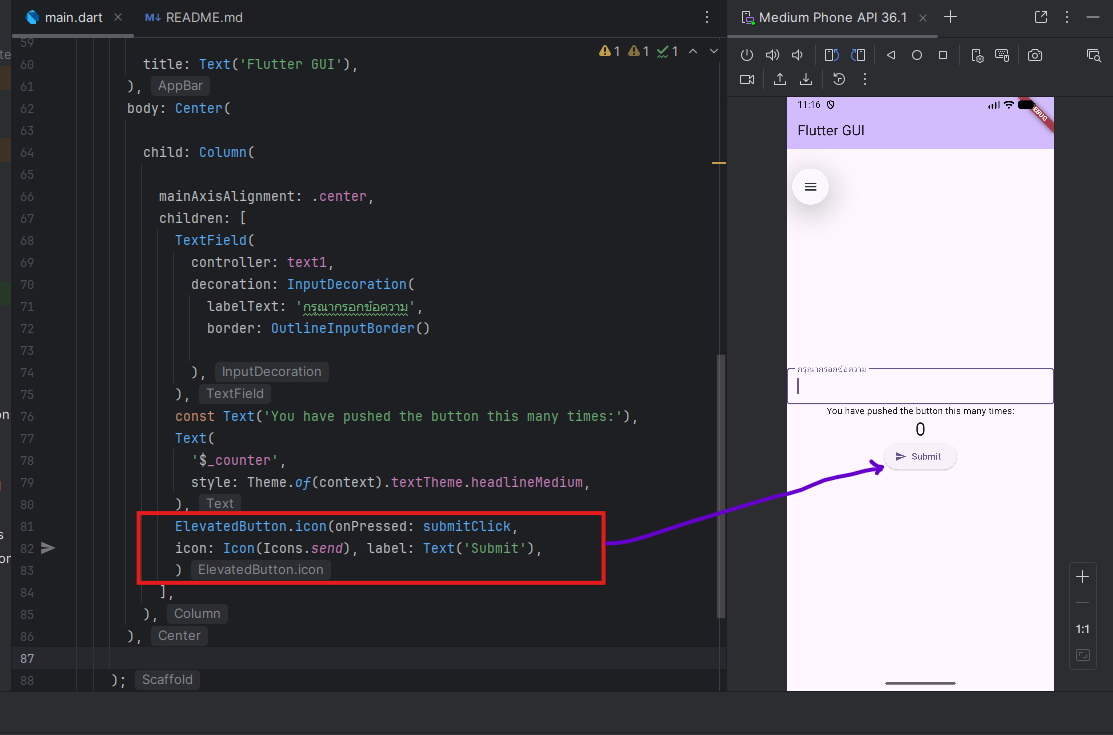
ตกแต่ง textfield
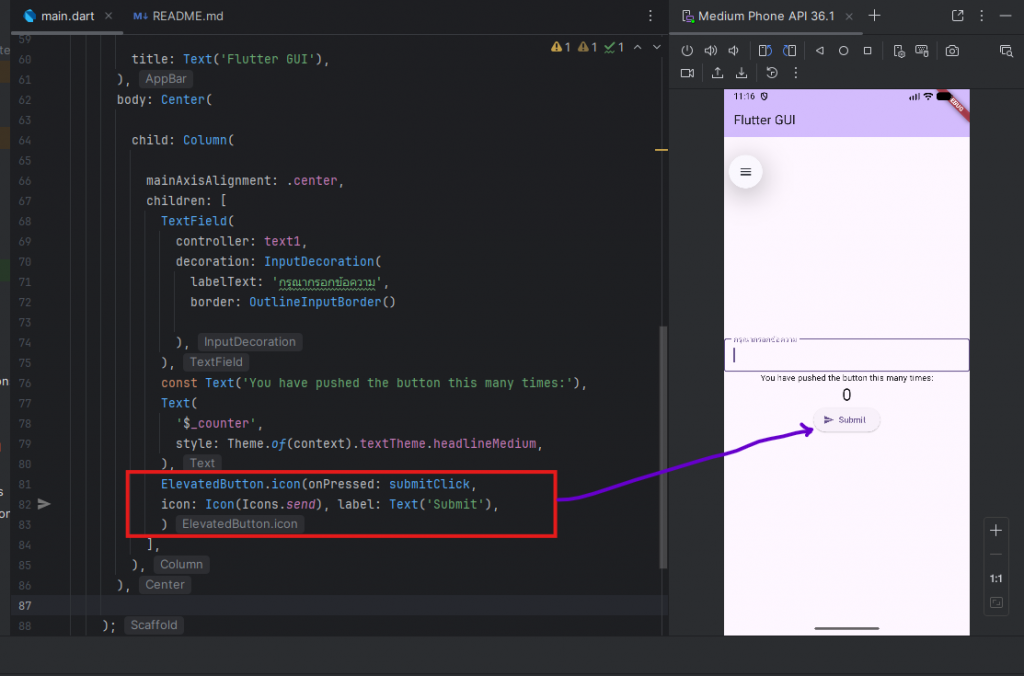
 แก้ปุ่ม button ให้มี icon ตามภาพ
- การใช้ Messagebox DialogBox
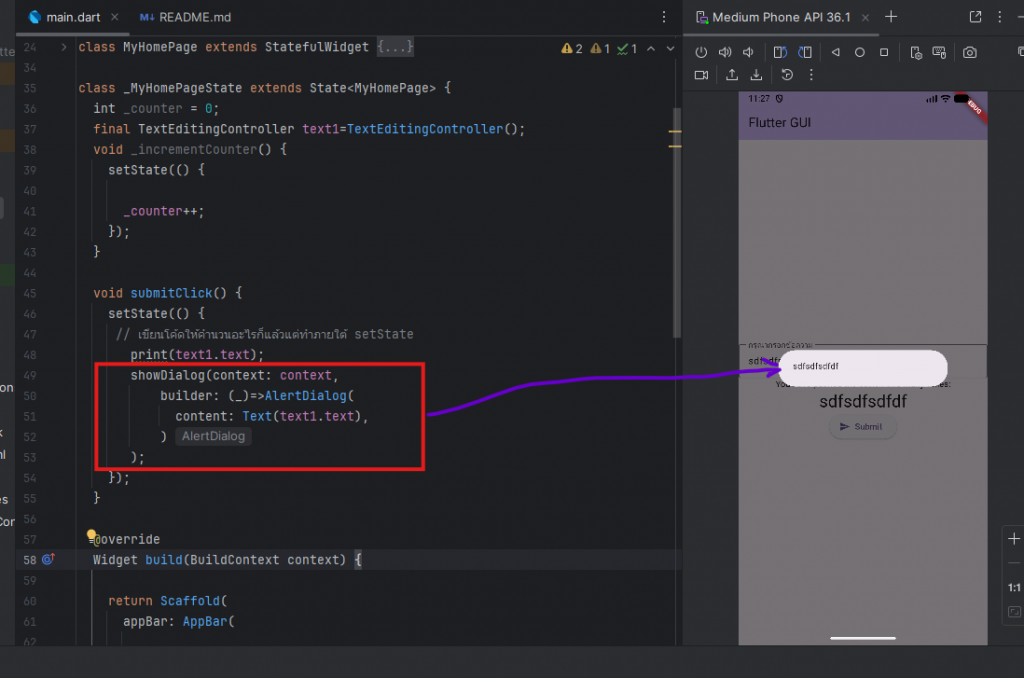 Code ทั้งหมด
import 'package:flutter/material.dart'; void main() { runApp(const MyApp()); } class MyApp extends StatelessWidget { const MyApp({super.key}); // This widget is the root of your application. @override Widget build(BuildContext context) { return MaterialApp( title: 'Flutter Demo', theme: ThemeData( colorScheme: .fromSeed(seedColor: Colors.deepPurple), ), home: const MyHomePage(title: 'Flutter Demo Home Page'), ); } } class MyHomePage extends StatefulWidget { const MyHomePage({super.key, required this.title}); final String title; @override State<MyHomePage> createState() => _MyHomePageState(); } class _MyHomePageState extends State<MyHomePage> { int _counter = 0; final TextEditingController text1=TextEditingController(); void _incrementCounter() { setState(() { _counter++; }); } void submitClick() { setState(() { // เขียนโค้ดให้คำนวนอะไรก็แล้วแต่ทำภายใต้ setState print(text1.text); showDialog(context: context, builder: (_)=>AlertDialog( content: Text(text1.text), ) ); }); } @override Widget build(BuildContext context) { return Scaffold( appBar: AppBar( backgroundColor: Theme.of(context).colorScheme.inversePrimary, title: Text('Flutter GUI'), ), body: Center( child: Column( mainAxisAlignment: .center, children: [ TextField( controller: text1, decoration: InputDecoration( labelText: 'กรุณากรอกข้อความ', border: OutlineInputBorder() ), ), const Text('You have pushed the button this many times:'), Text( text1.text, style: Theme.of(context).textTheme.headlineMedium, ), ElevatedButton.icon(onPressed: submitClick, icon: Icon(Icons.send), label: Text('Submit'), ) ], ), ), ); } } - ปิด logo debug บน flutter (กรณีที่ทำแอพเสร็จแล้วต้องการนำไปใช้งานเอาภาพคำว่า debug ขวาบนของแอพออก)
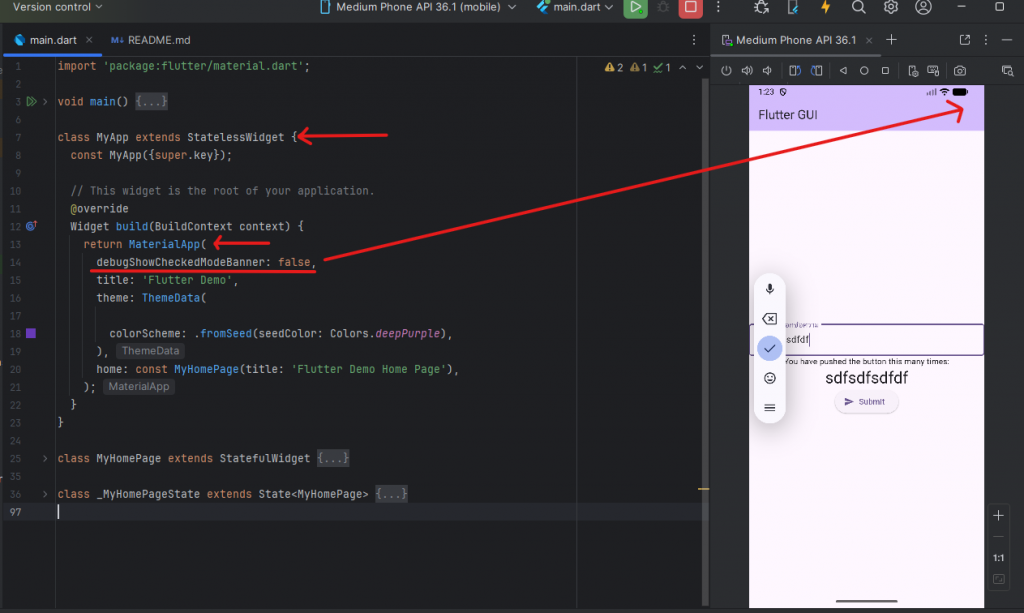 เพิ่ม code ลงไปในส่วน MaterailApp(
debugShowCheckedModeBanner: false,
ตามภาพด้านบน
- ทำ Logo App
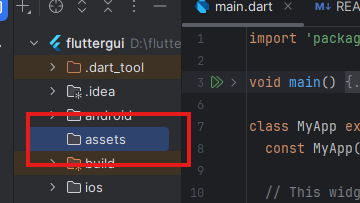
ทำการหารูปแล้วนำไปไว้ใน folder asset ใน android studio project ที่กำลังสร้าง แต่ปรากฏว่าเรายังไม่มี folder นี้ก็ให้สร้างขึ้นมาก่อน
ไปที่ project คลิกขวาที่ชื่อ project แล้วเลือก new แล้วเลือก directory แล้วตั้งชื่อว่า assets
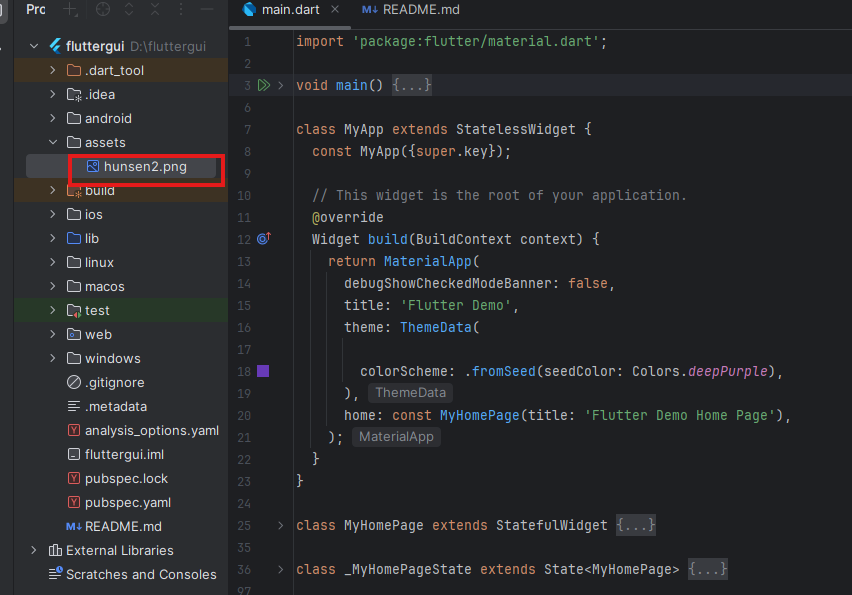
เอาภาพที่ต้องการทำ logo มาวางใน folder assets ที่สร้าง
 ไปแก้ไขโค้ดในไฟล์ pubspec.yaml
เปิดการใช้งาน folder assets ตามภาพ
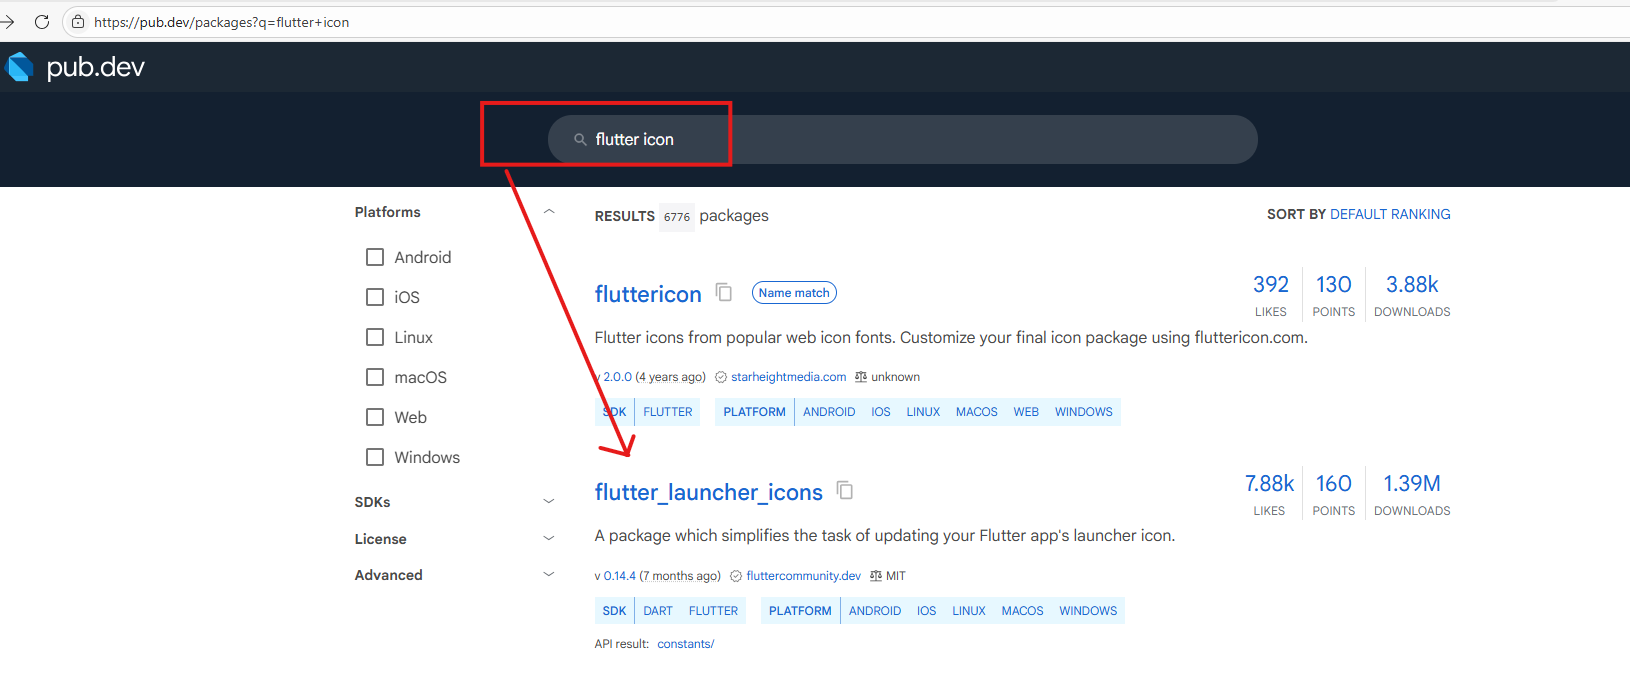
 เพิ่มการเรียกใช้งาน flutter icon โดยใช้ plugin จากเว็บ pub.dev แล้วค้นหาคำว่า flutter icon

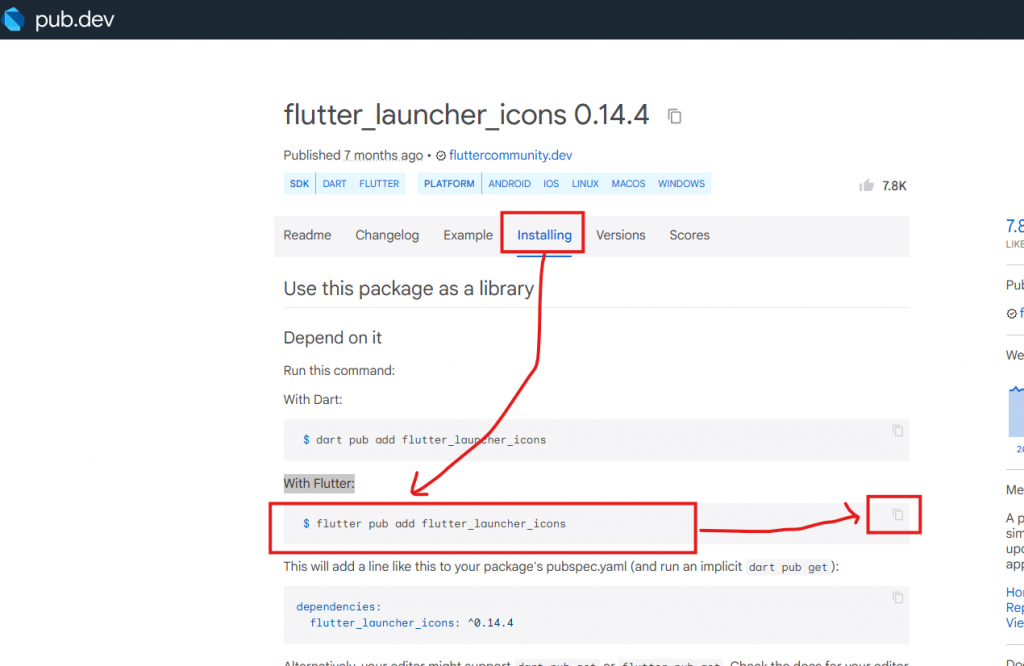 กลับมาที่ android studio ใน project ของเรา ให้เปิด terminal แล้วเอาคำสั่งที่ copy มาวาง
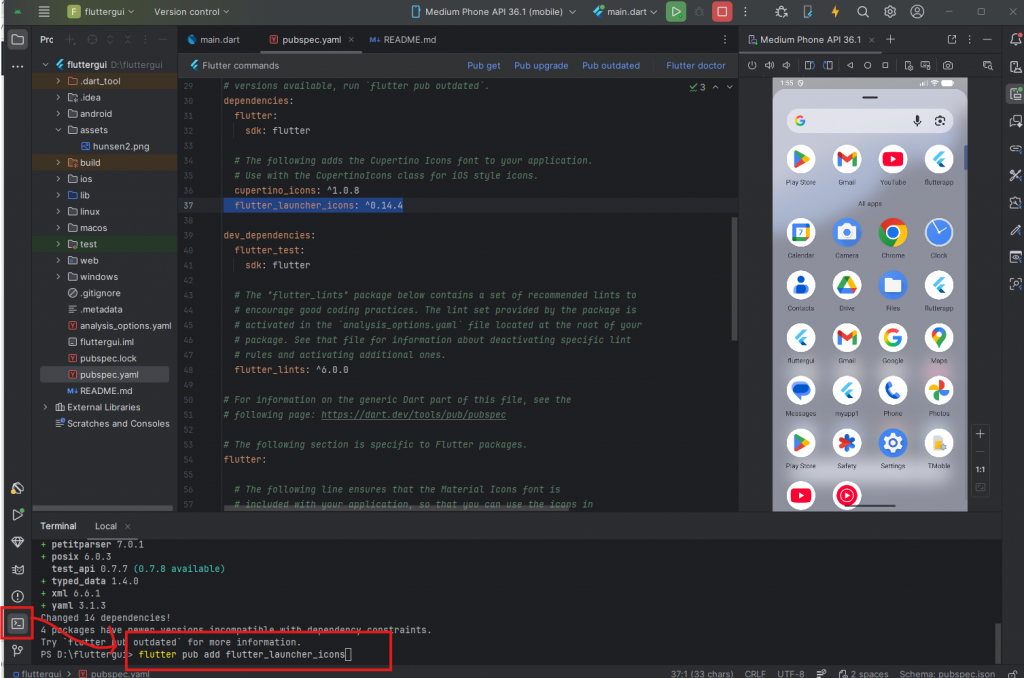 แล้ว กด enter ตัว flutter จะทำการลง lib ตัว flutter icon ให้
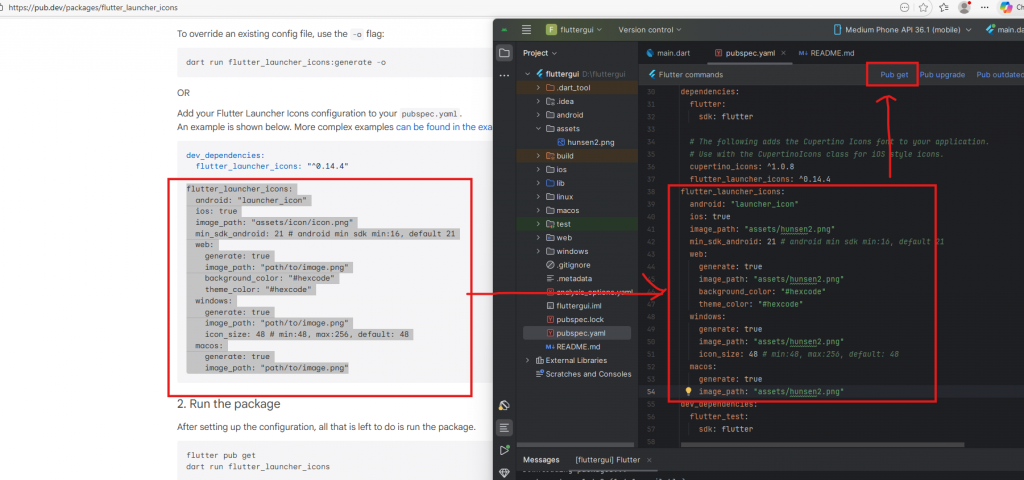 วางโค้ดลงไปด้านล่าง
flutter_launcher_icons: ^0.14.4
แล้วแก้ไข
image_path: "assets/hunsen2.png"
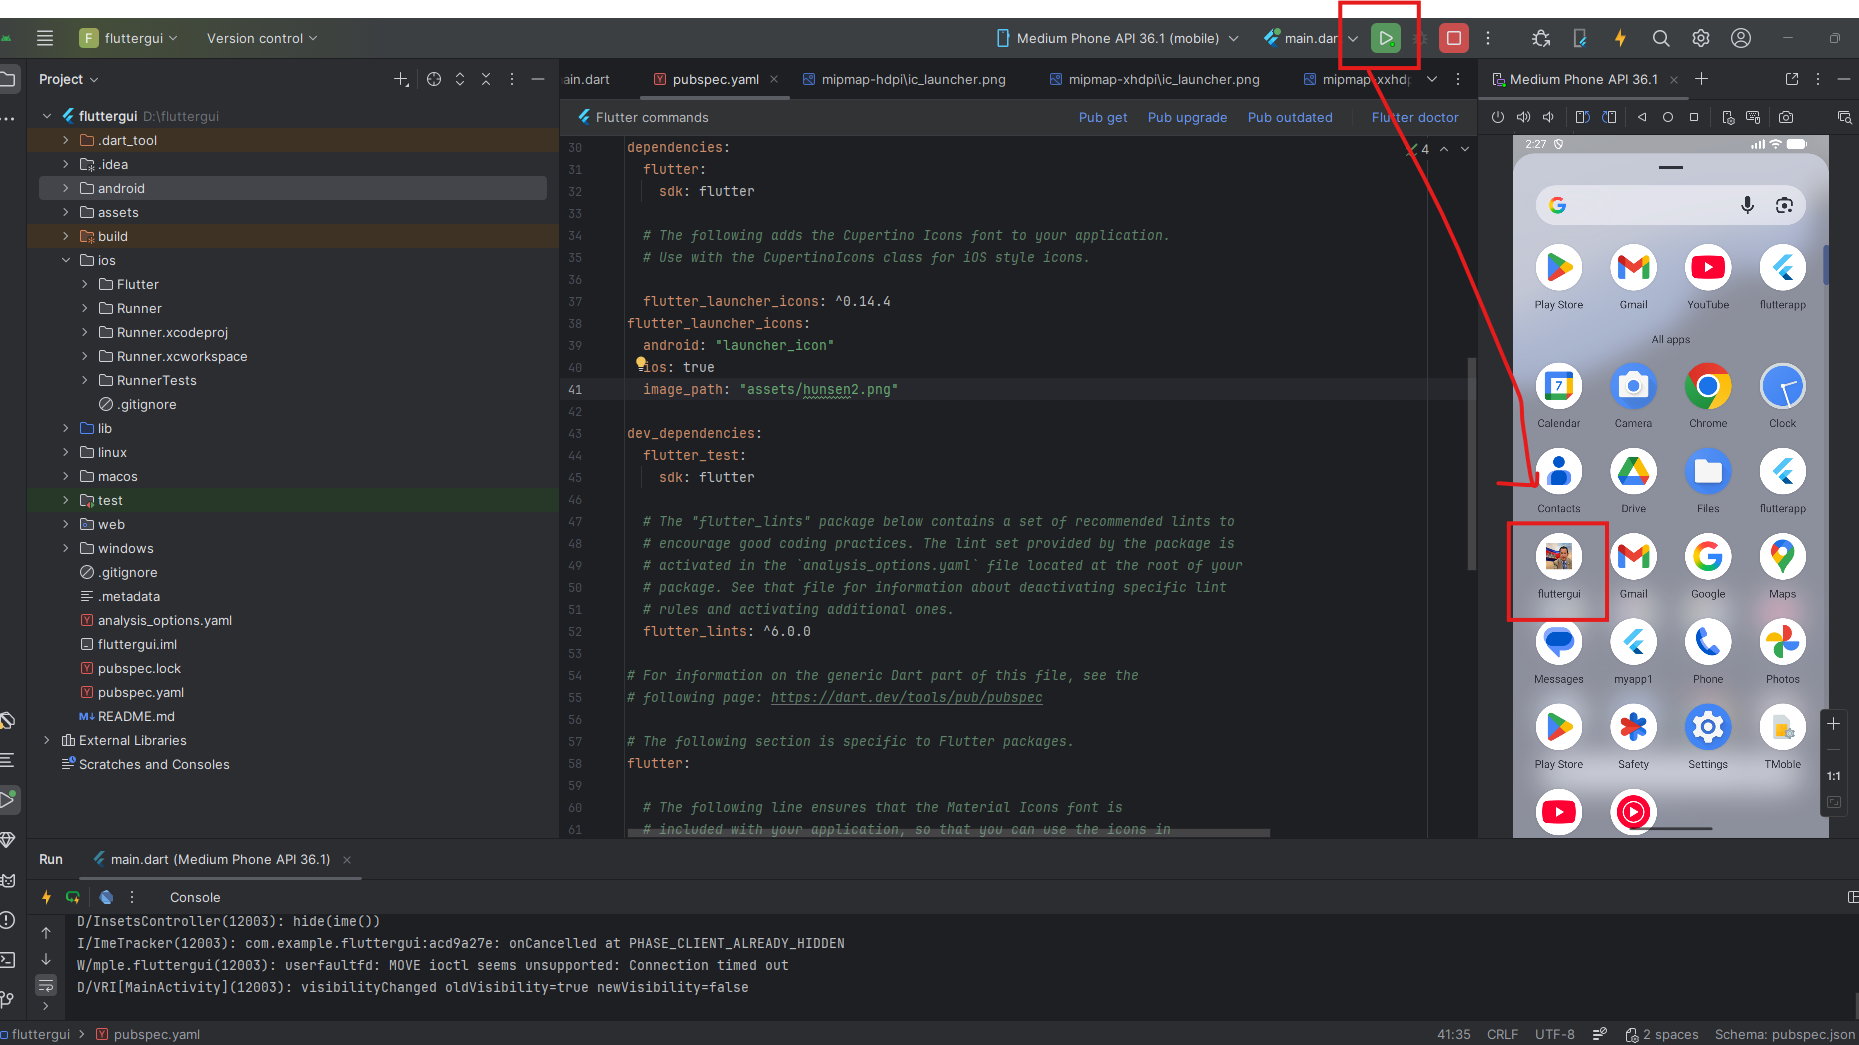
หลังจากนั้นก็ปุ่ม pub get ตามภาพด้านบนได้เลย ถ้า plugin ใช้ได้จะไม่ error
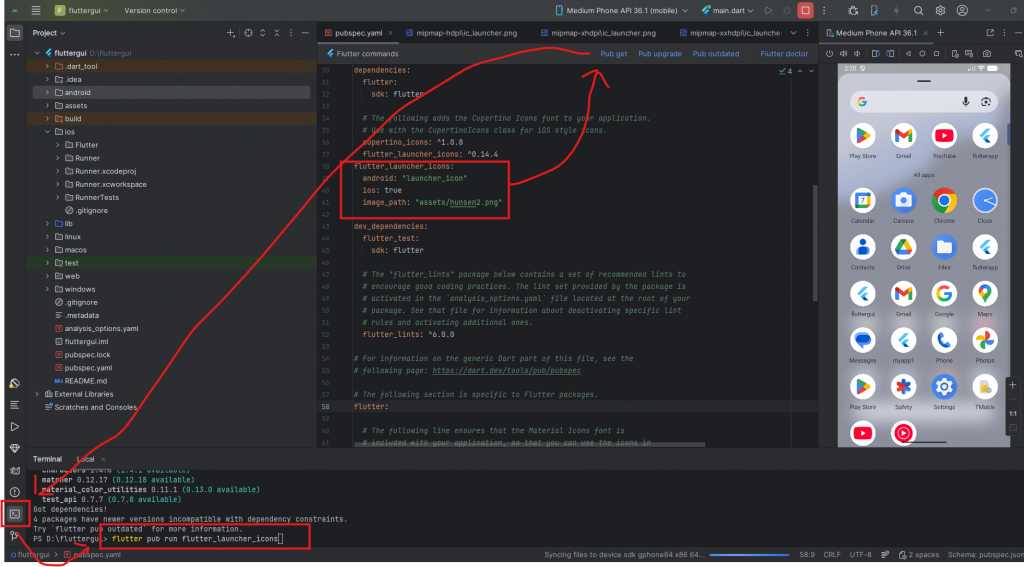
หลังจากนั้น มาที่ terminal พิมพ์
flutter pub run flutter_launcher_iconsแล้วพิมพ์ pub get อีกรอบ แล้วค่อยกด run app ใหม่
 หลังจากนั้นกด play บนสุดเพื่อให้มัน run app บน emulator ใหม่

Programming Mobile Application Development : Flutter fundamental Day 3 GUI and Plugin
Byadmin
Jan 7, 2026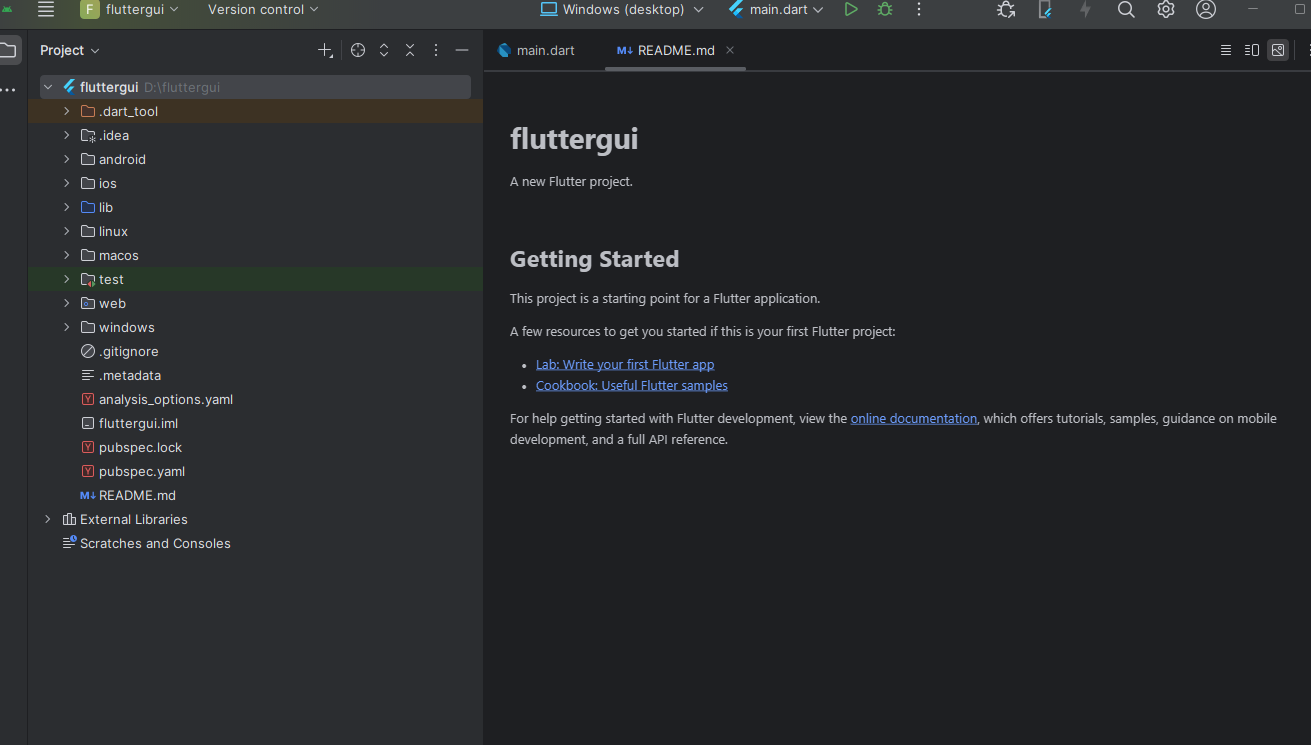


 เพิ่ม code ลงไปในส่วน MaterailApp(
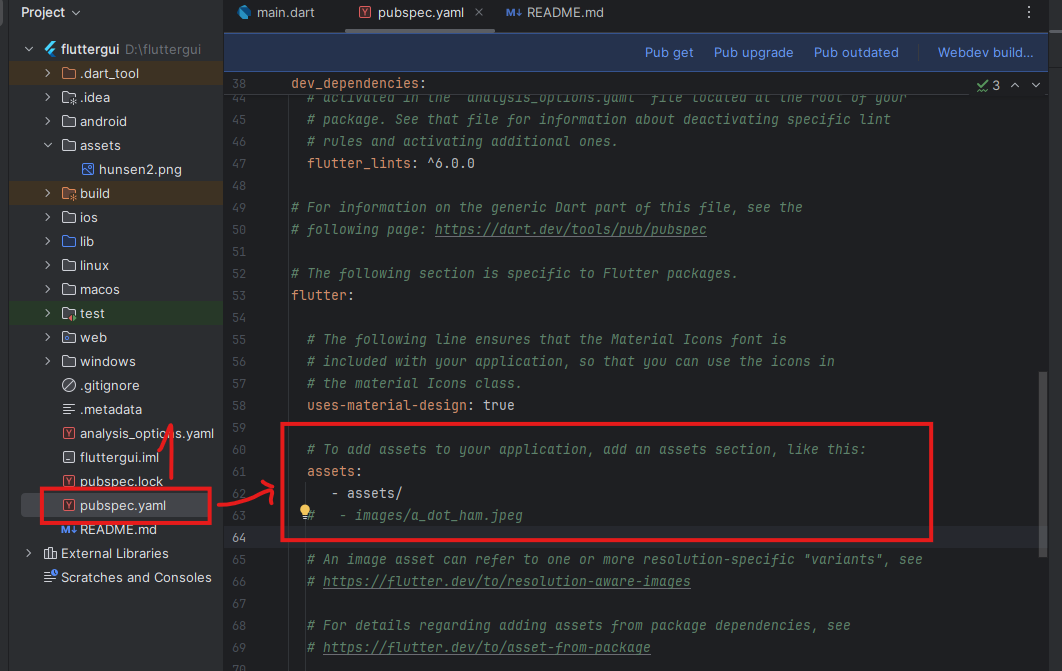
 กลับมาที่ android studio ใน project ของเรา ให้เปิด terminal แล้วเอาคำสั่งที่ copy มาวาง
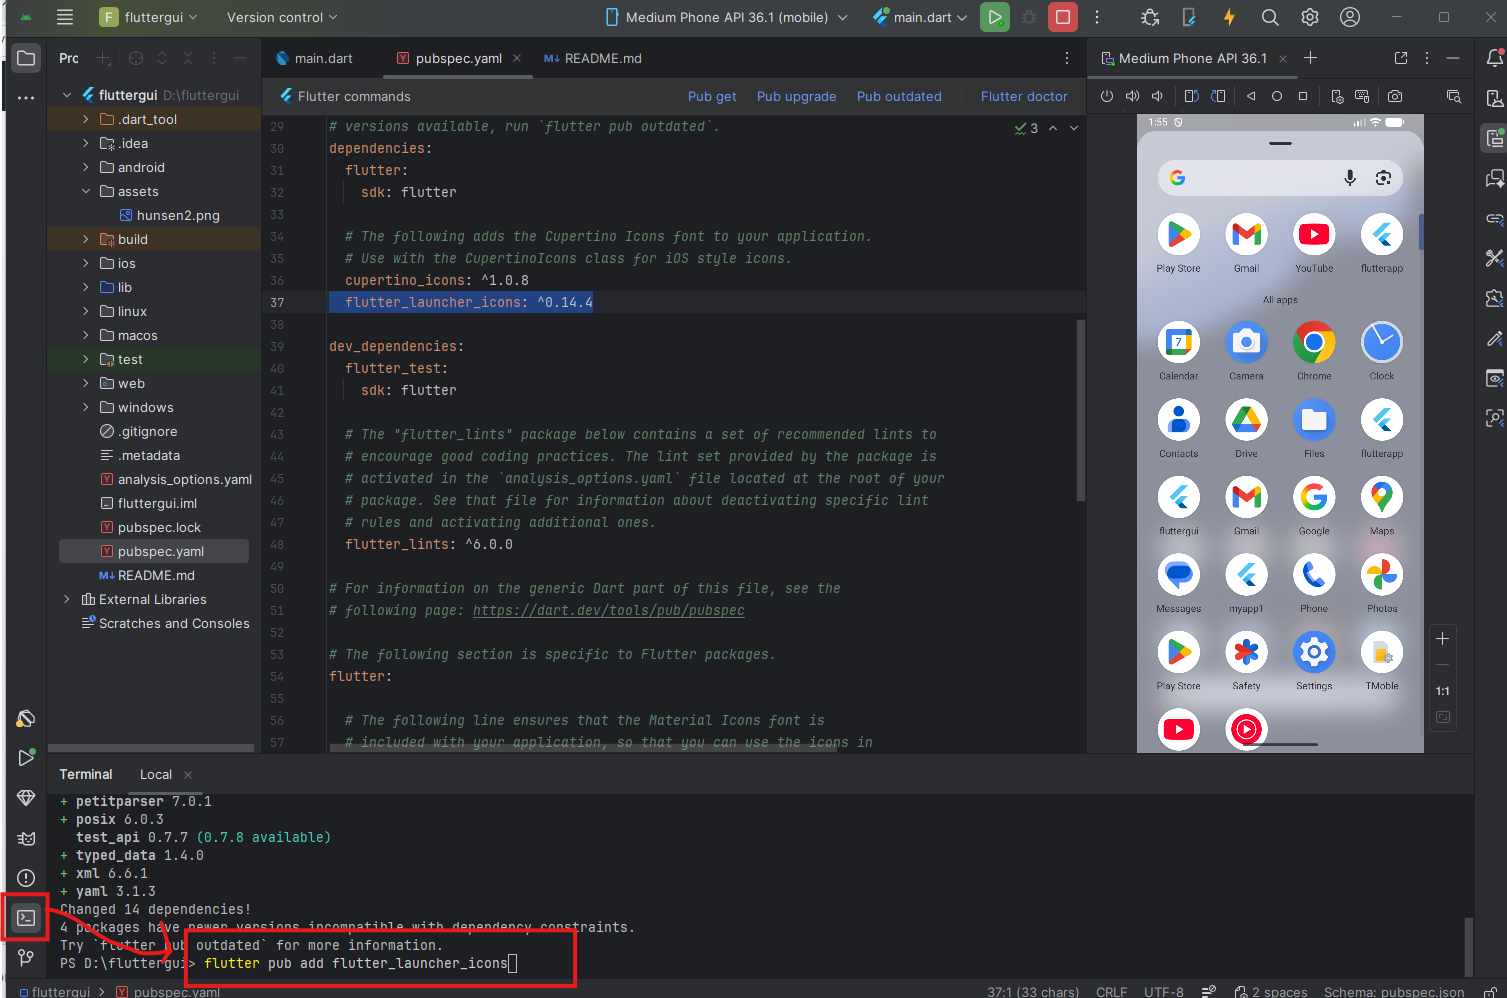 แล้ว กด enter ตัว flutter จะทำการลง lib ตัว flutter icon ให้
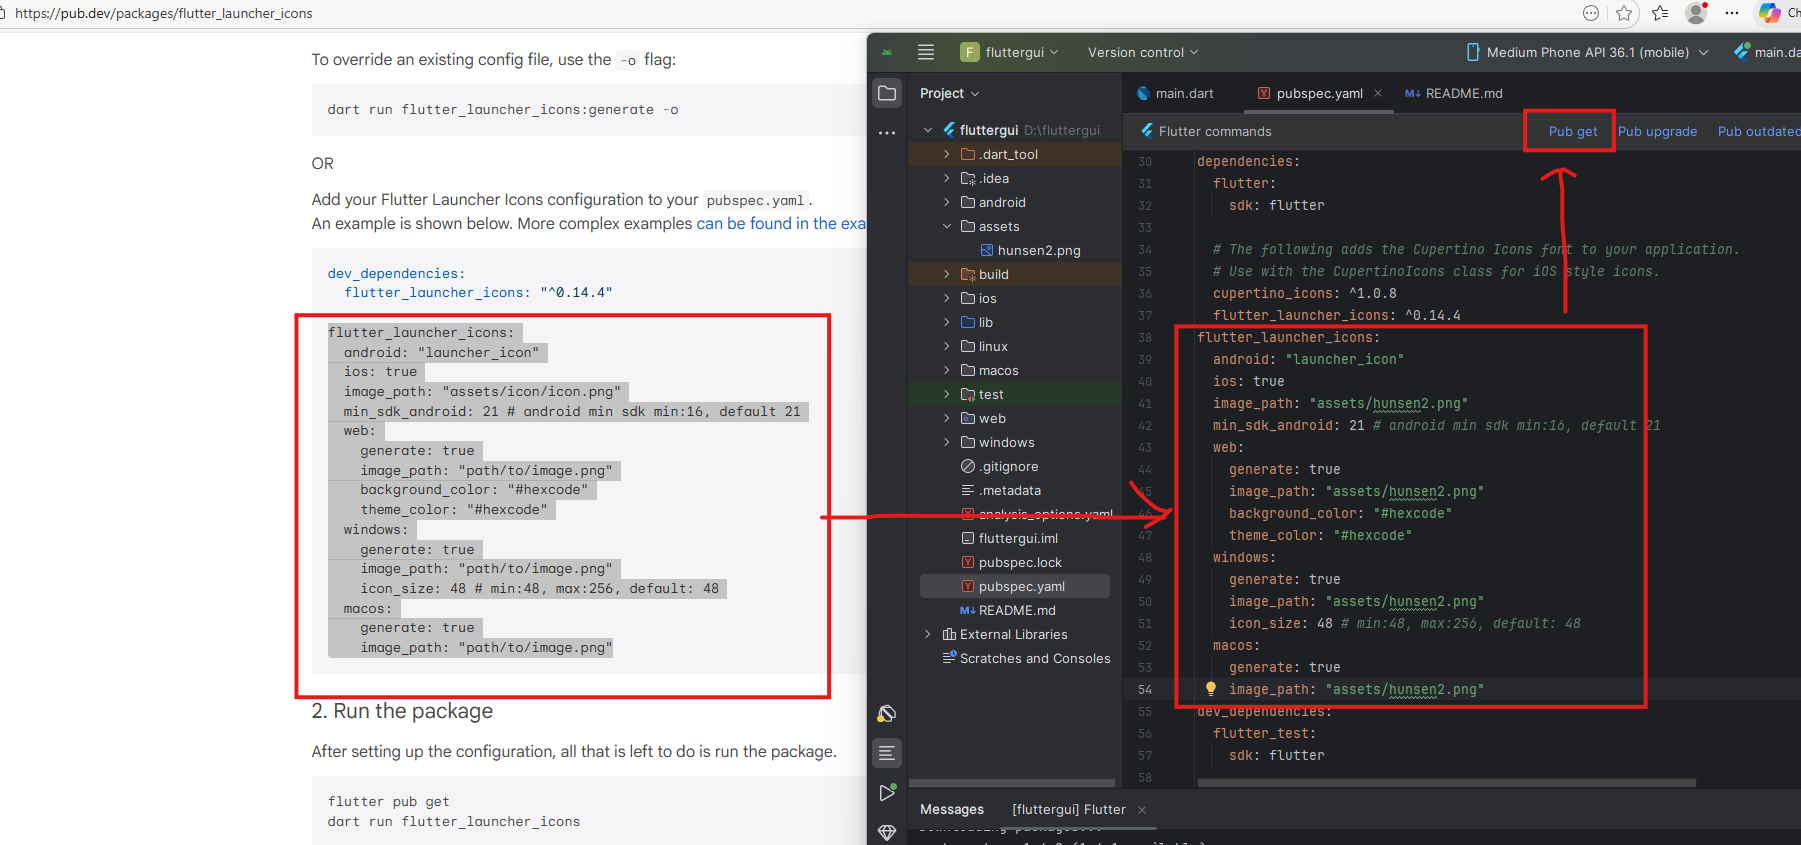 วางโค้ดลงไปด้านล่าง
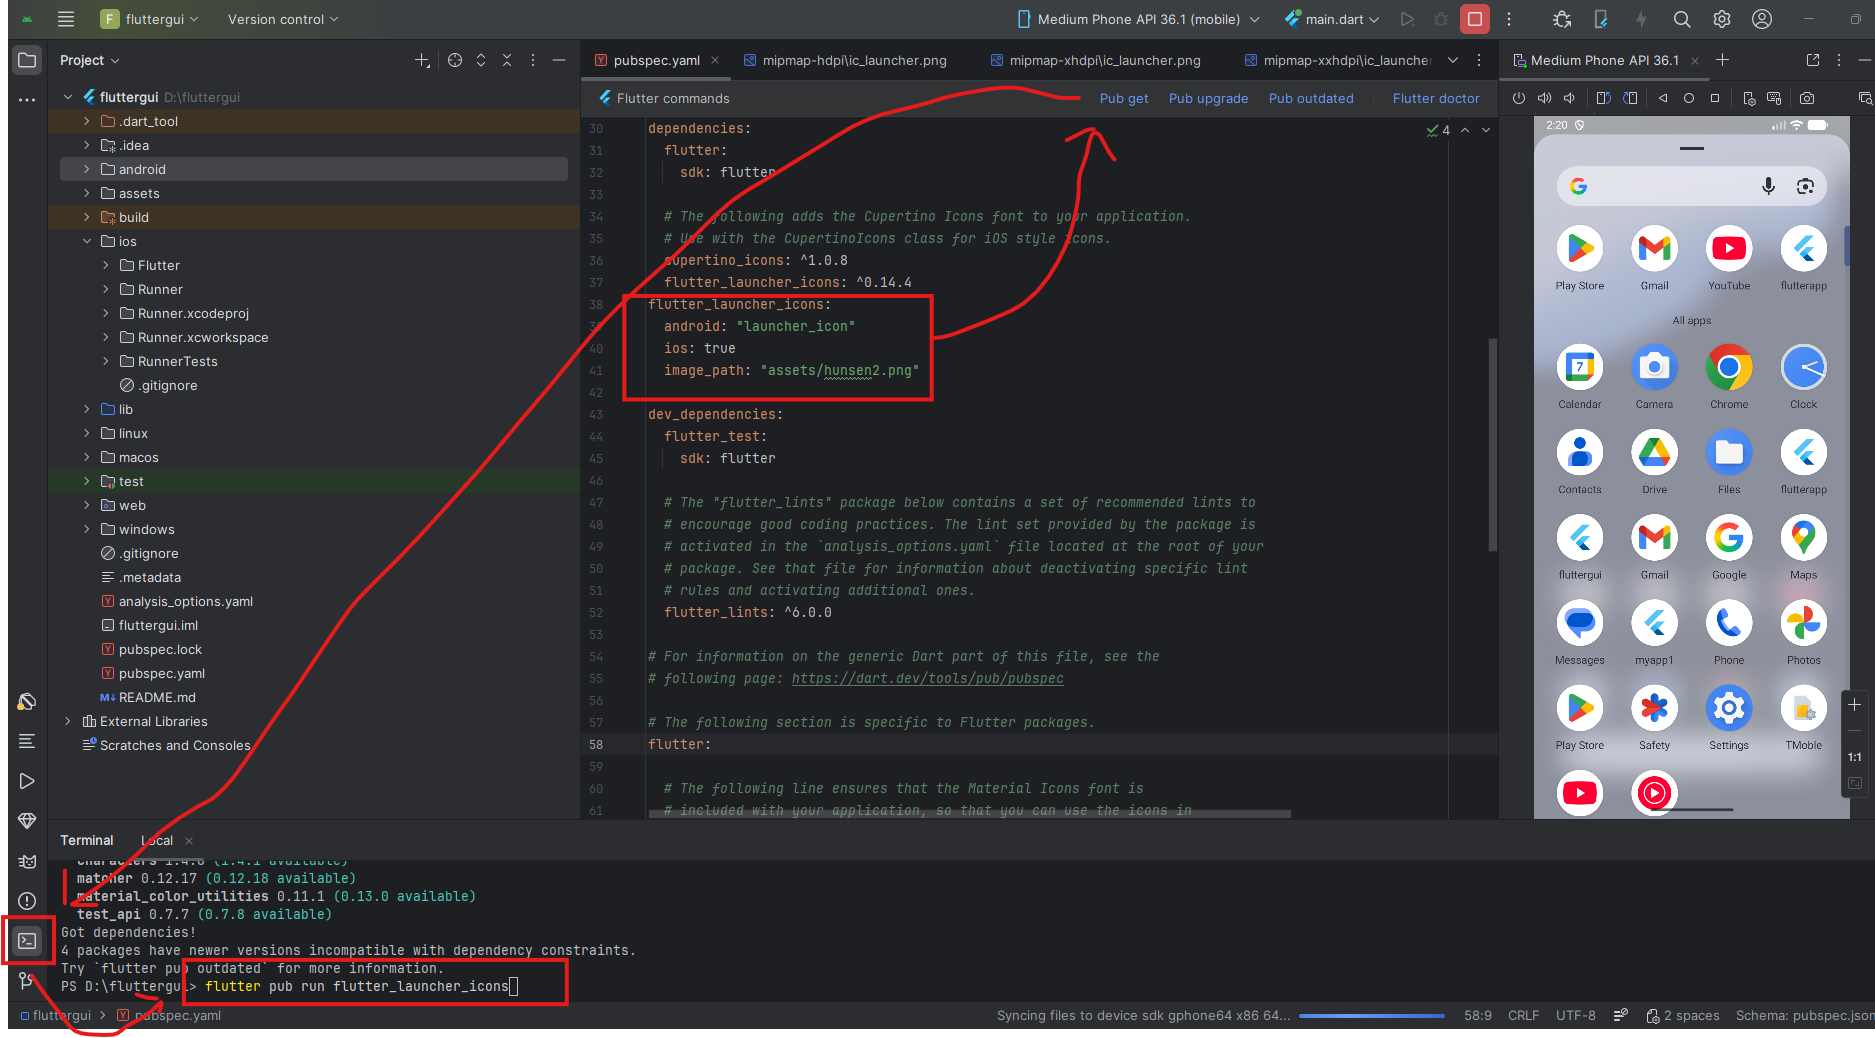 หลังจากนั้นกด play บนสุดเพื่อให้มัน run app บน emulator ใหม่